
In this post, we’ll share with you everything you need to know about creating a News & Media Website where you can share the latest update to your followers and provide insightful news. We will also share with you various features that you can add to your News & Media site and also strategies on how to attract visitors.
Are you looking to share the latest updates with your followers?
Would you like to provide insightful news on everything that is going on?
Have you made up your mind to start a News and Media Website?
If so, you are at the right place and creating a news website can be your next venture.
You may think it is difficult to start a news website.
Actually it is pretty easy to create a fully functional and attractive website.
Using MakeYourWP Ready made News Website Template,
you can launch your news website in just 5 minutes.
So, let’s dive right in!
In this tutorial, we will look at the following topics in detail.
If you want to start creating a website right away, here is a step-by-step procedure on how to start a News Website using MakeYourWP.
Now to learn how affiliate marketing works, you can watch this video.
How To Start Affiliate Marketing For Beginners In 2021
Have a clear plan of what news you want to focus on in the long run for success.
To begin with, pick out recent, newsworthy events or topics you wish to report on, and do extensive research on the same.
Arrange for the needed information, and have a clear focus in your mind before you start writing.
Next, start writing the outline and develop the news post by having catchy, error-free news content.
Now that you have some ideas in place, it is time to create a news website.
You will be using MakeYourWP, which makes the process of setting up and managing your website very easy.
With just a single click, you can quickly launch your website with a professional pre-designed news website template.
Then, upload your images, news, and ads.
You can get your complete website up and running in a few hours.
Additionally, you don’t need to worry about managing your website’s technical stuff. Right from speed, security and backups, everything is managed by MakeYourWP so you can focus on your business.
To create a news and media website, you can follow this tutorial,
and create a news website like this easily.
Then you can post news content on your online news website.
The best part is that you can earn income from your site,
by adding premium content.
You can allow people to subscribe & read your premium content.
And also you can run ads to earn income.
And, you will see how you can easily customize your site to any style you want, just by dragging and dropping like this.
So let’s get started.
You can easily create a news and media website in just 4 parts.
1. Launch your news website.
2. Add/Update news on your news website.
3. How you can earn money from your news website.
4. Get a unique domain for your news website.
So now you know what you’ll get after following this tutorial. So, let’s begin.
This is where you get your new website live on the internet.
So to launch your website, just click here,
and it’ll take you to the MakeYourWP website.
Now just scroll down and search for ‘news website’ in the search bar,
you’ll find the news website.
If you want to see how the news website looks like,
you can just click here or click the demo button.
You can see the pre-designed news website template that you can use.
Which comes with a few default news posts.
Now to get this news website, you can follow these steps.
A: Click the launch site button
B: Enter your details and click next.
Now enter your payment details and click Sign-Up.
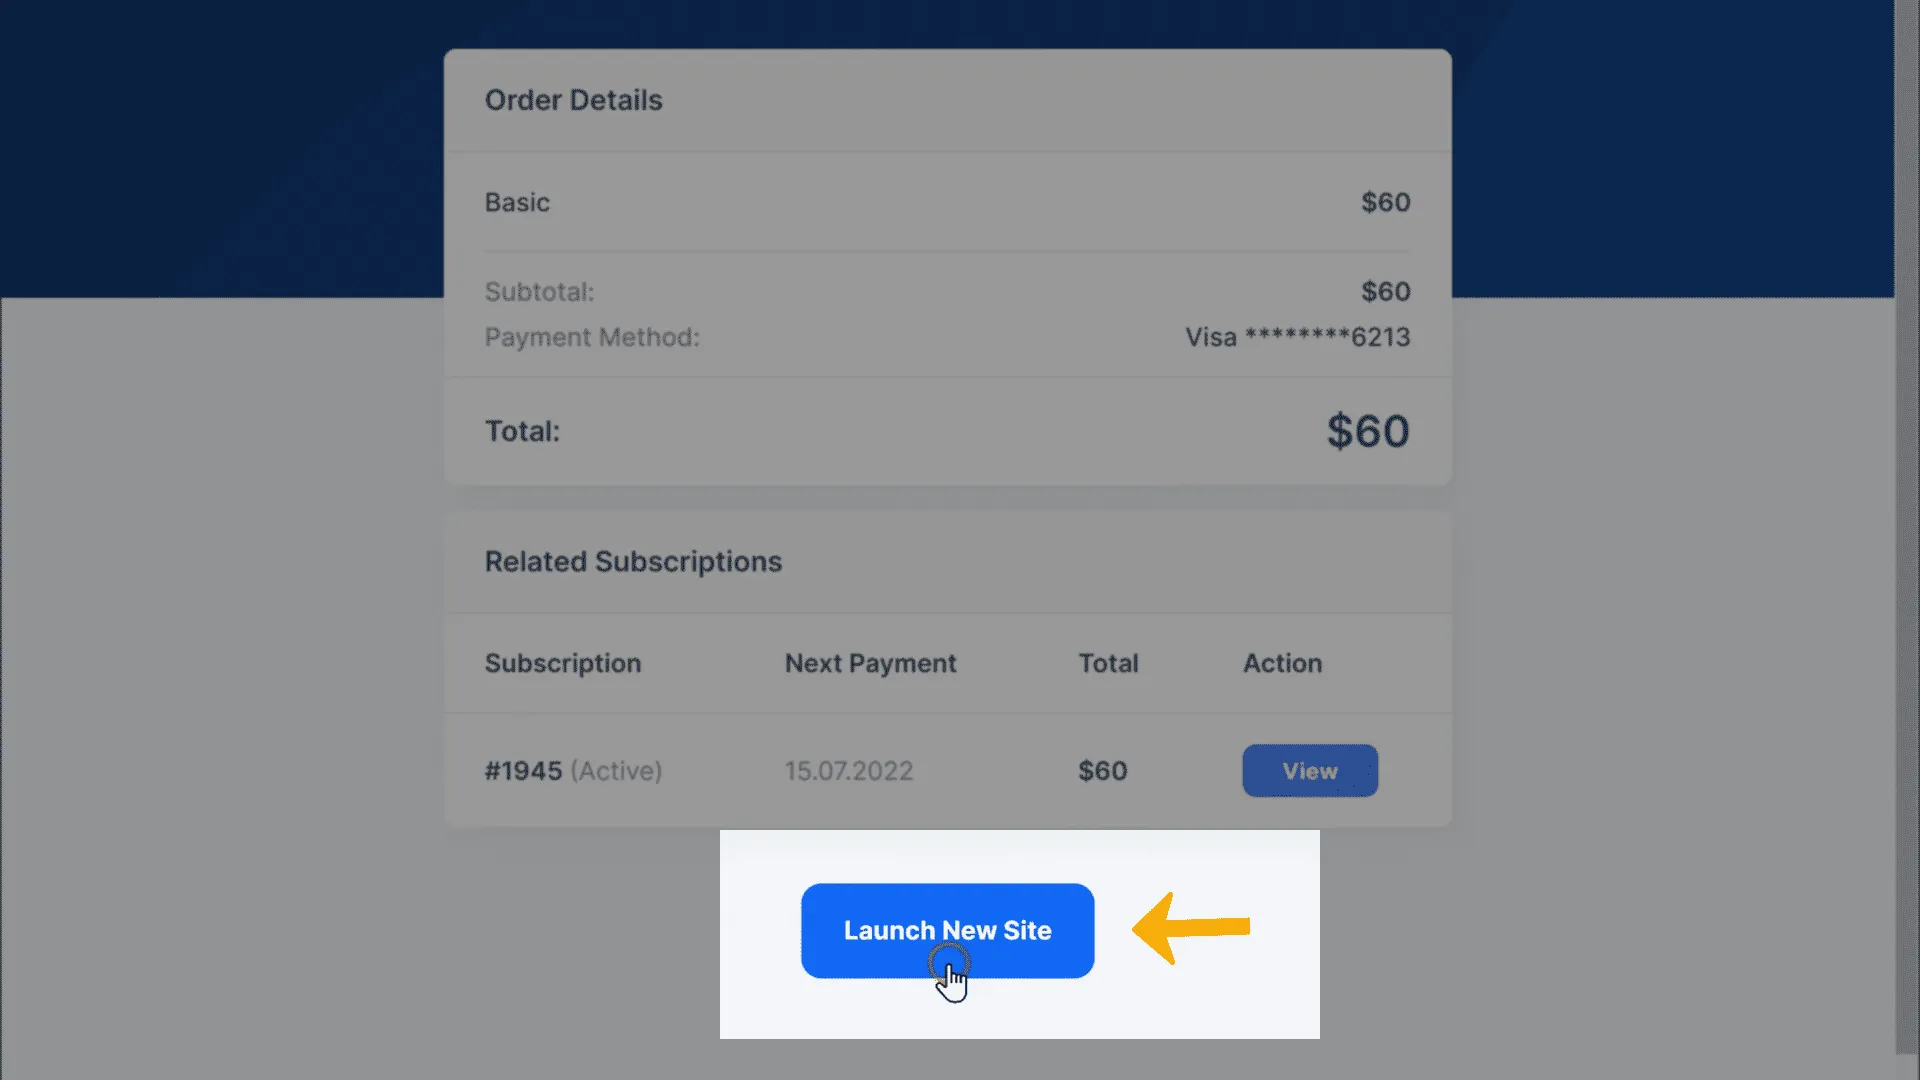
Now you’ve successfully purchased your website.
Next, to launch your site, scroll down and click launch new site.
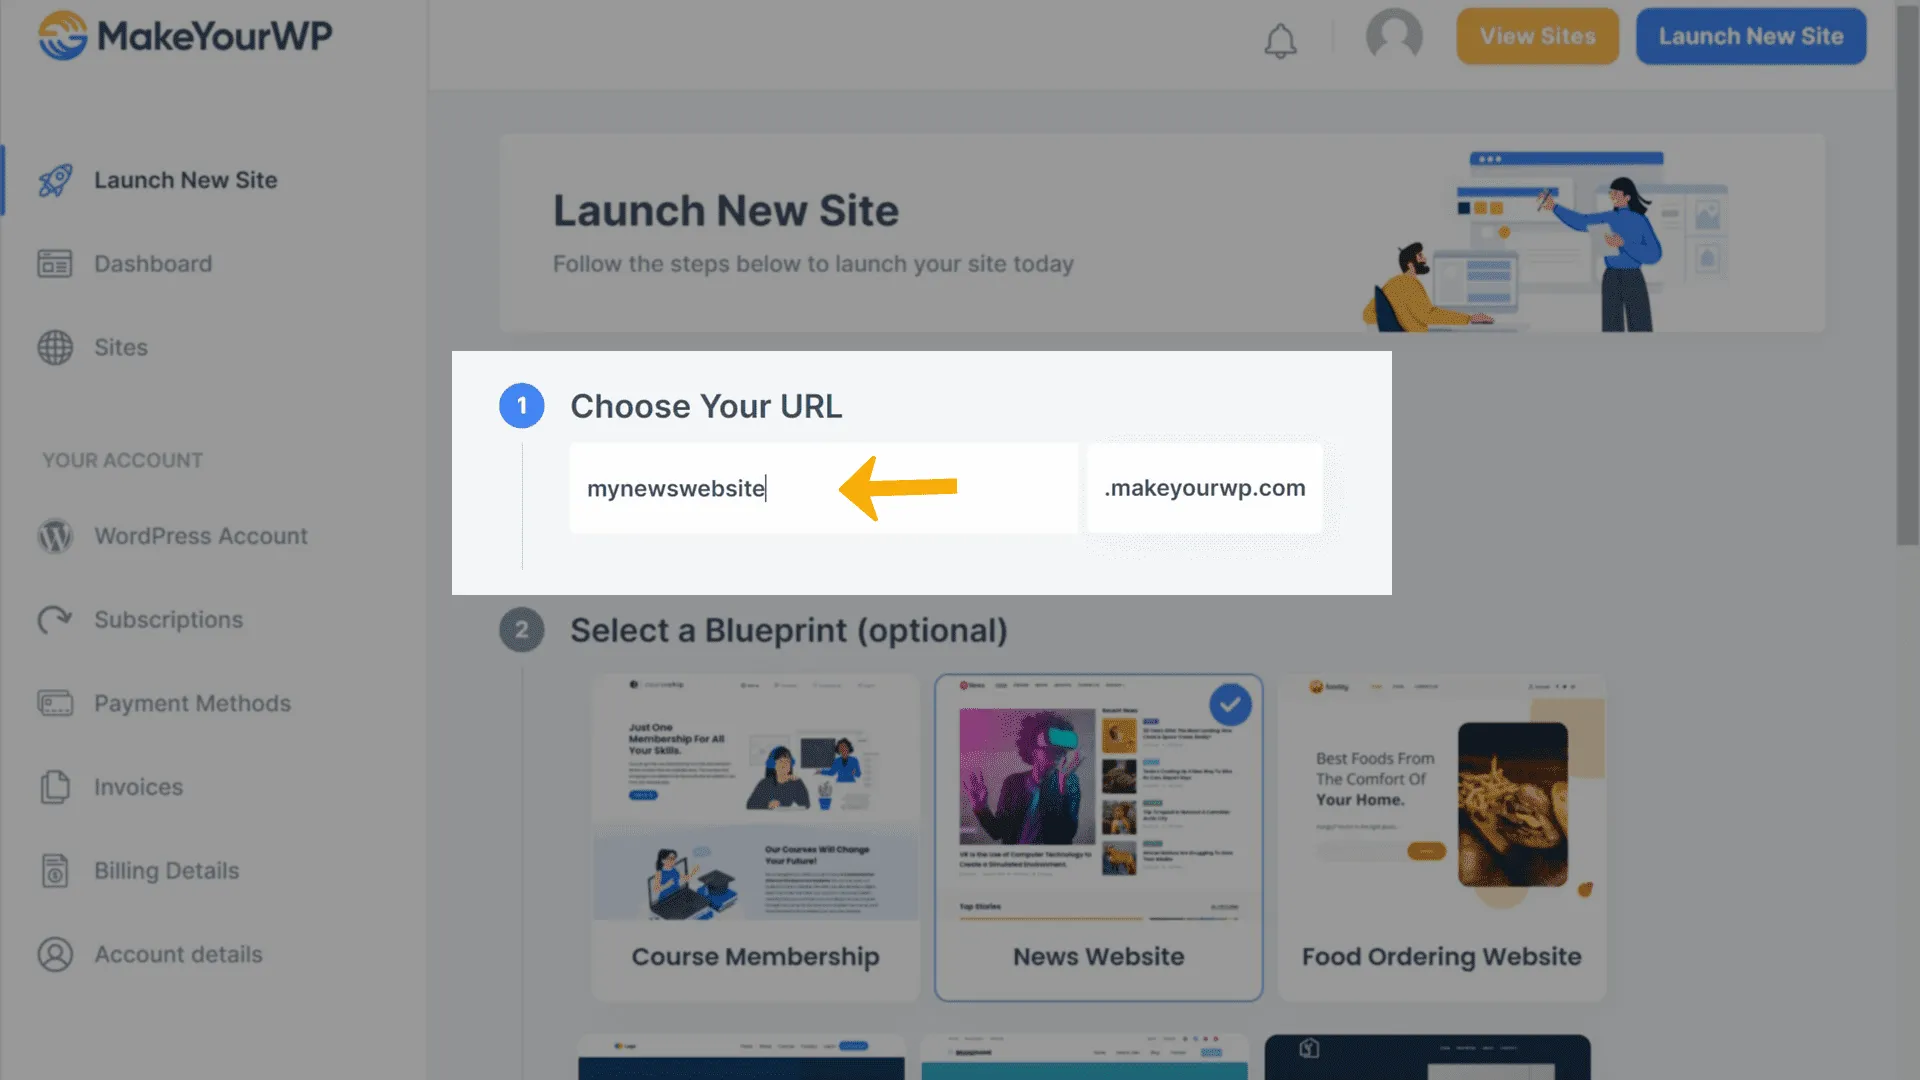
Once you launch your site, you need to name your site.
C: Now enter a temporary website address that you want in the URL section.
For example, if you enter “mynewswebsite” as the news website name.
So, the website address will be ‘mynewswebsite.makeyourwp.com’.
After entering the URL, click launch new site,
and you can see that your brand new website has been launched.
Now if you click visit, you can see that you have got the same site that you saw on the demo site, and it has all the features you need for your news website!
Now, this is just a temporary link for your site, and you can easily change this to your own .com domain. We’ll see how you can do that later in the final part of this tutorial.
Our website is ready now, but you are just getting started.
You still have a few more steps to go, and the first and foremost thing you can do is customize your site.
So next, let’s go to Part 2 of this tutorial, where you will see how you can add & update news on your website.
You can add and update news on your website in 2 steps.
2.1 Login to the admin area of your website
2.2 Create a news post
Step 2.1: Login to the admin area of your website
To edit your site’s content, you need to log in to your Website.
So to do this, go to MakeYourWP and type /wp-admin after the URL to login into your account.
For example, like this “mynewswebsite.makeyourwp.com/wp-admin”.
After logging in, you’ll be able to access the backend of your WordPress website from where you can control and make changes to your website.
Once you’ve logged in, you can go to the next step.
Step 2.2: Create a news post
You need news posts on your website for readers,
and you can easily create one by doing the following.
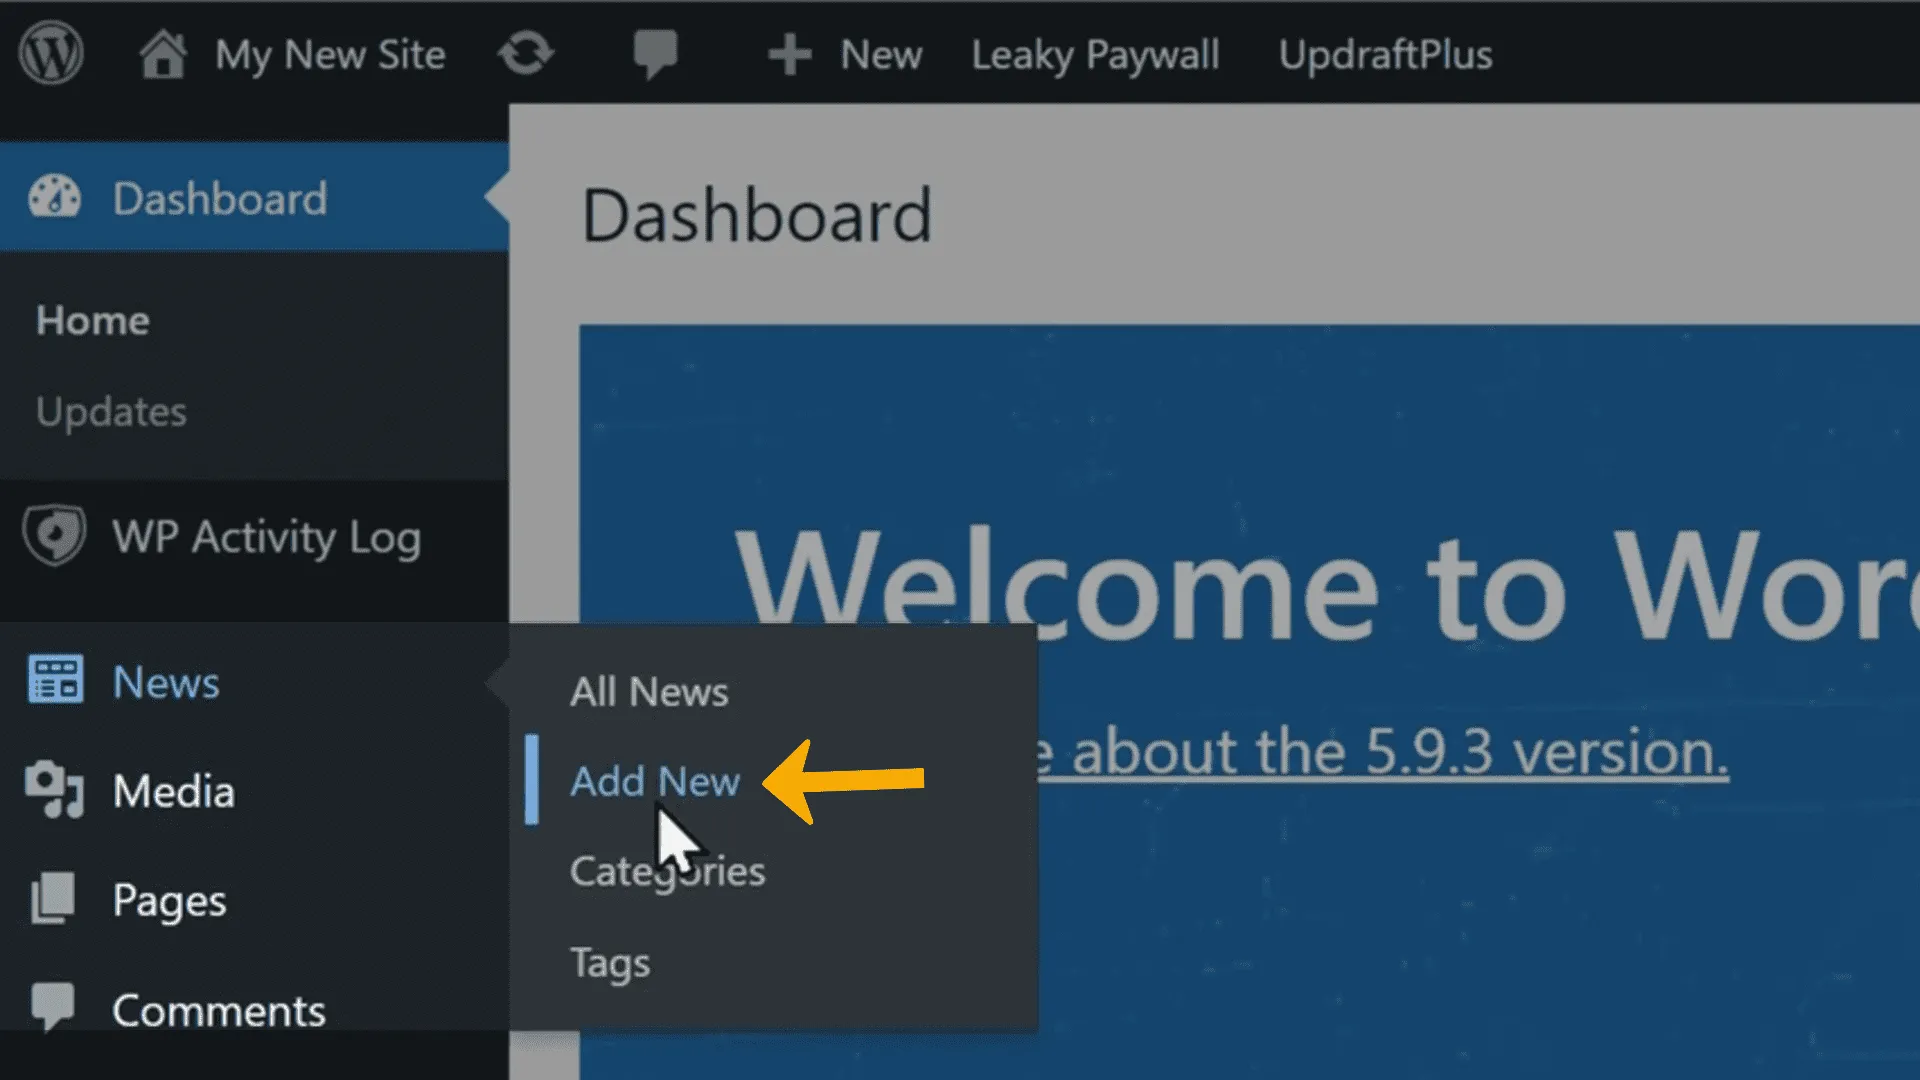
So to create a news post, go to news and click add new.
It will take you to a page where you can add a news article.

Here you can enter the title, content, and an appropriate image.
So now, if you click publish and go to your site,
you can see that your website has the news that you just added.
With that, you have just added your first news post to your website.
Yes, as simple as that!
You can also create any number of news posts the same way.
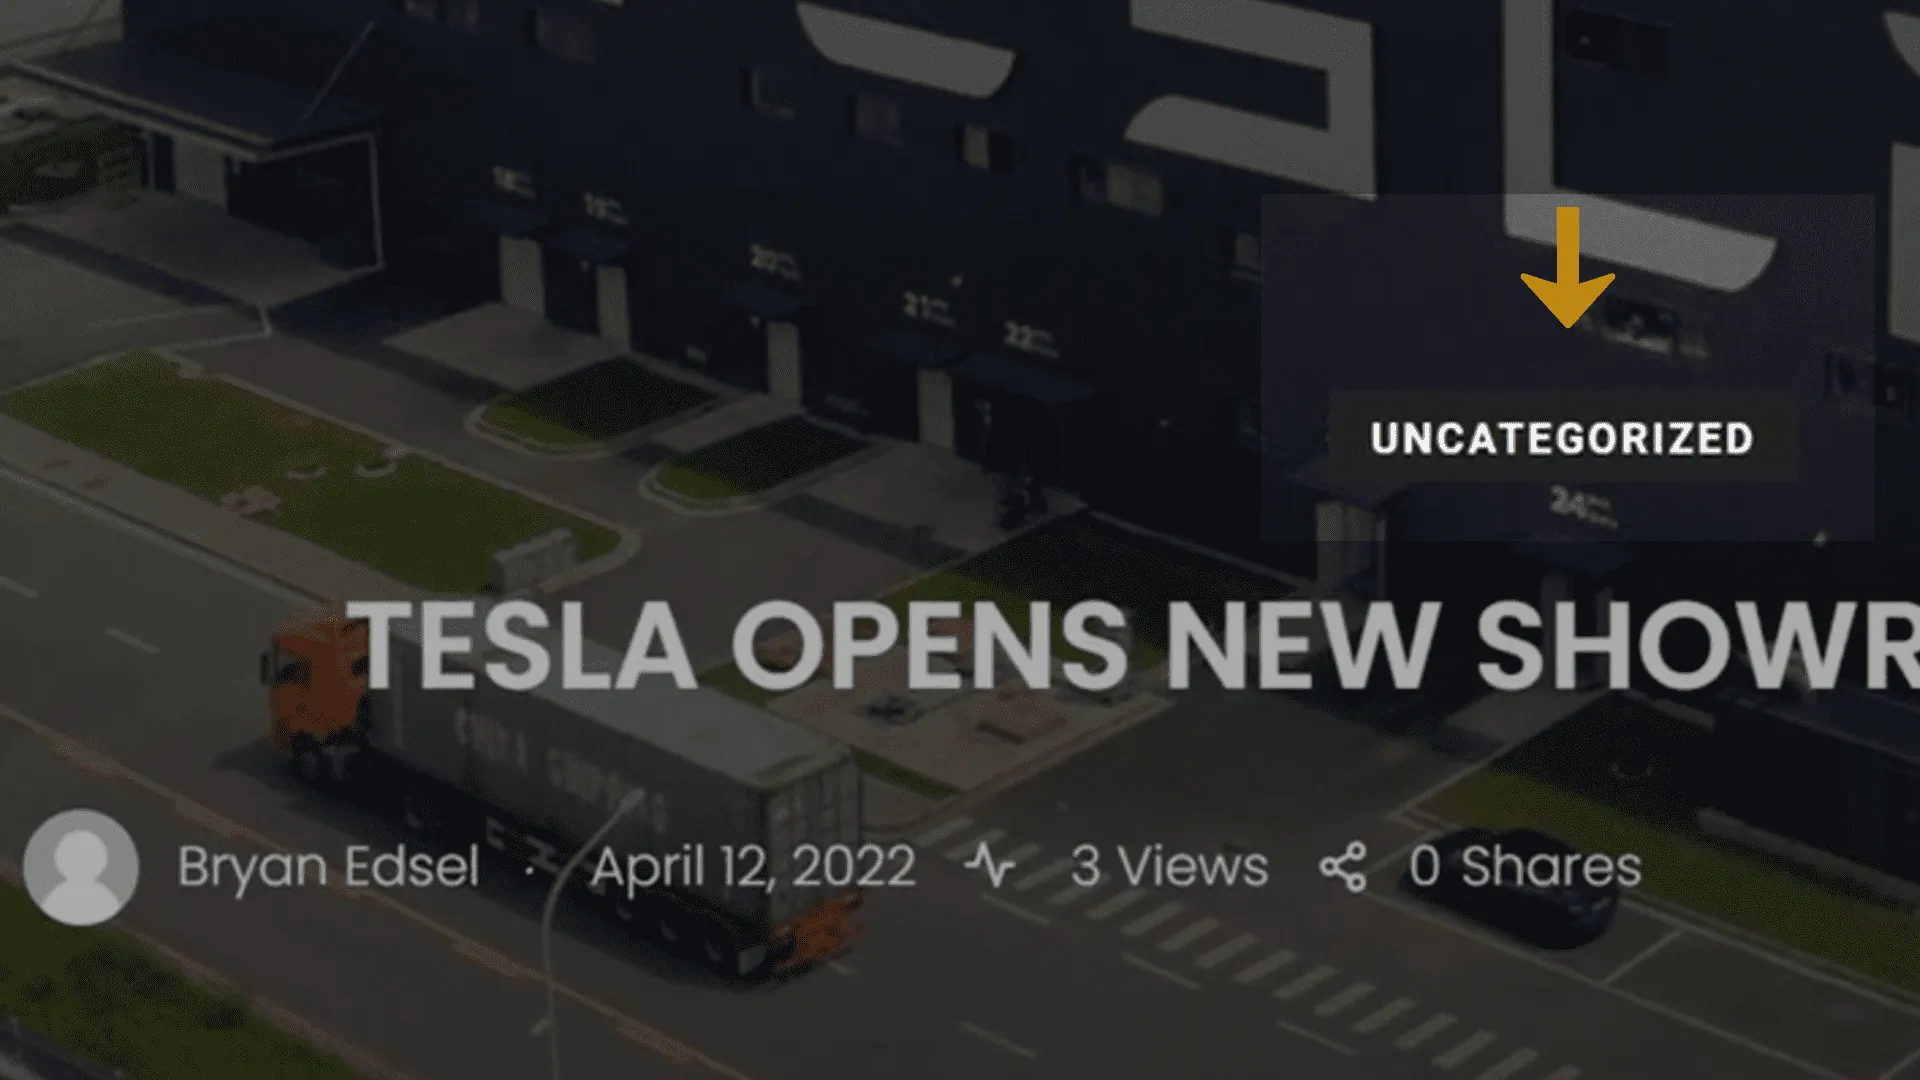
Now here you can see that, your news post has been set as ‘uncategorised.’
You can organize and sort news into categories and subcategories,
so visitors can easily find relevant content.
Now let’s see how you can add a category to the news post.

You can go to the news post and click customize.
Now, click on categories to add a category.
Since you will be adding a new one, click add new category.
And enter the category name.
Once you give a name, click on ‘Add new category’ and click Update.
Now, if you go back to your site and click refresh.
You can see that the category has changed from ‘Uncategorized’ to the category you just created.

In the same way, you can add any category you want for your news articles.

Now let’s say you want to change the layout of your news post.
So to change the layout, you can just click on Papr Options,
which will take you to Papr general options.
Just click Single, and once you scroll down,
you can see different layouts which you can add to your news post.
You can now choose any layout you want.
Once you’ve done, just scroll down and click save changes.
To see the changes, you can go back to your site and click refresh.
You can see that the layout has changed.
Now you know how to create a news post, add a category,
change the layout and publish it on your website.
Moving on!
When you first imported the news template,
you could see some sample news posts on your site.
You can delete those news posts and add new ones as you did before.
Now, let’s see how you can delete these posts.
To delete the following default news posts,
just go to your admin area and click News.
Now click All categories.
Finally, you can choose the category you want to delete.
Then click filter.
Once you choose a category, you can see all the posts under that category.
You can delete them by selecting all and clicking here to move to trash.
You can see that all the sample posts are deleted.
So now, if you go back to your site and click ‘refresh’,
you can see that all posts under that category are deleted.
In the same way, you can remove all sample posts from your website easily in just a few clicks.
Now let’s see how you can customize your homepage.
Now, if you see here, you have various news posts under the ‘travel’ category.
So now, if you want to show different category posts in this section.

Just click edit with elementor, and click the pencil icon, then click Query.
You can now change the category here.
Once you change, you can see that the news posts are updated.
You can click on update to save the changes.

Now if you want to add a new section to your homepage, just go to the place where you want to add the section and click the plus symbol.
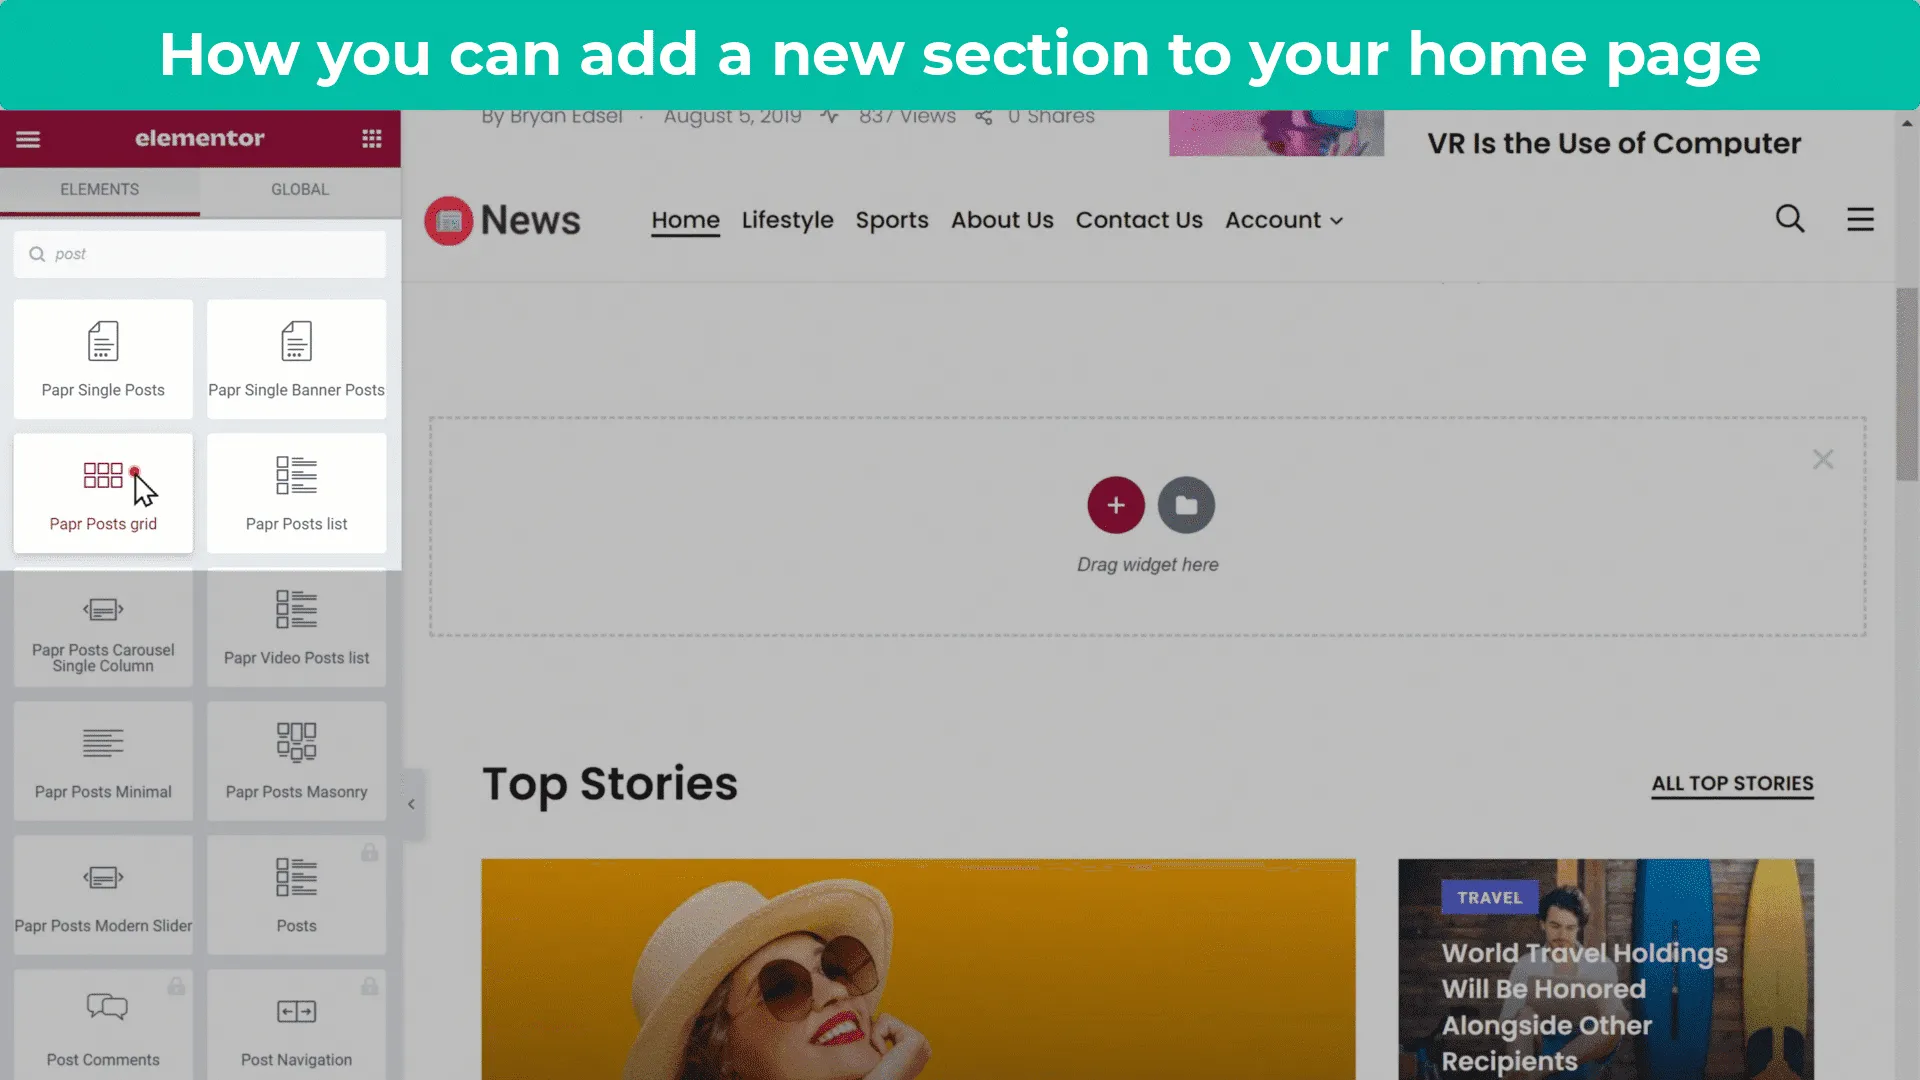
If you search for ‘post’ here, you will get these elements.
You can then drag the post grid element and drop it on the empty area to add the new section. You can give a name for this section.
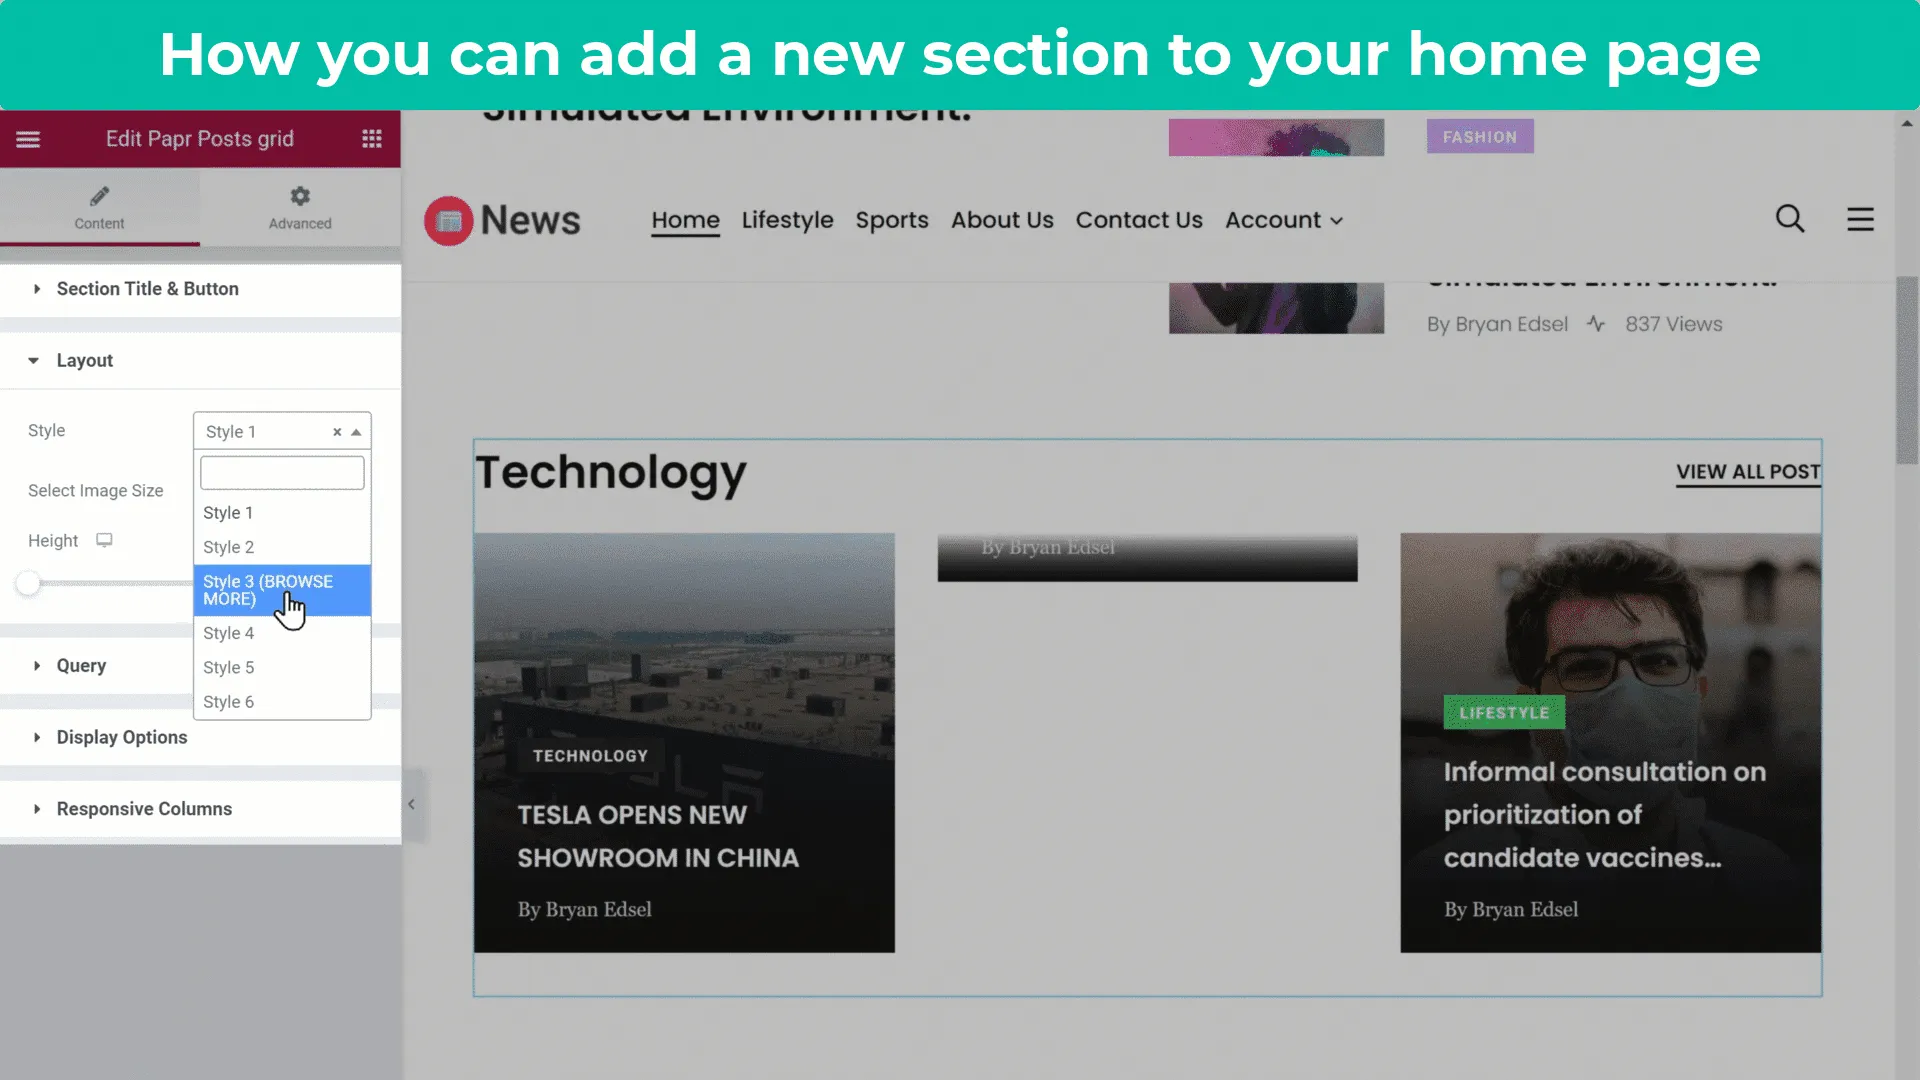
Now if you want to change the layout of this section,
just click on layout and click here to choose any style you want.

You can choose a category that you want to display in this section.
Once you choose, you can see that the category is updated here for the posts. Click update once you finish.

Now, if you go back to your site and click ‘refresh’, you can see that you have a brand new section on your homepage.
In the same way, you can customize your news website to any style you want.
Now let’s go to Part 3 of the tutorial,
where you will see how you can earn money from your news website.
There are many ways through which you can earn money from your site.
We will be showing you two methods that you can follow in this tutorial.
1. You can restrict premium content on your website and ask people to subscribe. For example, once a reader tries to read news on your website,
they can pay a small fee as a subscription to read premium content.
2. You can also display ads on your website. For example, if you have a Google AdSense account, you can connect that account with your site by showing ads. And when visitors click on your ad, you can earn money from Google based on the clicks.
First, let’s see how you can restrict your premium content and ask people to subscribe.
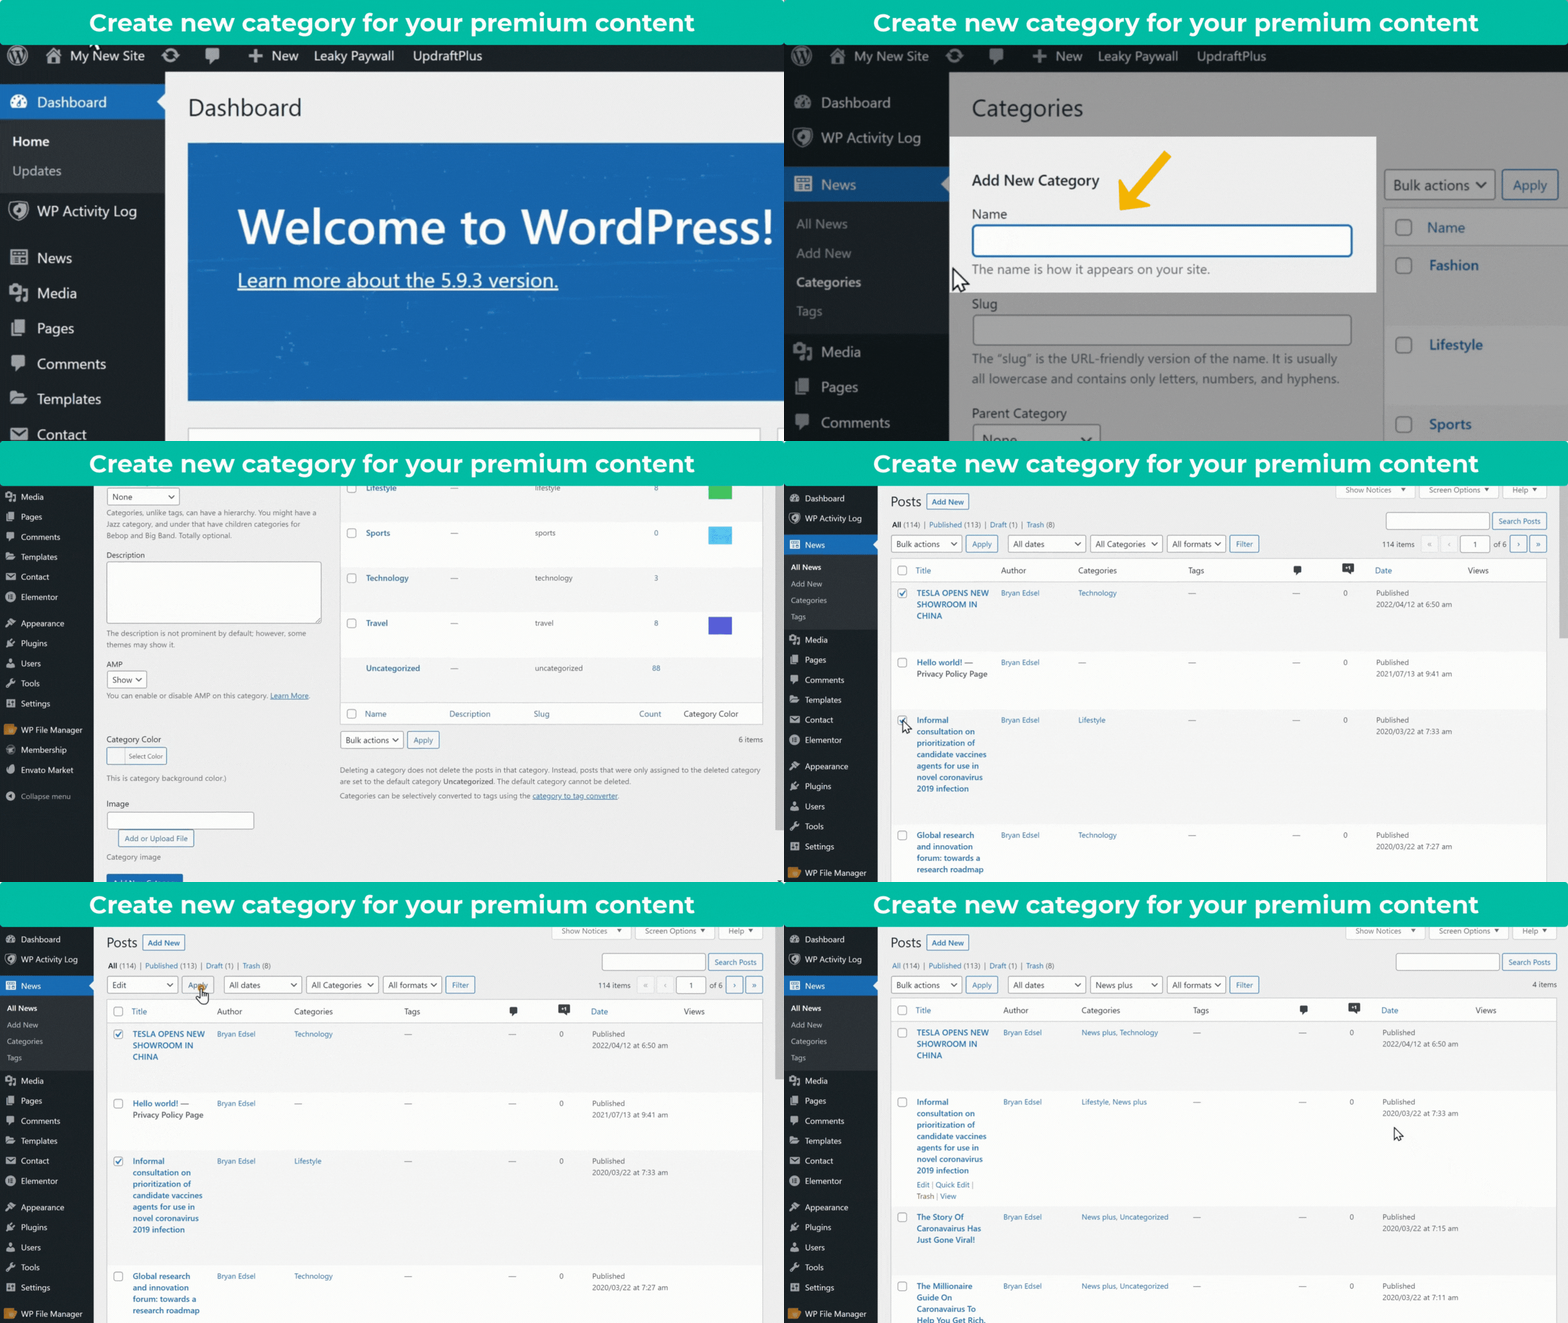
To restrict premium content, you can create a new category and add the content under it. You can go to your admin dashboard and go to Posts.
Next, click categories, and once you enter a category name,
you can click on add new category.
Once a category is created, you can group the news posts under them.
So to add the news posts that you want to restrict in this category.
Go to news and click ‘all posts”.
Next, select the posts you wish to restrict, click edit,
and choose a category, then click update.
Once you have added the posts in a category.
Next, you must set a subscription for the news content.
Just go to your admin area and then to ‘Leaky Paywall’.
Now click settings.
You will get the general settings tab.
Now select the options, just like we have shown in the above video.
And click save settings.
Now to setup pricing for your premium content,
go to the restrictions & levels tab.
Now you can select the content you want to restrict,
such as categories, specific news posts etc.
I am choosing the category which you just created.
Once you choose the category, all the posts under them will be restricted,
and visitors cannot view the news posts under them.
To make the visitors buy your subscription, you need to show them a few posts for free. This will create an interest in reading more news posts from us.
And there is a good chance that they could buy the subscription.

So here, you need to choose how many posts you want to display/show for free.

After reading two posts for free, the next premium content post will be displayed like this, and then you need to choose how much content to display before the subscribe message appears.

If you scroll down, you need to set up the subscription details.
When someone clicks subscribe on your premium content,
they will get a subscription plan.
Now to change the name of the subscription,
you can give a name here and some details such as description, price, etc.
Once you are done, click on save settings.
You have successfully set the subscription.
Next, you need to choose the payment method for your customers to make payments on your site.

So you can just go to the payments tab.
Here you can see the available payment methods,
and you can choose the one you want.
We are going to use Stripe which is a popular payment method.
Stripe is a simple way to accept payments online, and it has no setup fees,
no monthly fees, and no hidden costs.
To add stripe payment to our website, we will be doing 2 steps.
3.1 Create an account on stripe
3.2 Activate your stripe account
Step 3.1:Create an account on stripe
Now to create your Stripe account, you can click here.
It will take you to this site which you can use to sign-up.
Now just fill in your details and click Create account.
Once you’ve created your account, it will ask you to verify your email.
So if you go to your Gmail inbox,
you can see that we have received an email from Stripe.
You must verify your email in order to activate your Stripe account.
So to confirm, just click verify email address button,
and your email ID will be verified.
So once you’re done, you can go to the next step,
which is to activate your Stripe account on your website.
Step 3.2: Activate your stripe account
To activate your account click activate payments.
Here, you need to provide all these details about your business.
Click continue once you fill in the details.
You can fill up your name, address, and PAN details.
And once you are done, click continue.

Now here, enter your business details such as industry,
website URL and a short description of your business.
Once you are done, click on continue.


Here enter your bank details where you want to receive the payments.
Once you click continue, you can see all the added details.
Make sure everything is correct, and then click submit.
You can see that, our Stripe account has been activated successfully.
To add the Stripe account to your site,
copy these API key details and paste them into the Stripe settings.
So let’s copy and paste these details, then click save.
And your Stripe account will be successfully connected with your website.
Now if a person goes to your site, they can view only 2 posts for free.
And if they open the 3rd post,
you can see that it asks them to get a subscription.
Now if the readers want to read more,
they will have to purchase your subscription plan.
So to buy a subscription, a reader can just click on subscribe.
They can fill in their details, and click on subscribe to get a subscription.
Once your reader has successfully got their subscription,
they can now view the premium content from your website.

If the reader wants to view their account details,
they can just go to the account menu and view their subscription details.

Once the subscriber has purchased their subscription, they will receive an email saying that their subscription is successful, along with their login details.

And you will get a notification in your email with the details of the new subscriber.
So this is how you can earn money,
by creating a subscription for your premium content.
Let us now see how you can earn money, by displaying ads on your News website.
If you have a Google AdSense account,
you can connect that account with your site, and display ads on your website.
You will be paid by Google whenever :
1. People click on your ads.
2. People see Google ads on your site.
If you don’t have an account on Google Adsense, you can skip this step for now,
and apply for Google AdSense as soon as your website is eligible for Monetization through Google Adsense.
You can get more information on this from Google Adsense Policy.
Now let’s see how you can display ads on your site from Google Adsense.

So let’s go to the admin area, then appearance,
Now click Papr Options and go to ad management.
Once you click News/Archive, you can choose where you need to display the ad. Since you will be showing your ad after the sidebar, enable this option.
Now scroll down and add an image for the advertisement by dragging and dropping it like this.
You can now add a link to your ad, which you get from Google Adsense.
Once you paste it here, click save changes.

If you go back to your site and click on any news post, you can see the ad here.
And when a user clicks on the ad, you can earn money from Google based on the number of ad clicks & advertising products.
This is how you can earn money by promoting ads on your website.
Now let’s go to the next step,
where you can see how you can edit any page on your site.
First, we are going to see how you can edit the header area on your website.
To edit any page on your site you just have to go to that page,
and click edit with elementor.
A. Adding a logo

Let’s say you want to edit the logo of your website.
So to do that, just click Papr options, and it’ll take you to the general settings.
Now scroll down, you can see the default logo.
However, if you want to change it, just click upload.
And drag and drop your logo from your computer.
Once you are done, click save changes.
Then, if you go back to your site and click refresh,
you can see the new logo on your site.
Okay,
Now you know how you can add your logo to your website.

Next, let’s see how you can change the menu displayed on top of your website.
A menu acts as a way to access the pages making it easy for your visitors to find their way around your site’s pages and other content.
In addition, it also acts as a navigational tool for all the news posts on the website.
So to edit the menu, let’s go to the next step.
B. Edit the menus

Go to your admin dashboard, and just click Customize and then on ‘Menus’.
Now you can click on the main menu to add the news categories to your menu.
Next, click on add items, and here you can see the categories you have on your site.
Click on the category you want, and drag and drop them like this,
which will get added to the menu.
You can also rearrange the menu items,
by dragging and dropping them anywhere you want.
Once you are happy with the changes, you can click on Publish.
Now, if you go back to your site and refresh, you can see that the category has been added to the main menu, and you can see the posts under them.

This is how you can edit the header area of your news website.
So now you know how to create a News Website.
If you go to your news website, you can see that,
your website address ends with makeyourwp.com.

Instead of this, what if you want your website to have a simple address like Mynewswebsite.com, which looks more professional.
You can do that by getting your domain name for your site.
Next, let’s go to the final part of this tutorial, which is to get your domain for your news website.
A domain name is the name of your site, and hosting stores all your site files in one place. Therefore, having a good name is essential as it represents your news site online. Take your time and weigh up multiple options before you choose one.
You need to choose a good hosting provider that offers excellent performance, automated backups, top-notch security, and more.
You already have hosting on MakeYourWP for your site.
So now let’s see how you can get a unique domain for your news website.
To get your domain name, just click on this link,
and it will take you to Webspacekit.com.
You can read this article to know why you can choose WebSpaceKit, a relatively new hosting provider, proving to be the best Bluehost alternative in India.
Now on the domain search box, enter any name you want for your website like mynewswebsite.com, and if you click search, you can see whether your domain name is available or not.
To get your domain name, just click add to cart, and then click continue.
Now it will ask you to select a hosting plan.
You already have a host for your site on MakeYourWP, so let’s click skip.

It will take you to this cart page. Now here you can see that we’re getting this domain for one year, and after one year, you can renew it to keep using it.
So to get your domain, fill up these details.
Then, you can enter your payment details, and click order now.
You can see that we have successfully got our domain name.
So once you’ve got your domain,
you need to connect your domain name with your website.
So next, let’s see how you can connect this domain to your news website,
which you just built, so to connect this domain, we’re going to do 2 steps.
Step 4.1 Add the domain name to your news website.
So to add the domain, go to makeyourwp.com.

Now go to domains, and enter the domain name which you purchased.
Once you’ve entered your domain, let’s go to the final step.
Step 4.2 Add your MakeyourWP IP address to your domain name.
To add the IP Address, go to your WebSpacekit account and click domains.

Now select the domain you purchased and click Manage DNS.
Now click on Edit zone.
Next to the ‘A’ record, you need to add your IP address shown here.
So go back to MakeyourWP, now copy your site’s IP address.
Then return to your Webspacekit domain name, and paste the IP address.
Once you are done, click save changes.
Now go back to MakeyourWP, and click connect domain button.
You can see that, we have successfully connected our new domain name with our website!
Once you have connected your domain name with your website.
Now if you open a new tab, then type your new domain name and press enter.
Tada! You can see your brand new news website live on the internet!
You can see that, we’ve got the news website we just created.
Now you know how you can create a news website using WordPress,
and customize it according to your needs.
Okay,
Now we have a complete news & media website.

So in this website, we have used a WordPress theme, to build our news website.
Now in future, let’s say you have got an update to your theme.
Now you can use this website, without updating the theme for as long as you want.
But if you want to have the latest version of the theme (for your website),
You can purchase the theme, then update it to the latest version.
So to purchase your theme, just click this link.

And you will get this page.
So this is the Papr WordPress theme,
which we have used to build our news website.
So to get your theme, you need to purchase it.
Now this is a one-time fee, and you don’t have to make any monthly payments.
So let’s click add to cart, then click go to checkout.
And it’ll ask you to create an account.
You can use Google sign up, or enter your details to create an account.
I’m going to sign up with Google, so let’s click on it.
Now select your Google account.
Then your account will be created.
Now fill up the required details.
Once you have done that, just click save and continue.
Now to get the theme, select a payment method.
And you can enter your payment details,
Once you are done, just click pay securely.
As you can see, we have successfully made the payment,
and purchased our theme.
Okay,
Once you’ve got your theme,
How will you know that, you’ve got an update for your theme?
Now in order to receive the latest updates for your theme,
First, you need to download and install a plugin called Envato Market, on your site.
This plugin will help you to receive the latest updates for your theme.
So to download the plugin, just click this link,
And you will get the envato marketplace plugin download page.
Now click download.
And the envato plugin will be downloaded to your computer.
Now to install the plugin, go to your site dashboard.
Then go to plugins, and click add new.
Now drag the downloaded envato plugin, and drop it on choose file option.
And the plugin will be selected.
Now let’s click install now.
Then click activate.
And you can see that, the plugin has been activated.

Now scroll down, and click the Envato market option in the WordPress menu.
Then scroll down.

Now it will ask you to enter this token, to get the new updates for your theme.

Now to get your token, just click the link on the same page.

And it will ask you to sign into your envato account.
Now you can continue with Google.
Or you can enter the envato account details,
which you have used to create your account, while purchasing your theme.
Once you have entered your details, just click sign in.
Now, enter a name for your token.
You can enter anything you want.
Then scroll down.

And click on this box.
Now click create token.

And you can see that, we have got our token.

Now copy the token, and go back to your site,
Then paste the token.
And click save changes.

So now if we go to themes,
You can see that, we have got our purchased theme on our website.
So this means, whenever your theme has a new version,
You will get a notification like this,
So to update your theme, just click on the update notification.
And your theme will be updated to the latest version.
So that’s it guys,
This is how you can create a news & media website.
Before you go, here are some bonus tips on how you can attract readers and what plugins to use on your news website.
Now that you have created and launched a News Website,
you must cover all the topics ins and outs.
And most of you may be thinking,
“ How to write compelling content that ranks on Google, and engages people? ”
Well, your target is not just attracting generic readers but attracting the right readers—readers who are passionate about the issues you have been covering on your website.
But how to connect with the people interested in topics that you want to post on your website, and how you can attract those people in and help them become avid readers of your news website.
Well! We believe the following strategies can help answer those questions.
1) Publish news that people want to read with catchy headlines
Be the best at reporting on topics you plan to cover. Whether it is a piece of breaking news or some niche that covers an industry or topic, find a way to make your content better than anyone else’s. Talk and interview real people, subject matter experts, celebrities and dig deeper to uncover truths that nobody else has found. And when you produce top-quality content, the readers will have no choice but to click on your site.
2) Build a community on social media
Start a social media page on all platforms. For example, you can join Facebook groups and start following Twitter and Instagram hashtags that focus on the niche you are covering. Engage with your followers and once you’ve gotten to know the people in these communities, let them know what you offer. In addition to attracting readers to your website, social media can become a valuable source of new readers, story ideas and expert resources.
3) Try forming industry partnerships
Identifying and having a personal connection with individuals, brands, and other media companies can help grow your readership in several different ways. For example, an influencer can share your news on their Facebook feed and link to your article. A brand can funnel traffic your way through a series of sponsored posts; a well-known personality can guest post on your website. In addition, you can collaborate with other media companies on time-intensive diverse projects in your niche.
4) Take advantage of organic search
Organic search is one of the best ways to attract readers. Thus, optimising content for search engines is essential. In addition, you should consider using a plugin like Rank Math, which handles the technical aspects of search engine optimization. And that improves your news post chances of ranking highly on search engines.
5) Use ads to attract readers
You might want to reach people in a particular city or people interested in specific topics. But if you already don’t have an audience use Facebook, Twitter, or Instagram to run paid ads.
You can then offer something enticing to get them to come over to your website. Make sure you encourage new readers to share their email addresses or connect on social media for access to exclusive content, and you’ll likely gain some helpful feedback too.
You can also read this blog to increase traffic to your news website.
Now, if you are looking for the best WordPress plugins to take your business to the next level, you can choose from various available plugins.
However, choosing the right one may be a challenge, and we are here to make it easy for you.
Having the right set of WordPress plugins and tools can help grow your news website, and here are some must-have WordPress plugins you can have for your website
1.WPForms
Every website needs a contact form, and WPForms is the most user-friendly contact form plugin for WordPress that you can use for your readers to get in touch with you. You can easily create any form in just a few clicks using drag and drop. With over 300+ pre-built layouts, it can make your life easier. It is a paid plugin, and there’s a free WPForms Lite version available for looking for a simple solution.

You may want to display important announcements/upcoming events on your website. It is a simple WordPress news update plugin that can keep your audience updated about your website’s latest and most important happenings. The plugin is easy to set up and configure on any website. Get the News Announcement Scroll plugin today!

3. RafflePress
This giveaway plugin on the market allows you to increase your website traffic, get more social media followers, email subscribers with viral contests, and giveaways. Using the easy drag and drop giveaway builder, you can create a giveaway that attracts visitors’ attention. Though paid, you can start with its free version called RafflePress lite. However, if you want more powerful features for your better growth, you can use RafflePress Pro.

4. Rank Math
Rank Math is one of the most downloaded and widely used Search Engine Optimization plugins for WordPress. It makes it easy to optimize content with built-in suggestions, customize the essential SEO settings, and control which pages are indexable, and how you want your website to appear.
Both paid and free versions are available.

You can also use these plugins and the ones we mentioned above.
Grammarly – A grammar checking tool with a plagiarism detector and enhancement to make writing clear and compelling. Free and Paid versions are available.
PublishPress – A plugin that makes it easy to manage editorial work, and content in one place.
Antispam Bee – An excellent plugin to improve the comments section with reduced spam on your website. Works well when used alongside Akismet to combat spam comments.
Envira Gallery – A widely used responsive-choose plugin that helps us create stunning photo and video galleries with an easy-to-use interface.
Smash Balloon – A popular social feed plugin that can. Can be easily customised to display custom Instagram feeds, Facebook feeds, Twitter feeds, YouTube feeds, and a social wall.
WPML– A plugin that allows you to easily and quickly create multilingual websites with WordPress.
Now you know the best WordPress plugins you can use for your news website. Depending on your need, you can use any of the WordPress plugins and tools that are mentioned above.
Now that you have a news and media website, it is time to include it in Google News. Having your news content up in Google News can be most beneficial as it will appear in Google search results immediately once you post. As a result, your news website can have more viewership and reach wider audiences.
In addition, it can be valuable during breaking news situations. You will also see that users are more likely to engage with your content, and they will be shown other news content from your website in the future by Google.
But to get your website on Google news, you need to provide high-quality content and follow Google news guidelines. You can then submit your site to Google News using Google Publisher Center. Google will then review your news website and then update whether your website is approved or not. The process may take upto seven days or more.
Gone are when people used to wait for days to get the paper or watch TV to get the latest news. Consumption of information online at the click of a button with no additional cost is more significant than before. And the time for starting a news website is now!
As a News Website Owner, you can focus more on creating valuable content for your readers on your Website. You do not have to worry about the technical things of your website, as it is already prepared for you.
With in-built premium theme, plugins, and features that you need,
MakeYourWP can be your preferred website template for building your dream website.
Just select the template you want, purchase, customize, and you are ready to go!
Now, if you have any questions about starting a news website with MakeYourWP or any other queries?
Feel free to discuss them in the comments section below!