
Looking for the fastest/easiest way to create a listing and directory website?
Then look no further. We know that creating a Listing and Directory website can be challenging. Especially if you are a beginner who’s going to build it from scratch. That’s why we’ve written this comprehensive step-by-step guide just for you.
Looking for the fastest/easiest way to Create a Listing & Directory Website?
Then look no further. We know that creating a Listing and Directory website can be challenging. Especially if you are a beginner who’s going to build it from scratch. That’s why we’ve written this comprehensive step-by-step guide just for you.
(If you’re still wondering whether to create your own listing and directory website, keep reading to find out more about what a listing and directory website is, what you can do with it, and more importantly, why you should have one.)
Ever seen those huge, heavy books that have a list of all the businesses in your city, in alphabetical order along with some contact details?
They are called directories; books that people search through to find a particular business, get the details of that business, and contact them regarding the service they want.
A listing and directory website is the compatible, user-friendly, online version of these directories, that has more than address and contact details. With a few clicks, It gives
In this fast-paced, modern world, many startups and businesses want to list their business on these websites because it is one of the quickest ways to establish an online presence and reach more potential customers.
By having a listing and directory website, you can make use of this opportunity to get more traffic and earn passive income in the long run.
Monetizing a Listing website can be really simple and it can be done without incurring extra costs. Only one thing influences monetization: Web traffic. The more traffic your site attracts, the more valuable your site becomes, which attracts more businesses to (submit a listing on) your site. Depending on the traffic, you can use some of these methods to monetize your website.
You can charge business owners who want to add their listing on your website. It can be a one-time payment for submitting a listing or a recurring payment for keeping the listing active on your site.
You can sell advertising spaces to business owners who want to post their advertisements or campaigns. With the combination of Google Analytics and Google Adsense, you can quickly decide the spaces you want to sell and the ads you want to post.
You can create a special package for listing owners who wish to promote their listing on the homepage or on top of the search results (which will be covered later in this blog).
When a business gets more customers through a listing on your site, they will want to claim that listing and make optimum use of it. In that case, you can sell the listing to them for a certain amount.
There are endless possibilities when it comes to creating a listing and directory website. That’s why it’s important to choose a niche; something you know very well or are passionate about. Based on your niche, you can create some of the following types of listing websites.
If you have other niches that you like, you can build your listing website for that as well. Choosing a niche helps you to focus on your research and develop your website quickly.
In this guide, we’ll be creating a listing and directory website for businesses (Business directory) in just 7 steps.
Launching your website is going to be very simple.
Just click this link and it will take you to MakeYourWP, which has ready-made WordPress website templates (with domain and hosting!).
Not yet convinced? Just scroll down and you will find the listing and directory template among many others.

To see how the website will look, click “Demo”, and you can see the complete website with sample listings.

To see more (details) about a listing, just click on it, and it will show you the details.
You can also use these buttons to see how your website will look on different devices.
To get this website, let’s click “Launch Site” and it will ask for your details.

Enter those details and click Next.

Now it will ask for your address and payment details. Enter those details and click Sign Up Now.

Now we have successfully purchased the listing and directory website, which is ready to be launched. So just scroll down and click “Launch New Site”.

Under the “Choose Your URL” section, you need to enter the website address of your choice. I’m going to enter “listable” and you will notice that the listing and directory website has already been selected.

Once you have entered the URL, scroll down and click “Launch New Site”.
And there you go! You have launched your brand new website.
Now if you click “Visit”, you can see that we have got the same site, which we saw previously in the Demo.

So once you have launched your site, you can now go to step 2, which is to add a listing on your site.
Let’s say you want to add a listing on your site. Just click Add listing, and you will find the default listing types available on your site.
Before we add our own listing, we’re going to delete these default listing types and add the listing types we want.

To delete the default listing types and create our own, we’re going to do four steps.
A. Login to your website
B. Delete the default listing types
C. Create the listing types you want
D. Add the fields you want
A. Login to your website
To login to your website, just go back to MakeYourWP, and click Admin.

As you can see, we’ve now logged into our WordPress dashboard, where you can control your site.
Once you have logged in, we can go to the next step, which is to delete the default listing types.
B. Delete the default listing types
To delete them, go to “Listing Types”, and click “Listing Types”, and you will find the default listing types.

Now click the box near “Title” to select all the listing types, then click on “Bulk actions” and select “Move to Trash”. Now if you click Apply, the default listing types will be deleted.
Once you have deleted the default listing types, you can create your own listing types.
C. Create the listing types you want
To create your listing types, just click “Add New”, and it will take you to this page, where you need to enter the details of your listing type.

First, enter the name of your listing type. It can be a type of business like Health & Fitness or Restaurants. I’m going to enter “Auto Care”.

You can also add an icon for your listing type, which will make it easier for visitors to identify the listing type.
So to add an icon, just click the “Icon” field, and you will see different kinds of icons.
Search for the icon you want by using keywords related to your listing type. I’m going to search “car” since my listing type is “Auto Care”.

Then select an icon from the list and it will be added to your listing type.
Fill in the rest of the details and then click Publish.

So now we have successfully added a listing type on our site. In the same way, you can create other listing types of your choice.
Now if we go back to our site, and click Refresh, you can see that the listing types we created are not visible.
In order to make them visible, we need to add our listing types on this page.

So to add the listing type, just click “Edit with Elementor” and it will open the page in Elementor.
Now search for “Add listing” in the search bar, and you will get the Listing Form element. We are going to use this element to add our listing types.
So let’s drag the element and drop it on the page/under the text.
As soon as you drop the element, you will get the editing options on the left panel.

To add the listing type, just click “Add item” under Listing types, then click on the empty field, and select the listing type that you created.
As you can see, our listing type has been added on the page. In the same way, you add the other listing types.
Now if you want to change the icon color of your listing types, just click on the second button in “Color” and choose the color you want.
You can see that we have changed the icon color. In the same way, you can change the icon color for other listing types.
Once you have made the changes, click “Update” to save those changes on your site.

Now let’s check if our site has been updated. So go back to your site, hit the Refresh button…and voila! You can see that the listing types are now visible on our site.

Now that we have created our listing types, let’s go ahead and add a listing for our business.
So select a listing type related to your business, and…hold on for a second. There are no fields on this page to enter the details of our business. Now to get the fields on this page, we’re going to add the fields from our dashboard.
D. Add the fields you want
To add the fields, let’s go back to our WordPress dashboard. Now go to one of your Listing types and click Edit.
Once you’re on the editing page, click on Fields, and you will find the fields which you can add to your listing type.

Now to add a field, just click on it, and it will be directly added to your listing type.
If you want to make it as a required field, click on it, and enable “Required field”.

Under the Placeholder Text, You can type what should be entered in this field.
In the same way, you can add other fields to all your listing types.
Now if you want to create a heading for a group of fields like this, just scroll down and click on “Form heading”.

To change the name of the heading, scroll up, then click on that field again and enter the name you want. I’m going to enter “Images”.

You can also add an icon for your heading by clicking here and selecting an icon.

Once you’ve made the changes, click “Done” to save them. Now add the fields you want under this heading. In the same way, you can create more headings and add fields under them.
Once you have added all the fields, click Update. Now if we go back to our site, and click Refresh, you can see that we have got the fields that we added. So now that we’ve got the fields, let’s go ahead and add our listing.
To add your listing, just fill in the details of your business.
Now scroll down, and here you can add your logo, cover and gallery images. All you have to do is just click the upload icon and select the images.
Once you’ve added the images, scroll down further to add your contact details and social media details. Similarly, add details about your working hour, location and price range for your services.
After you have added your details, click “Preview”, and it will show how your listing will look on your site.

But as you can see, some of the details we entered are missing/are not seen on this page. So how do we show them here?
To do that, let’s go back to our dashboard, then go to “Single Page”, and click “Content and Tabs”.
Here we need to create a profile for our listing and add the details to it.
So to create the profile, click “Profile” and it will be added to your listing page. Then click on it again and change the name.

Now to show the details in a two-column layout, click the “Layout” field and select the “Two Columns” option. Then scroll down and you will see the fields which you can add.

Since I want to add the description, I’m going to use the “Text area” field. So let’s select it, then click on that field, and change its name to description.
Now to show the description which we entered before, click under “Use Field”, and select “Description”. Then click “Done” to save the changes.
Once you’ve added the details, click update. Then go back to your site and if you click Refresh, you can see that we have got the description.
So in the same way, add the other fields you want to show on your listing page, and click update. Then go back to your site, click Refresh, and…there you go! We have got the details which we added now.
Let’s say you want to add details on the cover section of your listing page, just go back to your dashboard, go to “Single Page“ and click on “Cover details”, where you will find the details that you can add to your cover section.

Like we did before, just click on the detail you want to add and it will be added directly to your cover section. I’m going to click “Price” to add the price range details.
To change the name, click on that detail, then enter the name you want, and click “Done”.
Now scroll up and click Update to save the changes. Then go back to your site, click Refresh and you can see that the detail has been added to the cover section. Likewise, add the other details you want to your cover section.
Once you’ve added the details you want, click ”Submit Listing”.

So now we have successfully submitted our listing and as you can see, it says our listing needs to be approved by the admin.
That means whenever a listing is submitted on your website, you need to approve it. As soon as you approve the listing, it will be automatically published on your site.
So to approve the listing, let’s go to our WordPress dashboard, then go to Listings and select All Listings. Here you will find the listings with their status; whether they are published or pending approval.

As you can see, our listing is pending approval. So to approve it, just click Approve, and it will be published on our site.
To check it, let’s go to our site, and if we click All Listings, you can see that the page is empty and our listings are not visible on our site.
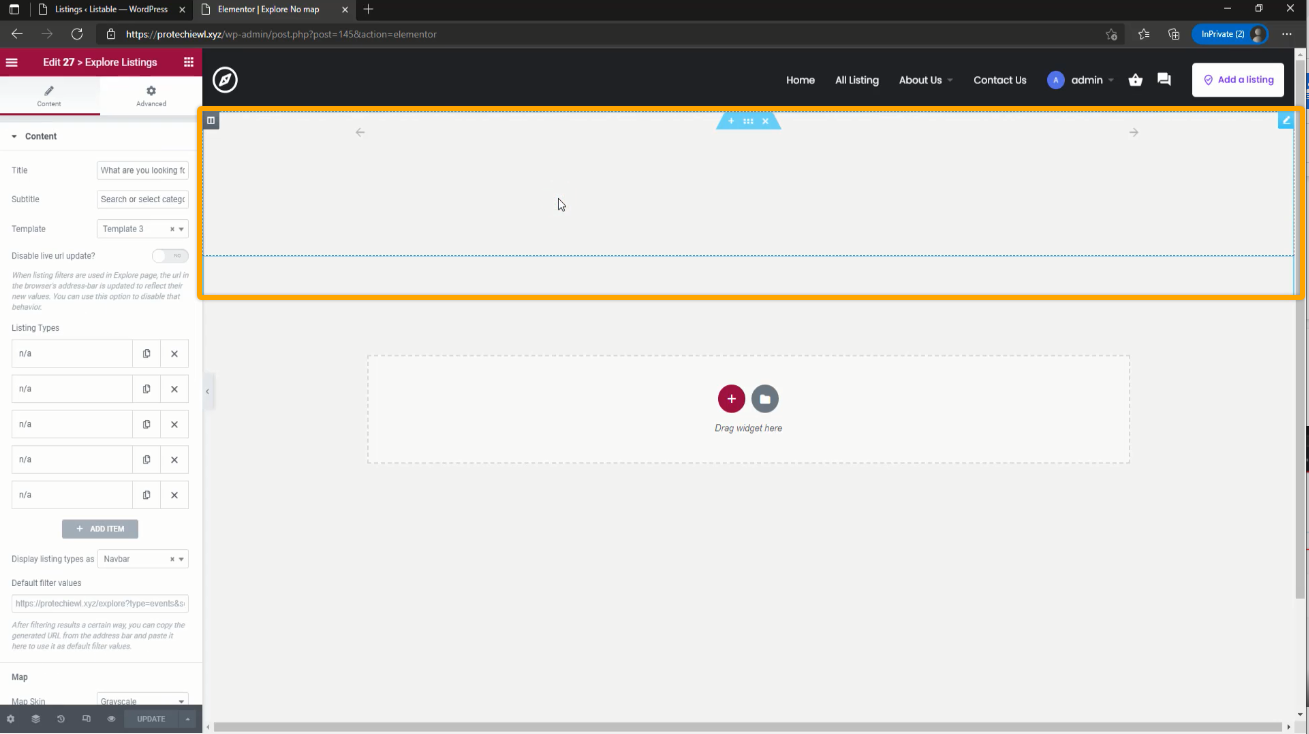
In order to make them visible, let’s click Edit with Elementor, and it will take you to this page.
Now click inside this section to open up the editing panel on the left.
To make our listings visible, click on the first field under Listing types, then click on the field which opened, and select the listing type that you added before.
As you can see, our listing is now visible on our site. In the same way, you can add the other listing types here.

Once you’re done, click Update to save the changes. Then go back to your site, and if you click Refresh, you can see that our listing has been added.

To see more details, just click on the listing and you will see the details which we entered before.
So this is how you can add a listing on your site.
Let’s say you want to show your business location on a map so that visitors can easily find their way to your location, how will you do it?
So next, let’s see how you can add Google maps to your listing.
To add Google maps to your listing, we’re going to do 2 steps.
A. Add location field to your listing
B. Enable Google Maps service for your site
A. Add location field to your listing
To do that, let’s go back to our WordPress dashboard, then go to “Listing types” and select “Listing types” from the options. Now go to the listing type you want, and click “Edit”.
Since we are going to add a location field, let’s click “Fields” and click on “Location” to add that field. Then scroll down and you will find the location field that we added.
Now if you want to move this field to this group (named “Location”), just drag the field and drop it where you want.
Once you’ve added the location field, we need to add it on our listing page to make it visible. So scroll up, go to “Single Page”, and click “Content and Tabs”. Now click on Profile, then scroll down, and click on Location to add it to Profile.
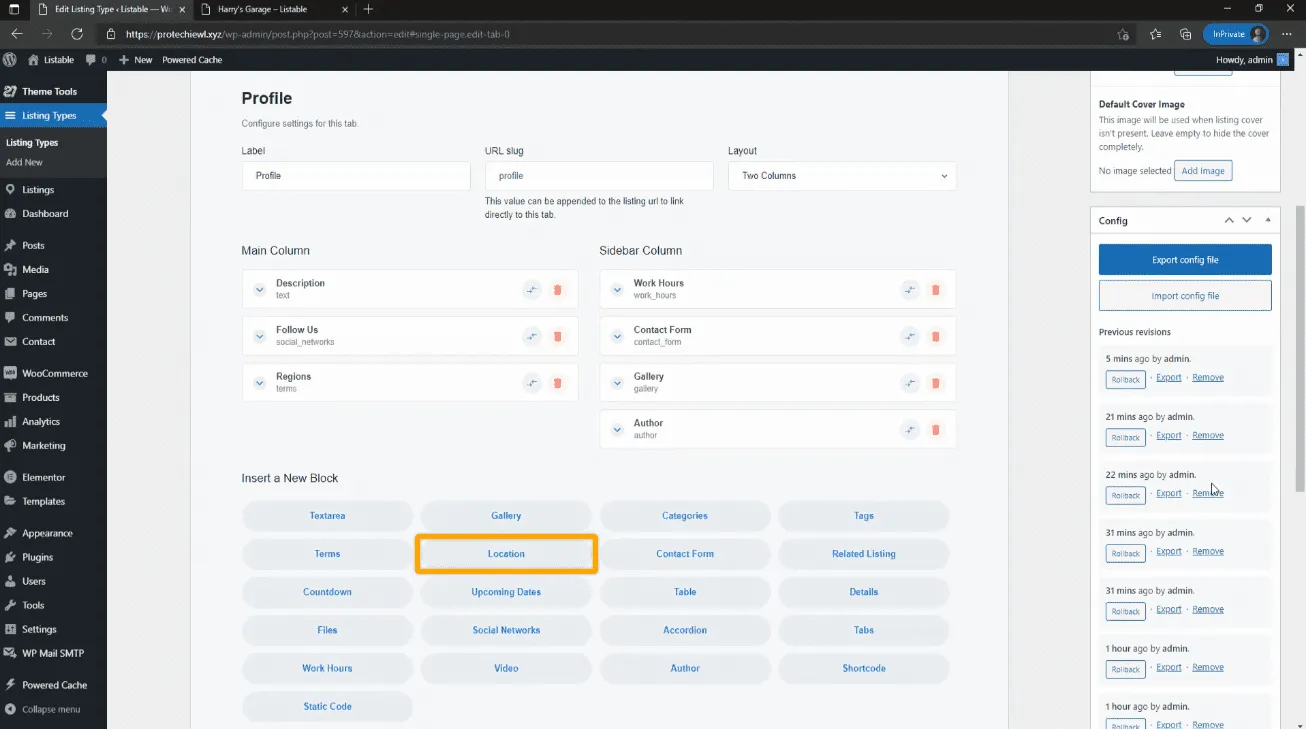
Then to change its position, just drag and drop it where you want. Once you’re done, scroll up and click update to save the changes.

Now that we have added the location field to our listing, we can enter our location details there and get our location on Google Maps.
So to enter the location details, just go to Listings and select All Listings. Then click the Edit button in your listing.

Now scroll down the page and you will find the location field we added earlier.

Enter your location details in that field, then scroll up and click update to save them.
So to check it, let’s go back to your site, and click Refresh. Now if you scroll down, you can see that we have got the location details we added before. But as you can see, Google Maps is not loading properly on our site.

That’s because we need to enable Google Maps services for our site, which is what we are going to do in step 2.
B. Enable Google Maps service for your site
First, we’re going to check what is needed by our site to enable Google Maps services.
So let’s go to our WordPress dashboard, then go to “Theme Tools”, and select “Map services”, which will take you to this page.

Now here you can see that we need the Google Maps API key to enable Google Maps services on our site.
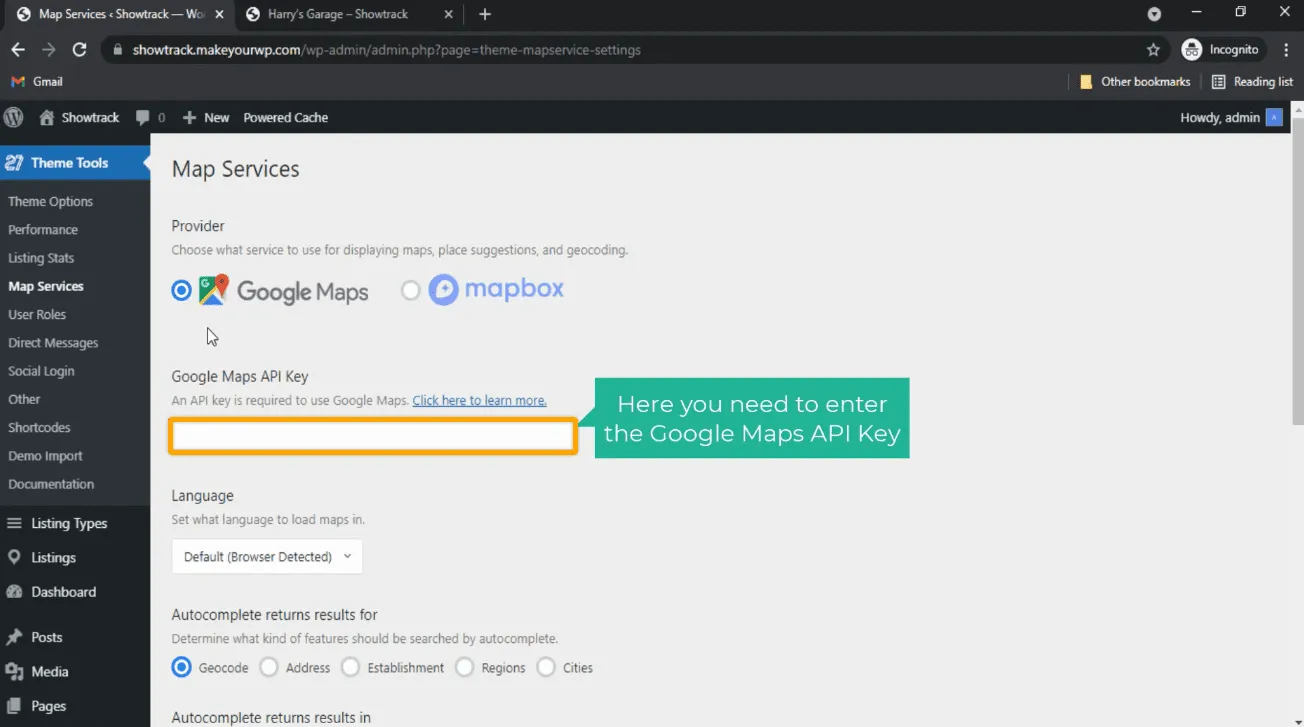
So let’s go and get the API key!
But wait…where to get it? Don’t worry, we’ve got you covered! Just click this link and you’ll be asked to sign in to your Google account.

So enter your email and password/select your Google account, then click the box and click “Agree and Continue”.
So we have successfully signed in to Google Cloud Platform. Now click Activate and it will take you to this page, where you need to give some information about yourself to use the free trial.

So just check the box under “Terms of Service”, click Continue, and it will ask for your contact information. Now enter your mobile number, and click “Send Code”.

You would have received a verification code on your mobile. Enter that code and click verify.

Now it will ask for your payment information. The details you enter here will only be used for verification and you won’t be charged when the free trial ends.
So let’s click the icon near “Account type”, and select your account type.
Then scroll down and enter your card details. If you have any tax information, you can click on tax information and select your option. Once you’re done, click “Start Free Trial”.
So we have successfully activated the free trial of Google Cloud. Now to get the Google Maps API key, click “Select a Project”, and click on “New Project”.

Here it will ask you to enter the details of the project. So enter the name you want under “Project name”, then click the “Billing account” field and select “My Maps billing account”. Once you’ve entered the details, click “Create”.

Now click the menu button on/at the top left corner of the page, go to “APIs and Services” and select “Library”. This will take you to the page that has the APIs for Google Maps. Before we get the API keys, we need to enable these 2 APIs.

So let’s click the first one, and click Enable

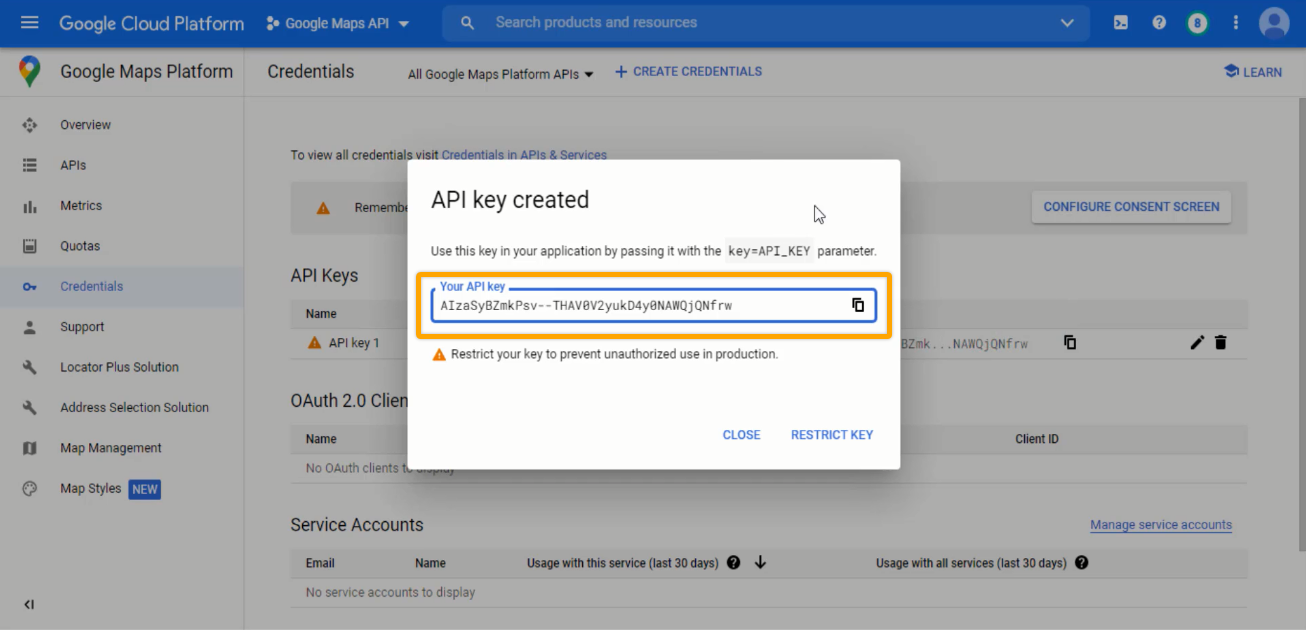
Then go back, click the second API, and click Enable. Once you have enabled the APIs, click “Credentials”, then click “Create Credentials”and select API key.
And that’s how you do it! We have successfully got our Google Maps API key.
Now to get Google Maps working on your site, just copy this API key, then go back to your dashboard and paste it in this field.

Then scroll down and click Save settings to save the changes we made.
So now we have successfully enabled Google Maps services on our site. Let’s check how Google Maps is working on our site after this. So go back to your site, click Refresh, and you can see that the map has loaded properly. Now if you click “Get directions”, it will show directions to your business location.
Once you’ve enabled Google Map services, you can go to the next to add more features to your listing.
In this step, we’re going to add two kinds of features on our listing website.
A. Add Business features/services to your listing
B. Add search form on your site
A. Add business features to your listing
Now let’s say you want to have a separate section to show your business services or features which you are providing, you can create a features list on your website.
So to do that, let’s go to our WordPress dashboard, then go to Listings and click Tags. On this page, enter the name of the feature or service you are providing under the “Name” and “Slug” fields. I’m going to enter “Accepts Credit Cards”.

You can also add an icon for this feature. Just click on the “Icon” field, then search and select the icon you want. Since my feature is about credit cards, I’m going to search for ‘card’ and select an icon.

Once you’ve added an icon, click under Listing type and select your listing type.

Now click Add new tag, and the feature will be created on your site. Similarly you can create as many features as you want.
Once you’ve created the features you want, you need to add them to the listing types which we created earlier.
So to add the feature, just click “Listing types”, and select “Listing types”. Then go to a listing type and click “Edit”. Now click “Fields”, and you will get this page, which has a list of fields .
Let’s say you want to show your features in a separate section, just scroll down and click on “Form heading”. To change its position, you can drag and drop it where you want. If you want to rename this field, just click on it, and change the name under Label. You can also change the icon by clicking here.

Once you’ve edited these details, click Done. Now to add the features under this section, scroll up and click on tags. As you can see, it has been added at the bottom.
To bring it to the section we created, just drag and drop it there. Then click on it to change its name. I’m going to enter “features”.
Now to display these features on your listing page, scroll up, then go to “Single Page”, click on “Content and Tabs”, and click Profile.
Scroll down and click Tags to add the features. Like we did before, change its position and name. Then scroll up and click update to save the changes. Likewise, you can add the features to other listing types.
Once you have added these features, you need to add them to your listing details. So to do that, go to Listings, select All Listings, and click the “Edit” button next to your listing. Now if you scroll down, you can see that we have got a new section to add features to our listing.

To add your features, just click on it, and select your features from the list. Then scroll up and click update.
Now let’s go back to our site, then click Refresh, and you can see that the features have been successfully added to your listing.
Let’s say a visitor is on the homepage of your site, and they want to search for a particular business, you can see that they don’t have any search options which they can use to find that business.
So to solve this, we can add a search form on our site, which a visitor can use to search for the business they want.
B. Add search form on your site
To add a search form, make sure that you are on the homepage of your site and click Edit with Elementor. In the Elementor search bar, search for ‘shortcode’ and you will get this element.

Now drag that element and drop it below the text.
As soon as you drop the element, it will ask you to enter the shortcode in the left panel.

Okay, so you’re wondering what a shortcode is, right? Well, a shortcode is like a WordPress shortcut which you can use to easily add any feature on your site. Like a CTA button, image carousel or a form.
The best thing about shortcodes is that they are pre-built and they come along with the activated theme or plugin. That’s why we’re going to use a shortcode to add our search form.
So to get the shortcode, let’s go to our dashboard, then go to Theme tools, and select Shortcodes. Here you will get a list of shortcodes for different features including the search form.

So let’s click on Search Form, and it will automatically generate a default shortcode for the search form.

You can also use these shortcode options to modify the default shortcode. So let’s select the listing types and you will get the modified shortcode.
Similarly, you can select a style for your listing types. Just click the field under “Style”, and select an option. I’m selecting “Transparent”.

Once that’s done, you can use the shortcode to add the search form. All you have to do is copy the shortcode, go back to Elementor and paste it in “Enter your shortcode”.
Tada! We got the search form as soon as we pasted the shortcode. Pretty cool, isn’t it?
Okay, now click update to save the changes and let’s check our site for the search form.
So go back to the visitor’s tab, click Refresh, and yes, you can see that we have got the search form on our site.
Now if the visitor searches for a business, they will get the results, and if they click on the listing, they can see all the details of that listing.
So this is how you can create a listing website and add your listing on it. Now let’s say a visitor owns a business and wants to list their business on your website, how will they do it?
So next, let’s see how a visitor can add their listing on your site.
In this part, we’re going to see how a visitor or an admin can
A. Add a listing (Visitor)
B. Review and approve the listing (Admin)
C. Create promotion packages (Admin)
D. Setup payment method (Admin)
As we go through this process, you’ll begin to understand how your site works and what needs to be done when someone adds their listing on your site. So let’s dive right into it.
A. Add a Listing (Visitor)
Let’s say a visitor is visiting our site, and they wish to add their listing, all they need to do is just click the “Add Listing” button, and choose a listing type related to their business.
Here it will ask them to create an account.

So to create the account, let’s click Register, and it will ask you the account details. Once they enter these details, and click Sign Up, you can see that they’ve created the account and they can add their listing.

To add their listing, they just have to fill up the details about their business and then click Preview to see how their listing will look.

If they are satisfied with their listing, they can click Submit Listing and you can see the listing has been submitted successfully and it’s waiting for approval.
Once the visitor has submitted their listing, they can access their dashboard to check the status of their listings and manage them anytime.
So to go to the visitor’s dashboard, just click on the visitor’s profile, then select Dashboard, and it will take you to the visitor’s dashboard.
Now if you click “My Listings”, you can see the visitor’s listing which is pending approval. This means that the visitor’s listing will not be published until you (the admin) approve it.

B. Review and Approve Listing (Admin)
Once a visitor submits their listing, you will receive a notification in your inbox.
So if you go to your inbox, you will see the notification from your website and if you click on it, you can see that you’ve got a new listing on your site.

To view the listing, just click the “Review Listing” button and it will take you directly to your WordPress dashboard.
Here you can check the details given by the visitor and if you want to approve this listing, just click “Publish” and the listing will be published on your site.

Now if the visitor goes back to their dashboard, and clicks Refresh, they will see that their listing has been approved and published on our site.

This is how any business owner or service provider can add a listing on your site which you can review and approve right from your inbox.
Now let’s say someone visits this new listing and they want to reach the business owner, how will they contact them?
So if a visitor wants to contact the business owner, all they have to do is just scroll down, where they will find a contact form.

They can fill up these details and their query in this form and click “Submit”. Once they send their message, the business owner will receive an email.
So if the business owner checks their inbox, they will see the mail from your site and if they open it, they can see the visitor’s message. They can also click the reply by clicking the “Reply” button.

Now if the visitor goes to their inbox, they would have received the mail from the business owner which they can open and see what the message is about.
So this is how a visitor can contact the business owner regarding any queries they have.
Now if your site starts getting many listings later, the business owner would want their listing to be seen first among other listings. So to make their listing rank first, they can purchase a promotion package on your site.
So to purchase the promotion package, let’s go to the business owner’s dashboard and click Promote.

But here it shows that the promotion packages are not available on our site.
So let’s see how you (the admin) can create the promotion packages on your site.
C. Create promotion packages (Admin)
To create a promotion package, let’s go to our WordPress dashboard, then go to Products and click Add New.

You will get the page where you need to enter the details of the package. So enter the name you want, then scroll down, click next to “Product data” and select ‘promotion package’.
Then enter the price of the package near “Regular Price” and enter the number of days for which the package will be active near “Promotion duration”. Now to display the listing of this package at the top of the page/search results, change the “Promotion Priority” to 1.

Once you have entered these details, click “Publish”. So now you have successfully created a promotion package on your site.
Now if we go back to the business owner’s dashboard, and click Promote, it will ask you to select the promotion package. So select the promotion package and as you can see, there are no payment options available.

In order to allow business owners to pay for the promotion package, you (the admin) need to set up your payment method.
D. Set up Payment Method (Admin)
So to setup a payment method, let’s go to our WordPress dashboard, then go to WooCommerce and click Settings. Now click Payments and here you will find the different payment methods that you can setup on your site.
I’m going to choose Stripe because it’s easy to receive payments directly to your bank account. So let’s enable it, and click “Set Up”. Now if you want to use Stripe for your site, you need to create a Stripe account.
So to create a Stripe account, just click this link and it will take you to stripe.com. Then click Start now, and fill up these details.

Then click Create and we have successfully created our Stripe Account. Once you’ve created your account, it will ask you to verify your email. So let’s open Gmail, and we’ll be taken to our inbox.

Here you can see that we have received an email from Stripe.

So let’s open it and click the “Verify email address” button to verify our email.

Once your email is verified, you need to activate your account to receive payments. So click Start, and here you need to provide all these details about your business. 
First select your business industry, then enter your website’s URL. To get the URL, go to your website and copy the link. Now come back to the Stripe tab and paste it under “Business website”. Finally, enter a short description about your business and click “Continue”.

Here it will ask for your bank details where you want to receive the payments. So select your bank and enter your bank details. Then click Save, and click Continue.

Here you can see all the details which you have added. Make sure everything is correct and then click “Submit”.
So we have successfully activated our Stripe account. Now to let customers make payments on our site, we need to connect this account with our website.
So to connect it, let’s go to our WordPress dashboard, then go to Stripe gateway and click “API settings”. Now click “Click to Connect” and it will ask for your domain name. So select your domain name and click connect. As you can see, your Stripe account has been connected with your website, which means, we have successfully added a payment method on our site.
You can also change the currency used on your site. Just go to General and scroll down, where you will find the default currency on your site.

If you want to change the currency, you can click on the default currency and change it to the one you want.
Now if we go back to our site, and click Refresh, you can see that the payment method has been added to our site and the business owner can proceed with the purchase.
So to complete the purchase, they can fill up their personal and card details, and click Place Order. Now here you can see that they have successfully purchased the promotion package.
Now if you click the business owner’s profile, and click Promotions, you can see that their listing has been added to the promotion package with the expiry date of that package.

So to check it, let’s go back to our site, and if you click Refresh, you can see that the business owner’s listing is at the top of the page/ it is first in the list.
Okay! So now you know how a visitor can add their listing and how they can promote them on your site.
Next, let’s see how you can edit the contents on your site.
To edit the contents of your site, first let’s go to the page you want to edit, then click Edit with Elementor and it will take you to this editing section., where you can edit any part of this page.
Let’s say you want to change the text, all you have to do is just select the text you want to change, and enter your text. It’s that simple. Similarly, you can change any text you want on this page.
Now if you want to change the background image in this section, just go to that section and you will see three buttons on top of that section. Click the middle button, then go to the Style tab and you will find the background image for that section.
To change the background image, just click on it, then drag & drop your image and click Insert Media. Now you can see that the background image has been changed. In the same way, you can change any image on this page.
Once you’ve made all the changes, click Update to save them. Now go back to your site, click Refresh, and you can see that your site has been updated with the changes you made.
Let’s say you want to change this logo, just go to your dashboard, then go to Theme tools and click Theme options. Here you can see the logo which is there on your site.
So to change it, delete this logo first, then click Add image, and drag & drop your image. Now click select and you can see that our logo has been changed. Then click Update to save the changes.
To check the logo, let’s go back to our site and click Refresh. As you can see, we have successfully changed the logo. So this is how you can edit the contents of your site.
Okay! Now if you see your website address, it will end with makeyourwp.com. Let’s say that instead of this, you want to have a simple address, like yourwebsitename.com which will look more professional.
You can do that by getting your own domain name for your listing and directory website.
To get your own domain name, just click this link, and it will take you to webspacekit.com, where you can get a domain for your website.
Enter the name you want for your website and click Search to check if the domain name is available.

If the domain name is available, you can go ahead with the purchase. So just click Add to Cart, then click Continue and it will ask you to select a hosting plan.

Since we already have a hosting for our site on MakeYourWP, we can click Skip and you will get the cart page. Here it shows that we are purchasing the domain for 1 year. So after 1 year, we need to renew the domain to keep using it.

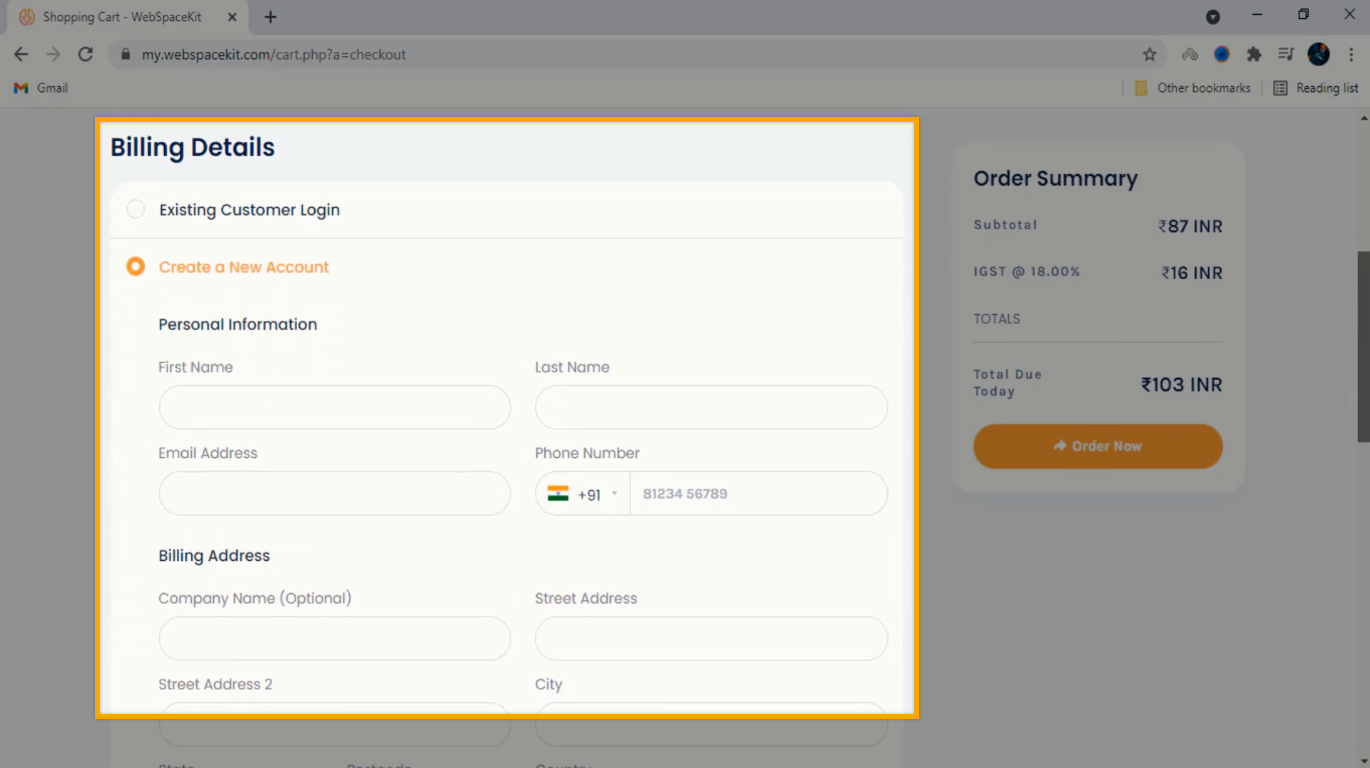
So to get this domain, let’s fill up these details, then choose your payment method, and click Order Now.
Then enter your payment details, and click Pay. So we have successfully made the payment and you’ll be able to view your dashboard. Now if you click “Domains”, you can see the domain name which we had purchased.

Once you’ve got your domain, how will you connect this domain with your website?
So to connect this domain, we’re going to do 2 steps.
A. Add the domain to your website
B. Add the IP address to your domain
A. Add the domain to your website
To add the domain, let’s go to makeyourwp.com, then go to domains, scroll down and enter the domain name which you purchased.
Once you’ve entered your domain, we can go to the final step, which is to add this IP address to your domain.
B. Add the IP address to your domain
To add the IP address, let’s go back to our WebSpaceKit dashboard, and click domains. Then select the domain which you purchased and click “Manage DNS”.
Now click the “Edit Zone” button and you’ll be able to find an IP address next to the A record. We’re going to delete this IP address and add our IP address here.

So let’s go back to the MakeYourWP tab, copy the first IP address, then come back to WebSpaceKit and paste it there. Then scroll down and click Save changes.
Finally connect this domain by going back to MakeYourWP and clicking “Connect domain”. So now we have successfully connected our new domain name with our website.
To check it, let’s open a new tab, and type our new domain name. Now if we press enter, you can see that we’ve successfully connected our domain and we’ve got our listing and directory website which we just created.
You can also see the listings that have been added by us and our visitors if you go to “All Listing”.
So this is how you can create a listing and directory website, where you can add your listing or let visitors add their listing, as well as how to approve and manage the listings on your site.
We know that you can’t wait to make your listing website right now. So before you start creating your listing and directory website, make sure that the following features are included in the theme or template that you are going to choose.
Demo content helps you to get an idea of how the site will work once it’s launched. Most of the themes and templates have demo content in them. So check the demo content whether it has the main features of a listing website like front-end submission forms, search and filter options, and categories (or listing types).
Your listing website can have many categories or listing types depending on your niche. So your chosen theme or template should allow you to add custom categories and fields that match your website’s needs.
A front-end submission form is an essential feature for a listing website. It allows visitors to submit their listing easily by just filling up a form. It’s an added bonus if your theme has strategically placed buttons that lead visitors to these forms.
With many different listings on your site, visitors can find it difficult to find the one they want if there are no search or filter options on your site. Search and Filter options make your website more user-friendly and efficient. So make sure to have them on your website.
One of the features that increases the credibility and trustworthiness of your site is a ratings and review section. Having a dedication section for it makes it a win-win for you, your listing owners and your visitors.
We had seen the different ways to monetize a listing website and how to integrate payment gateways. So look for a theme that is compatible with your preferred monetizing methods and payment integrations.
As you would have noticed, we had purchased our listing website from MakeYourWP for this video/guide. Looking at the features needed for our site and the time it would take to build it from scratch, MakeYourWP is the best choice out there.
MYWP offers ready-made WordPress website templates; packed with features, pre-installed plugins, and a cool design!
Let’s explore this a little more. Usually, a website creation process would look like this.
Purchase domain & hosting —> Install WordPress —> Purchase theme —> Upload theme —> Install and activate theme —> Configure settings —> Customize website
But with MYWP, your website creation process will look like this.
Purchase MYWP template —> Tweak the settings (optional) —> Edit website content
That’s the power of MakeYourWP. With a single purchase, you can launch a live and complete WordPress website that has
(You get bonus services also like
(So all you have to do is just purchase, tweak, edit and you are good to go!)
Well, now you know how easy it is to create a listing and directory website. Let’s have a small recap to jog your memory a little bit, shall we?
We started this article with what a listing and directory website is and why you should have one, especially when everything is shifting toward online resources.
Next, we explored different ways to monetize a Listing website with the fundamental requirement being web traffic. (The more traffic your site gets, the more valuable your site becomes.)
Then, we saw the different types of listing websites you can create (which is an endless list, actually).
Later, we dived into the main purpose of this guide which is how to create a listing and directory website in 7 steps, where we
Finally, we discussed the must-have features for a Listing website, the reason for choosing MakeYourWP for this guide and how MYWP makes the whole process easier.
So that’s all there is to it! Jump right in and start creating your listing website. If you have any doubts or clarifications in building your website, do leave us a comment or contact us to get help from experts.
Thanks for creating your website with us!