
Who doesn’t love an opportunity to gain more orders?
Who doesn’t love the convenience and easy way to order food from a restaurant?
With the growing popularity of online food ordering, it has been one of the leading drivers of growth, and as an owner, it is a sure-shot way of expanding your current customer base and boosting your revenue.
According to Statista, the revenue through Online Food delivery is expected to reach US$ 13,988M in 2022 alone.
With everything available at the click of a button, diners prefer the comfort zone of their homes or offices to place orders and get them delivered right where they are without travelling to the restaurant’s location.
Let’s face it; convenience is the most vital selling point for any potential owner and your restaurant can’t lose out on the opportunity. Now is the time to jump right in!
So having a food ordering website can help you get more customers, as your reach will increase. Plus, a food ordering website will help you build & improve your brand image by reaching the right people at the right time.
The benefits of having a food ordering website are becoming evident every day, with online ordering and delivery gradually becoming a norm among restaurants. Here are some important reasons why your restaurant needs an in-house online ordering system.
You make the ordering process easier for customers when you have a website, app or both. Customize the menu and add-on deals plus offers, if any, leading to more sale value per order. Since the whole process is automated and secure, the only thing you need to focus on is the quality of the food you plan to deliver.
An online ordering system can reach a wider audience, thus generating more orders/ revenues than in-store orders because you target a larger group, and sales can be more this way. In addition, you can have a strategy to boost your sales with your presence on social media, and customers have the flexibility to place orders from anywhere, anytime.
Your customer is looking for a quick and easy way to engage with your website. The usability and experience that you provide affect their impression of your restaurant. Right from finding your restaurant online to checkout, it needs to be simple to use and convenient. You can make changes to the menu and keep track of inventory in real-time so guests can order new dishes, leading to improved customer satisfaction.
There has been an enormous % increase in google search for online orders, and locally focussed listing for restaurants are the first thing that customers see. In addition, you can include the online ordering link on prominent places on your website, the order food button on Facebook, the link in bio on Instagram and Twitter, restaurant information on review sites and the order feature on Google My Business profile listing, making it convenient for your customers.
You can capture customer data through your website, through which you can create targeted marketing campaigns and loyalty programs. You can then use it to get more customers online, retain existing ones and get more purchases. You also get more insight into your customer’s spending habits, purchases, preferences and more. You can then customize the recommendations, tailor them as per your customers’ preferences and enhance their experience.
MakeYourWP provides you with the right set of tools that you can use to start building your website right away with a pre-designed food ordering website template with just a single click. The template is simple and accessible to everyone. You can customize it quickly, and it works well even if you are a family restaurant or a large restaurant chain.
With MakeYourWP, you can:
Additionally, you need not worry about managing your website’s technical stuff as its technical team does it all for you. Right from speed, security and backups, everything is managed by MakeYourWP so you can focus on your business. So get organized, streamline your workflow, and make sure you never miss another order.
Using MakeYourWP, you’ll be able to create a food ordering website like this where you can list your food items.

When customers visit your website, they can order food by clicking ‘order’. Once they fill in their address details, they can choose when to receive the order.

When your customer places an order, they can use multiple pay options.

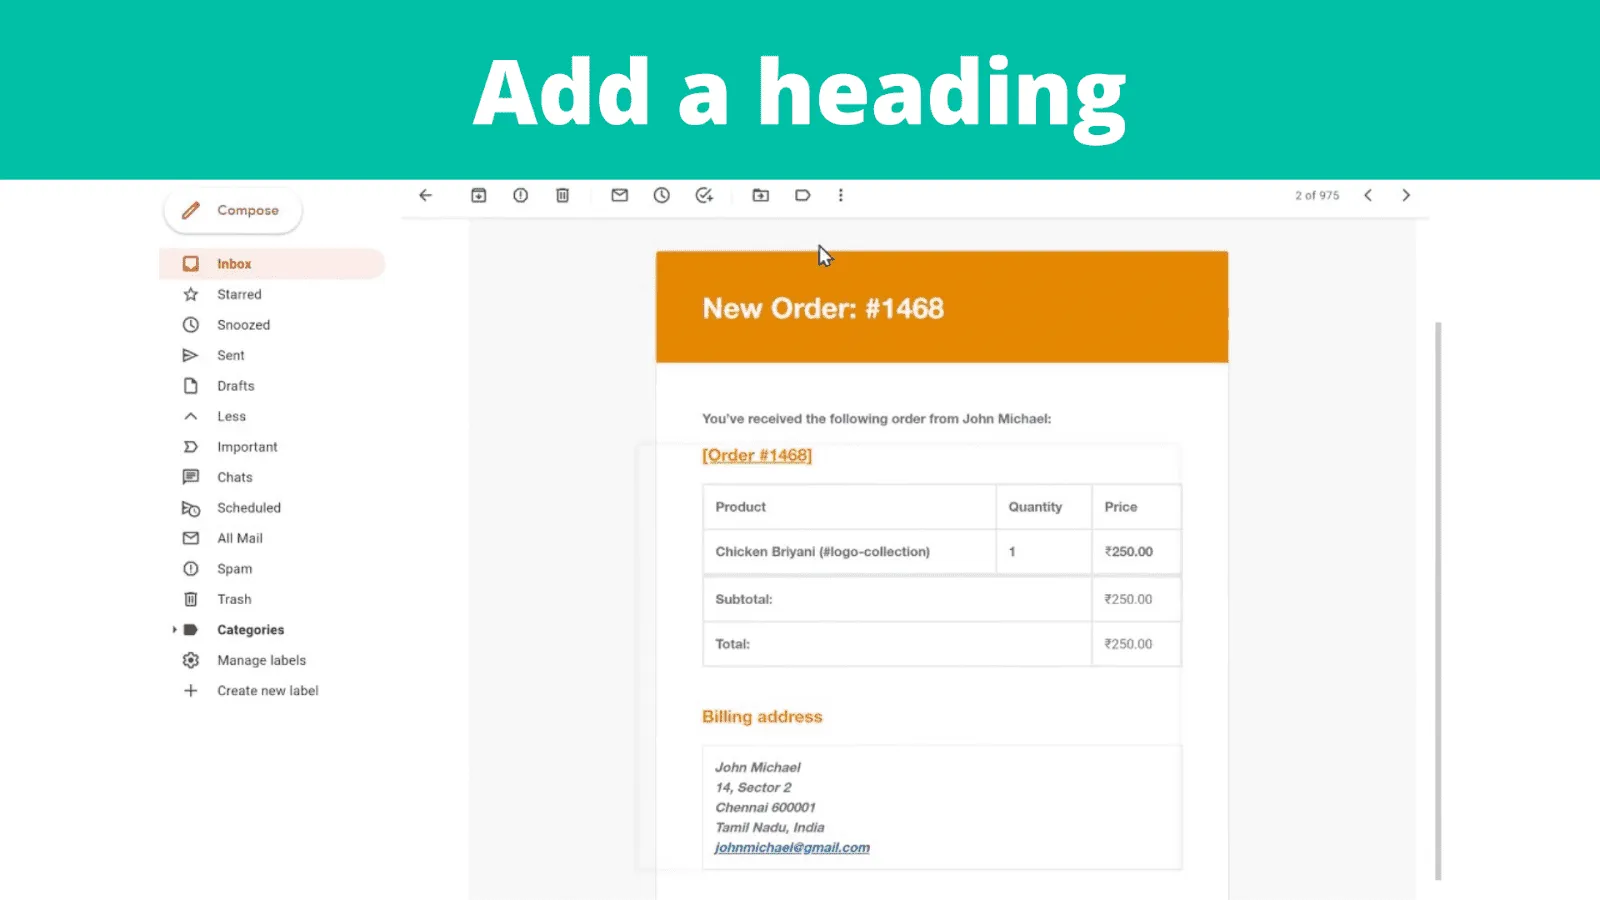
Once they place an order on your site, you’ll receive a mail in your inbox where you can see the order details of the customer.
You will see how you can deliver an order to your customer, by assigning a delivery person.

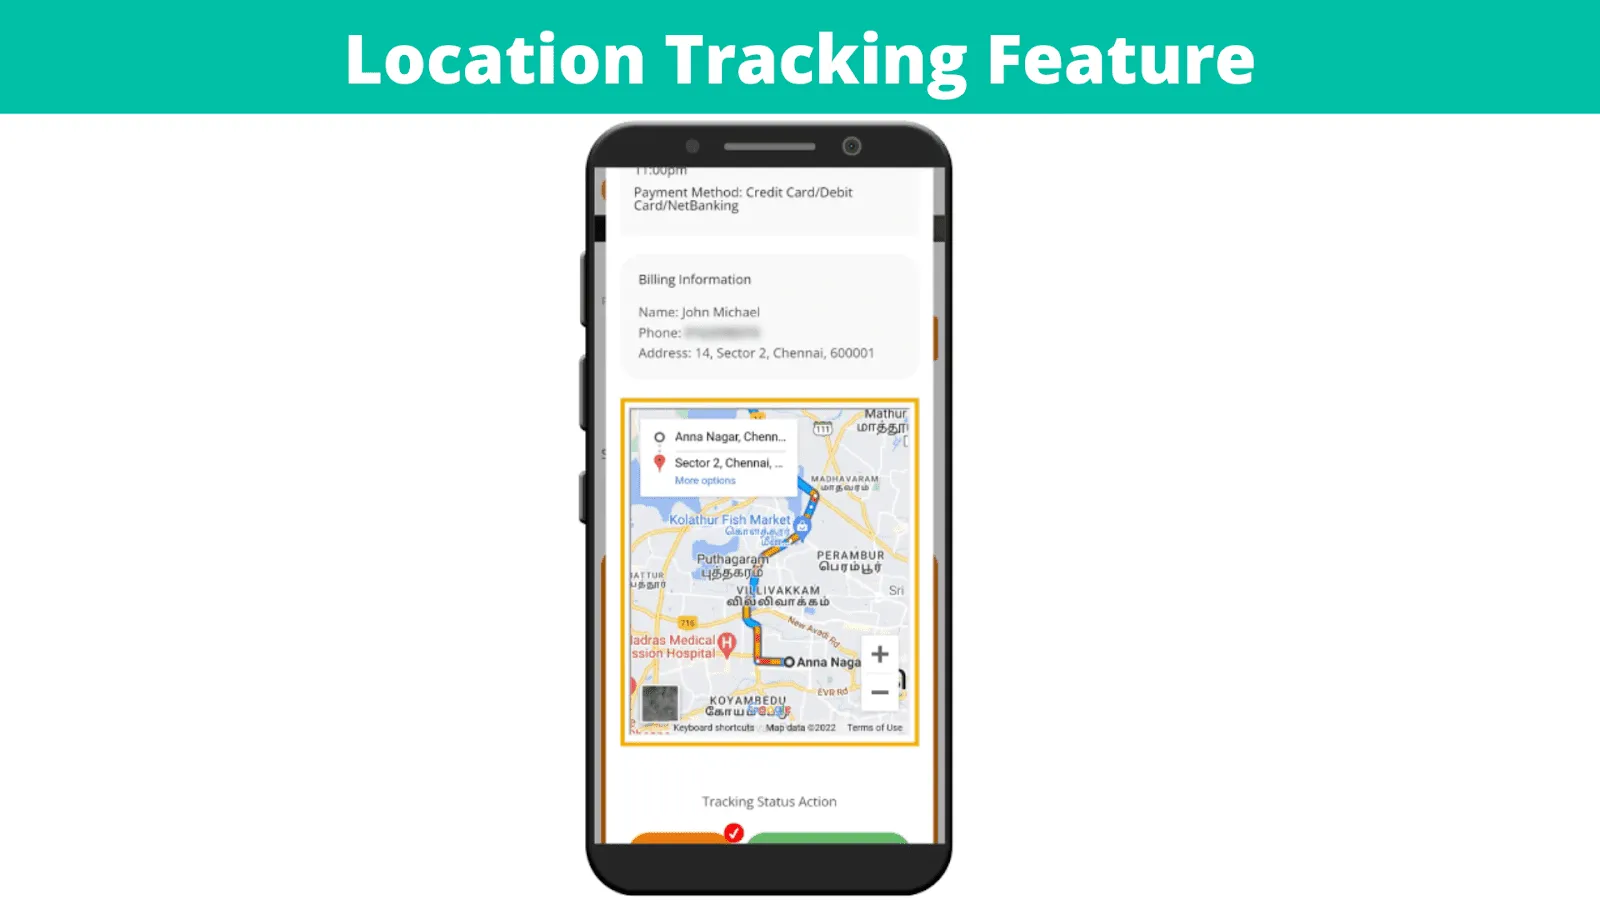
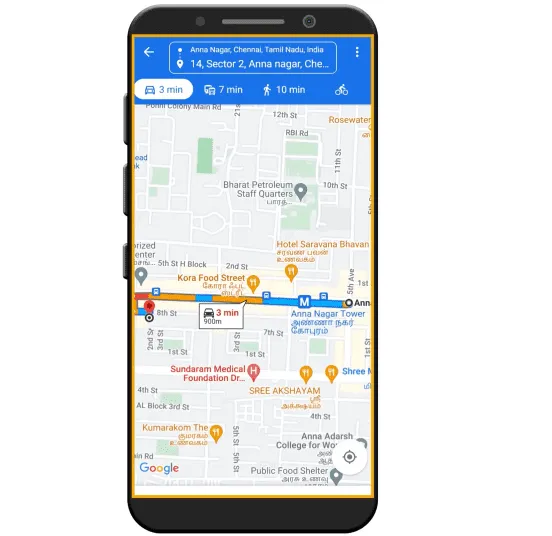
You can add a location tracking feature on your website, which can help the delivery person find your customer’s location and your customer can know where their order is.
And finally, MakeYourWP allows you to customize your site as per your need just by using drag and drop.

So let’s delve right in and see how to create a food ordering website.
You can create a food ordering website in just four steps.
1: Launch your food ordering website
2: Adding food items to your website
3: Adding a location tracking feature to your website
4: Get a custom domain for your website
So now you know what you’ll get after following this tutorial. So, let’s begin.
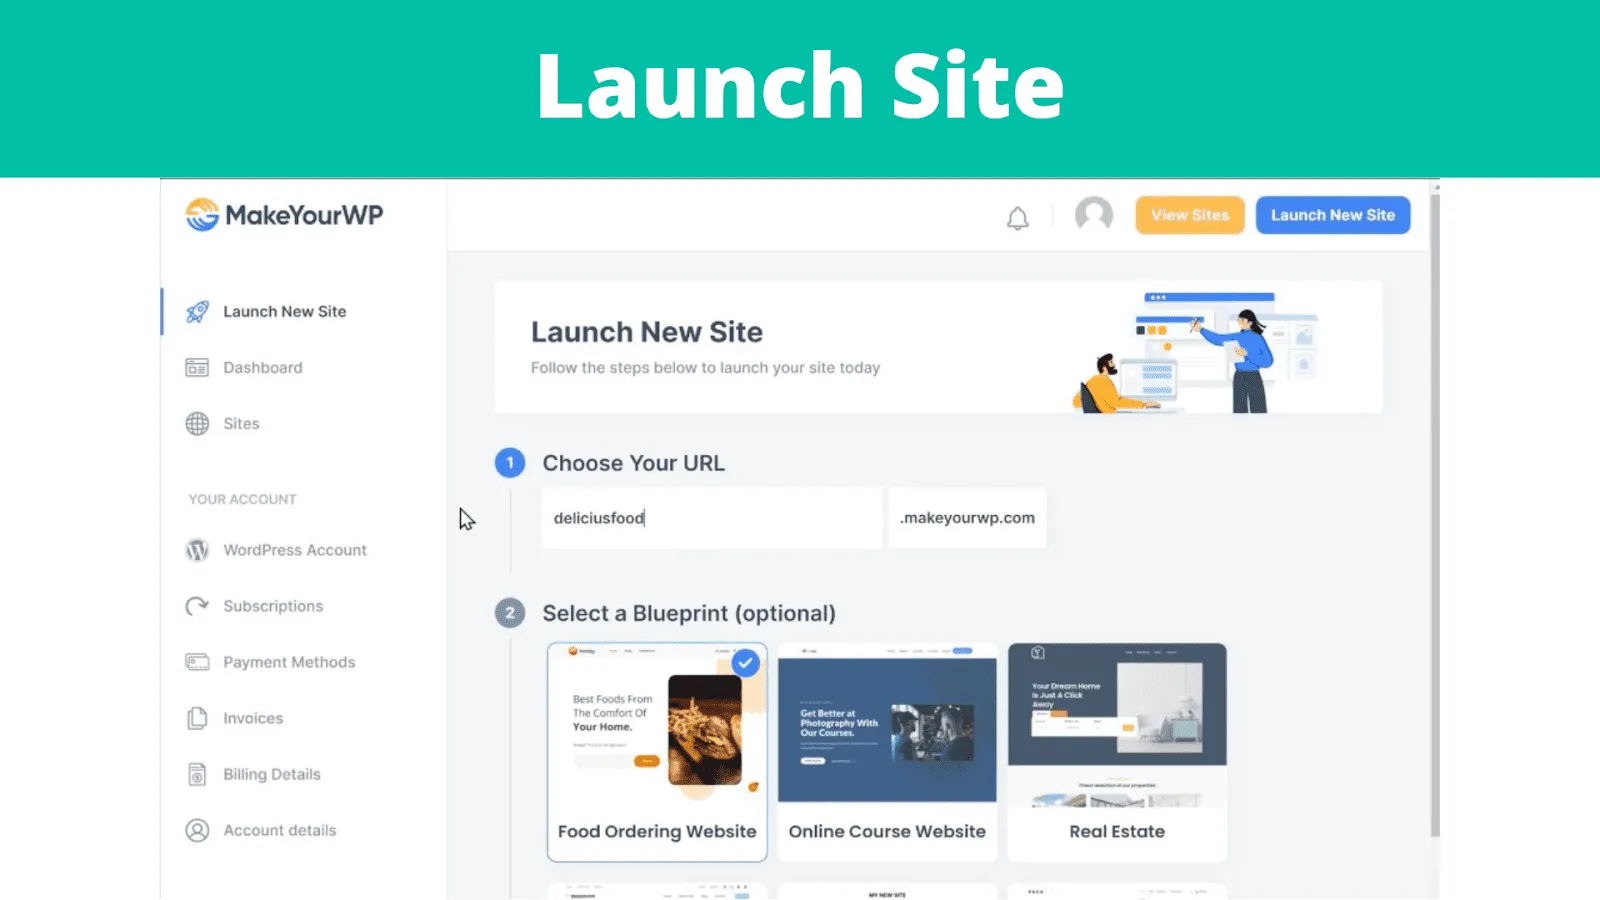
This is where you get your new website live on the internet. So to launch your website, just click here to see how the food ordering site looks. In addition, you can see the pre-designed website template that you can use, which comes with a few default content.

Now to get this food ordering website, you can follow these steps.
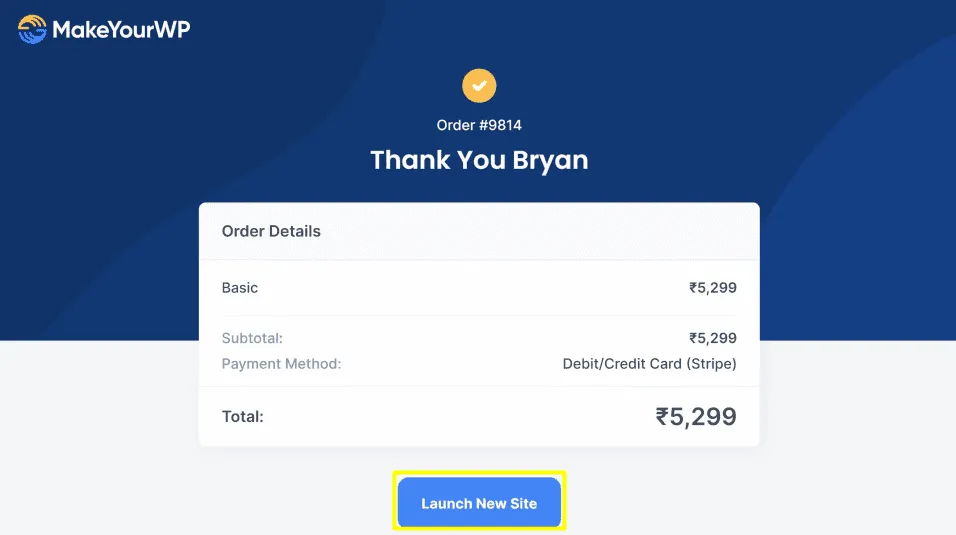
A: Click the ‘launch site’ button
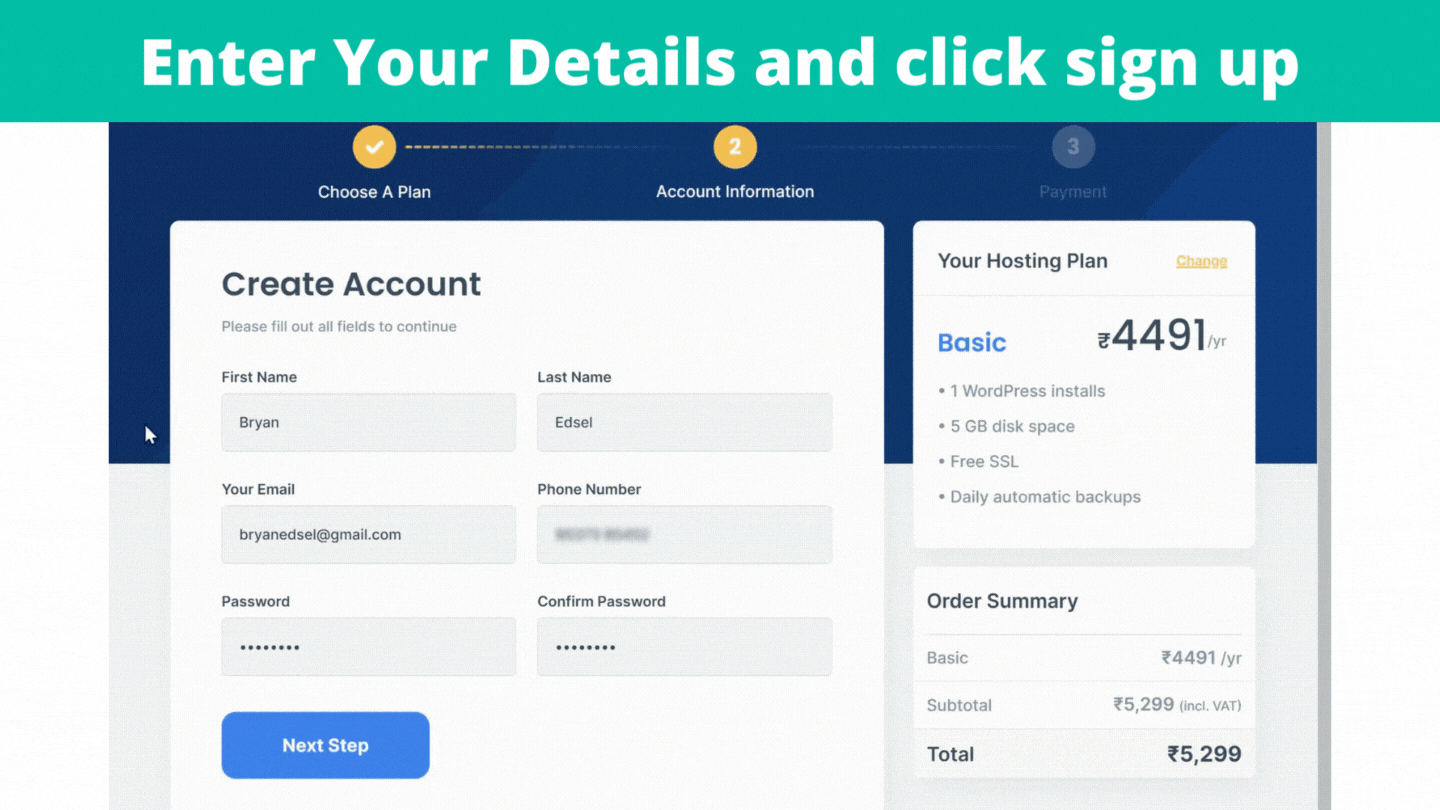
B: Enter your details and click Sign-up
Now you’ve successfully purchased your website. Now to launch your site, scroll down and click “launch new site.”
Next, you need to name your site.
C: Enter a temporary website address that you want in the URL section.
For example, if you give “Pastro” as the restaurant name, then your temporary website address will be ‘pastro.makeyourwp.com’ till you add the domain.
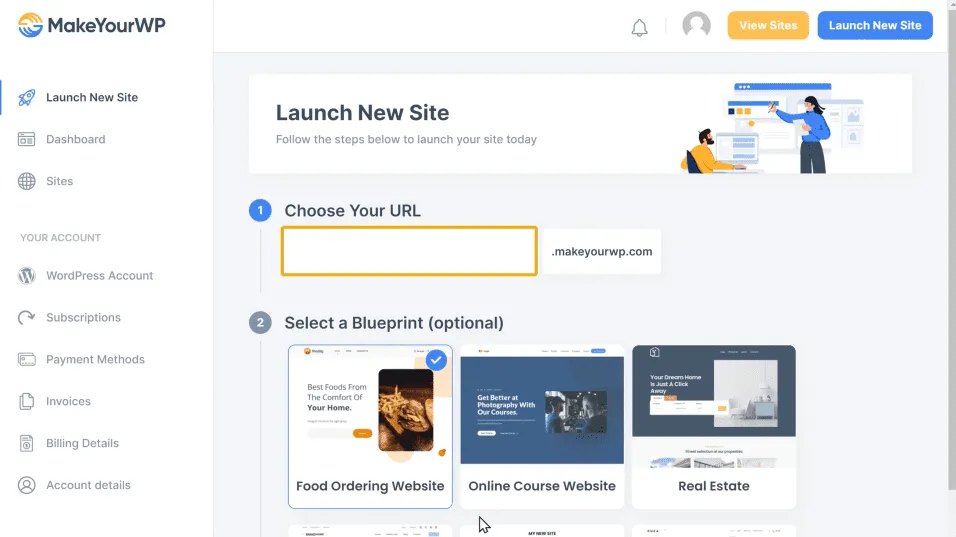
You can see the food ordering website has already been selected. Just scroll down, and enable Advanced Settings. Next, you need to enter any username and password you want that can be used to log in to your WordPress site. You can also give your site name and description here. Once you’re done, click ‘Launch new site’ and then click ‘visit’. You can see that you have got the same site that you saw on the link selected, and some features are missing from the food ordering website!

For all the features to work on your site, you need to install a plugin in WordPress.
D: Buy and Install FoodBook plugin in WordPress
Click this link to get the FoodBook plugin. This is the plugin that will help you to add all the features to your site.
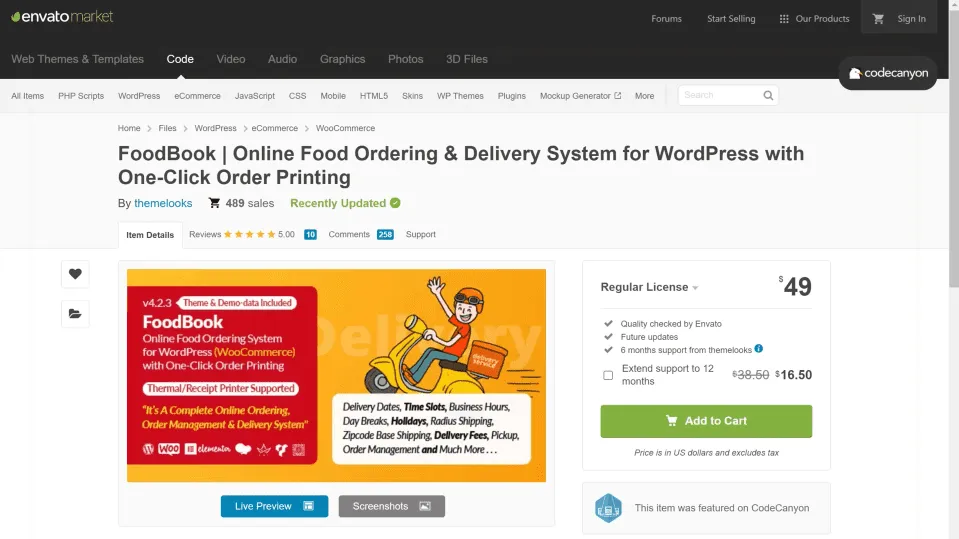
So to get the plugin, click ‘Add to Cart’. Next, click ‘Go to Checkout’ and you need to create an account. Fill in these details and select the payment method. Once you click “make payment”, you can see that you have got an option to download the plugin. Just click ‘Download’ and the plugin gets downloaded.

Now to install this plugin on your WordPress site, you need to upload this file on your website. So go to your WordPress dashboard, to plugins and click ‘Upload Plugin’. You can drag and drop the plugin zip file. Now to install the plugin, click ‘Install’ and click ‘activate’.

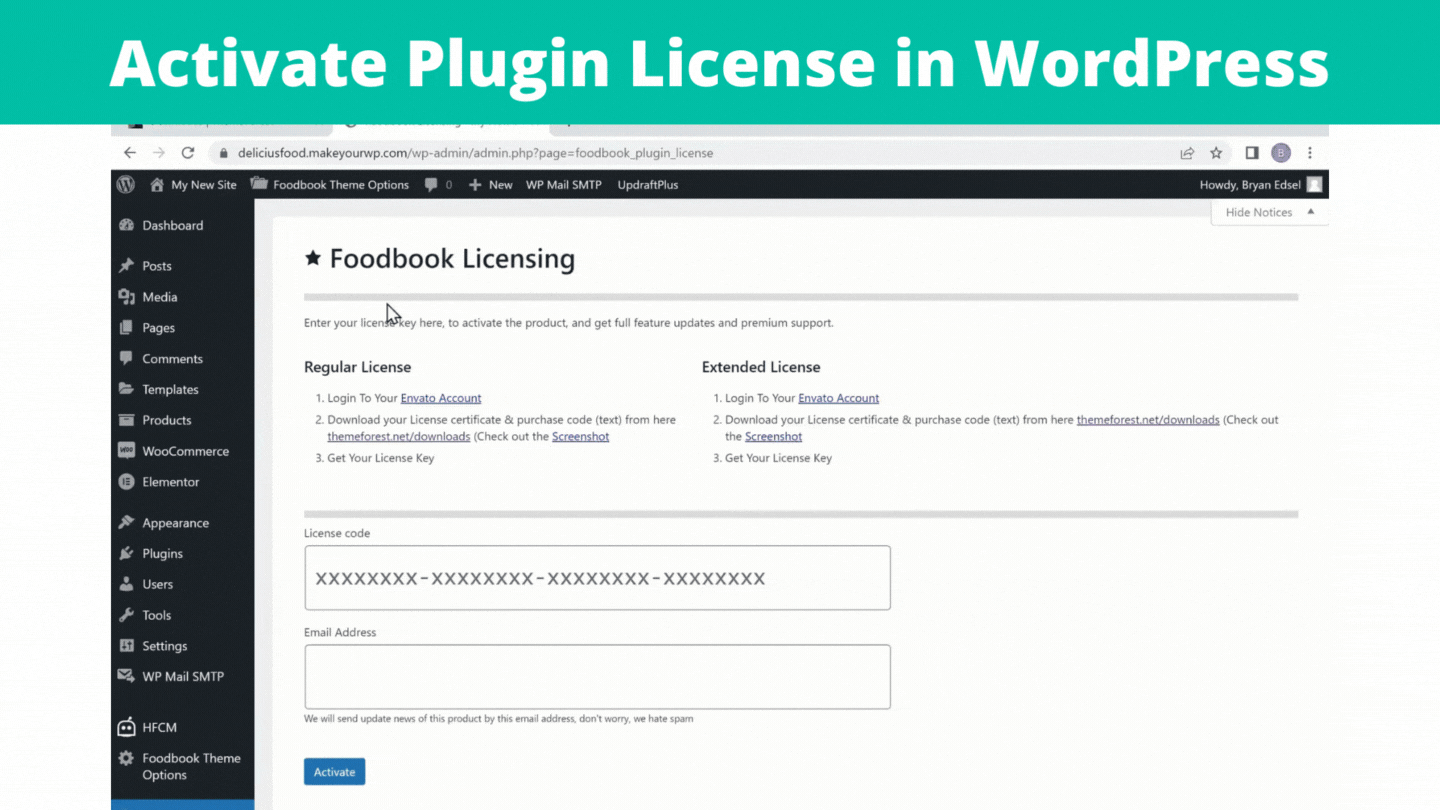
Next you need to activate the plugin license to get full access. So click “Activate license”. To get the license key, go to your plugin account and go to “downloads”. Click on Download and the license key will be downloaded. To get the license, open the document and copy the license.

Go back to your dashboard and paste it here. Give the email address you used to buy the plugin and click Activate.
Now, if you go to your site and click refresh, you can see that you have got the search option and all features are added to your site. You can now place an order by clicking on any dish, selecting the quantity you want and click ‘Add to Cart’. Click on Checkout and here you can give your details and place the order.

You have launched your complete food ordering website.
Now if you see your website, you can see that you have these sample food items.

You can remove these samples and add your own good items, which we will see how in the next part.
So to add your food items, you can do two steps.
Step 1: Delete the sample food items
Step 2: Add your food product
Step 1: Delete the sample food items
To delete the sample food items on your site click “Products”. You can see the sample food items which you have on your site. Just click and select all items. Then click “Bulk Actions” and choose ‘move to trash’. Now if you click ‘apply’, you can see that all the sample food items get deleted. If you go to your site and click ‘refresh’. You can see that the sample food items have been removed.

Step 2: Add your food product
Go to your dashboard and click ‘Add new ’. Enter your product name, price and description. To add the images of your food product, drag an image from your computer and drop it here. Click ‘publish’ once you are done.

Now if you go to your site and click ‘refresh’. You can see the food product that you just added.

In the same way, you can add any number of food items you want.
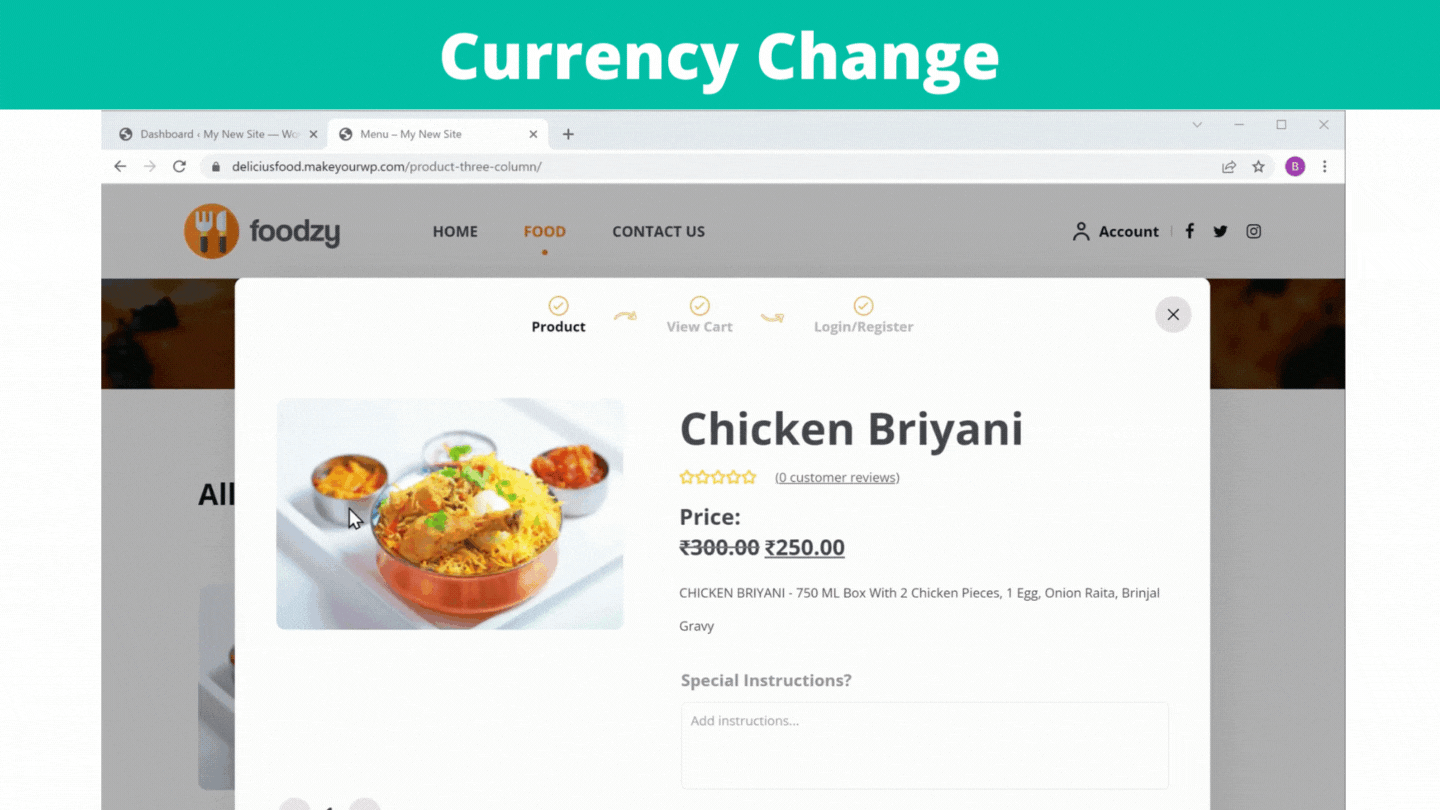
Now here, you can see that the product price is in dollars. Instead of this, if you want to have a different currency, go to your dashboard, then to ‘woo commerce’ and click ‘settings’’. Then, scroll down, and if you click, you can see all the available currencies.
Just select the currency you want and click ‘save changes’. Now, go back to your site and click ‘refresh’. You can see that the currency has been changed.
When a customer orders a food product and clicks “Add to Cart”, then on “Checkout”, it’ll ask them to create an account. So they can fill up their details and click Signup. They can enter their billing details. But here, you can see that “there is no payment method available”.

To allow customers to make payments on your site, you need to set up a payment method. It can be done in three steps.
Step 1: Create an account in “Razorpay”
Step 2: Activate your account
Step 3: Connect this account with your website.
Step 1: Create an account in “Razorpay”
Just click here and it will take you to this site. You can use your email id or use your google account to ‘signup’.

Once you fill in your details, click “Create Account”, you need to select if your business is registered or not. Next, you can choose your average order value, name and contact number. Once you click ‘Next’, it will take you to your Razorpay dashboard.

You have successfully created an account in Razorpay and you can go to the next step
Step 2: Activate your account
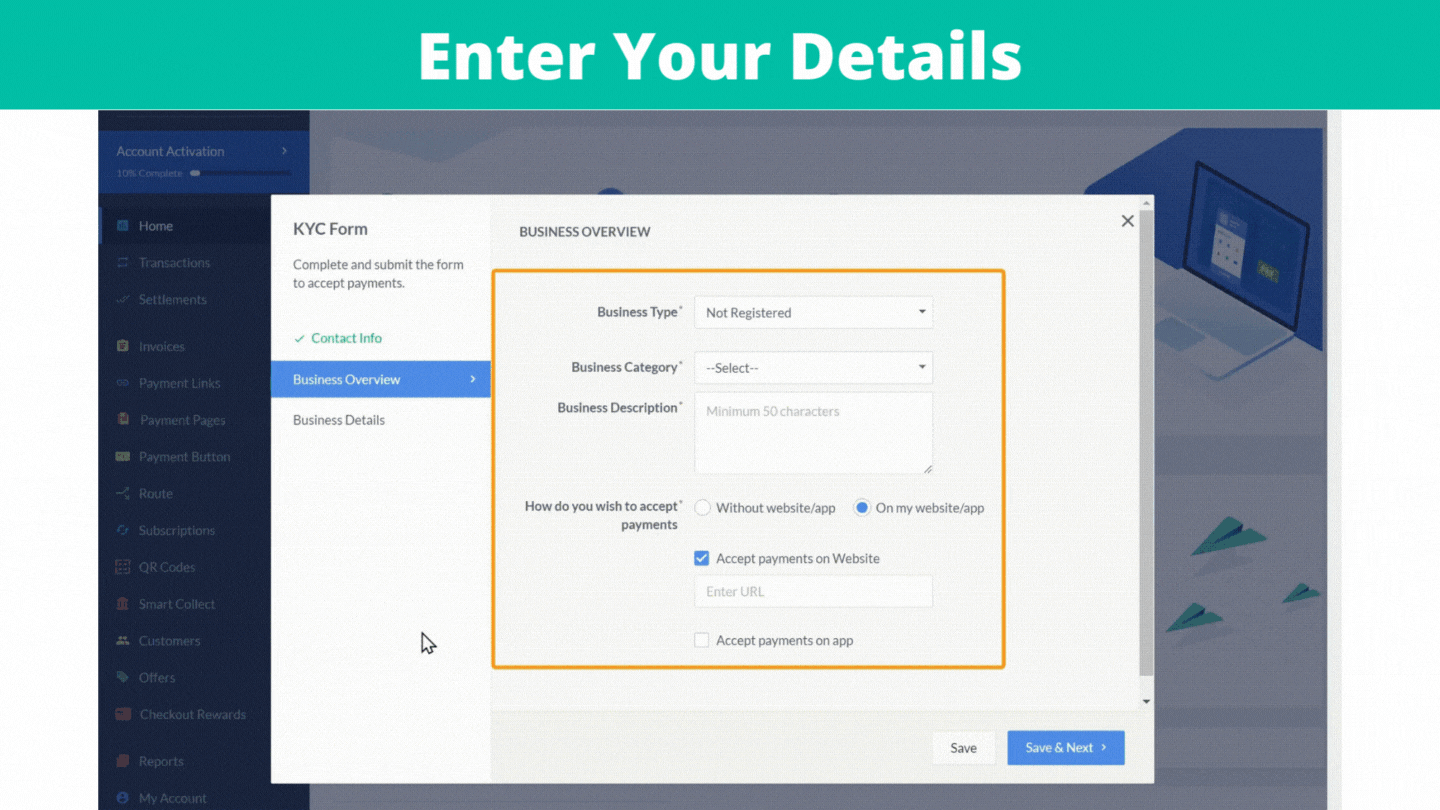
Now to accept payments from your customers, you need to activate your Razorpay account by filling in the KYC form.
So to activate the account, click ‘Activate’. Next, you need to fill in these details such as business type, category, description of your business, average order value, how you would like to accept payments from your customers, your website URL etc. Once you are done, click ‘Save & Next’.
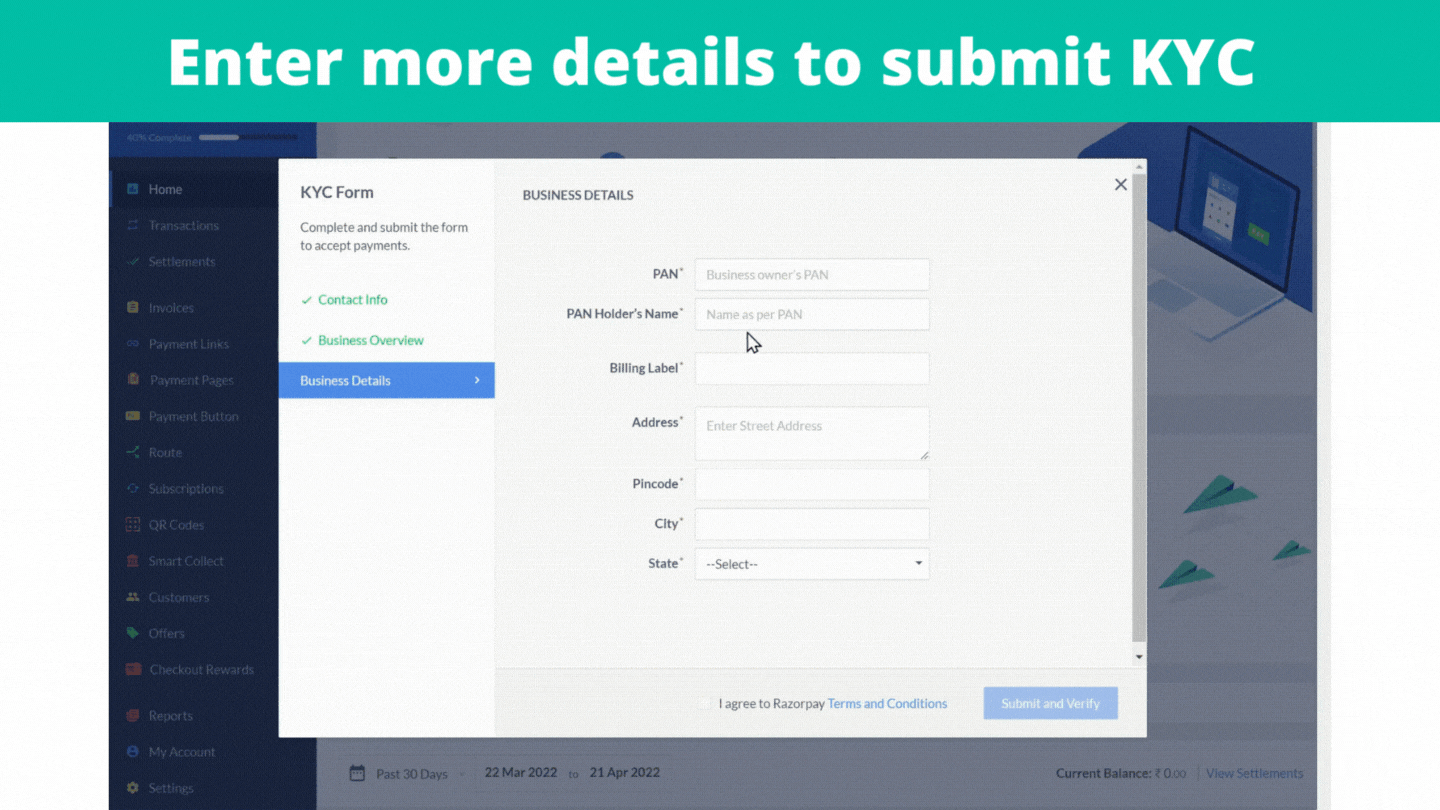
Next, you need to enter your business details such as your PAN number, name on your PAN card, name of your business which is the website name and address. Then, click on ‘Submit and verify’. You will get a box.
To complete the KYC form, click ‘Complete KYC’. Next, you need to enter your bank details, where you want to receive your payments. So when a customer makes a payment on your site, you will receive that payment to this bank account. Once you’ve entered the details, click ‘Save & Next’.
Finally, you need to upload the address proof documents here. Drag and drop your file and then click ‘Submit Form’. Click on the checkbox and click ‘Submit Form’.
So now, you have successfully submitted the KYC form.
Once you have submitted the form, it will be verified within 3 to 4 working days. After four days if you go back to your account, you can see that your Razorpay account has been activated.
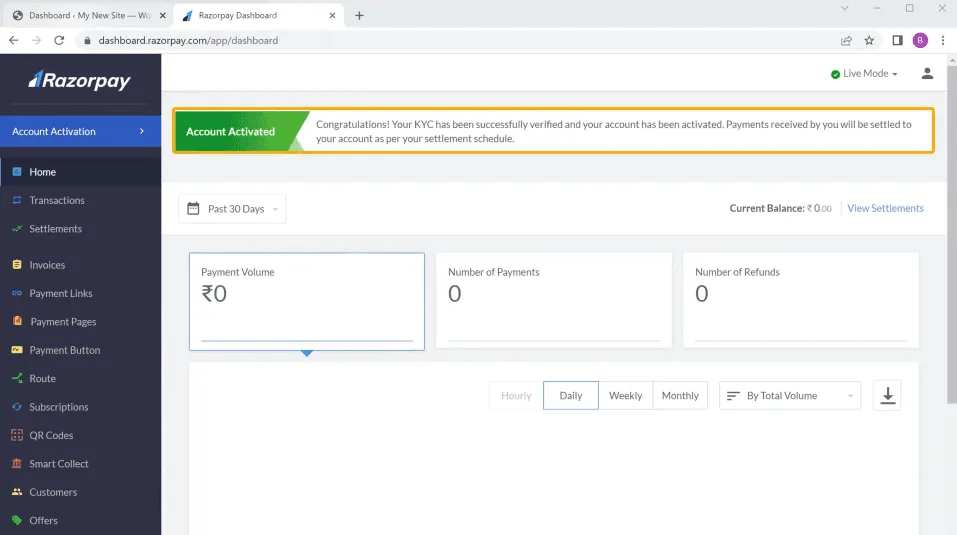
So now you will be able to accept payments from your customers and the amount will be transferred to your bank account directly.
Once you’ve activated your account, you can go to the final step.
Step 3: Connect this account with your website.
To let your customers make a payment on your site, you need to connect your Razorpay account with your website.
Go to ‘Woocommerce’ and click ‘settings’. Now go to ‘payments’, and click on Set-up. Enable this option to connect the Razorpay account with your website. You need these details.

So to get the details, go to your Razorpay account and click ‘settings’. Click ‘API keys’ and click ‘Generate live key’. You need to copy these details and paste them on your site. Once you have entered the details, just scroll down and click ‘save changes’.
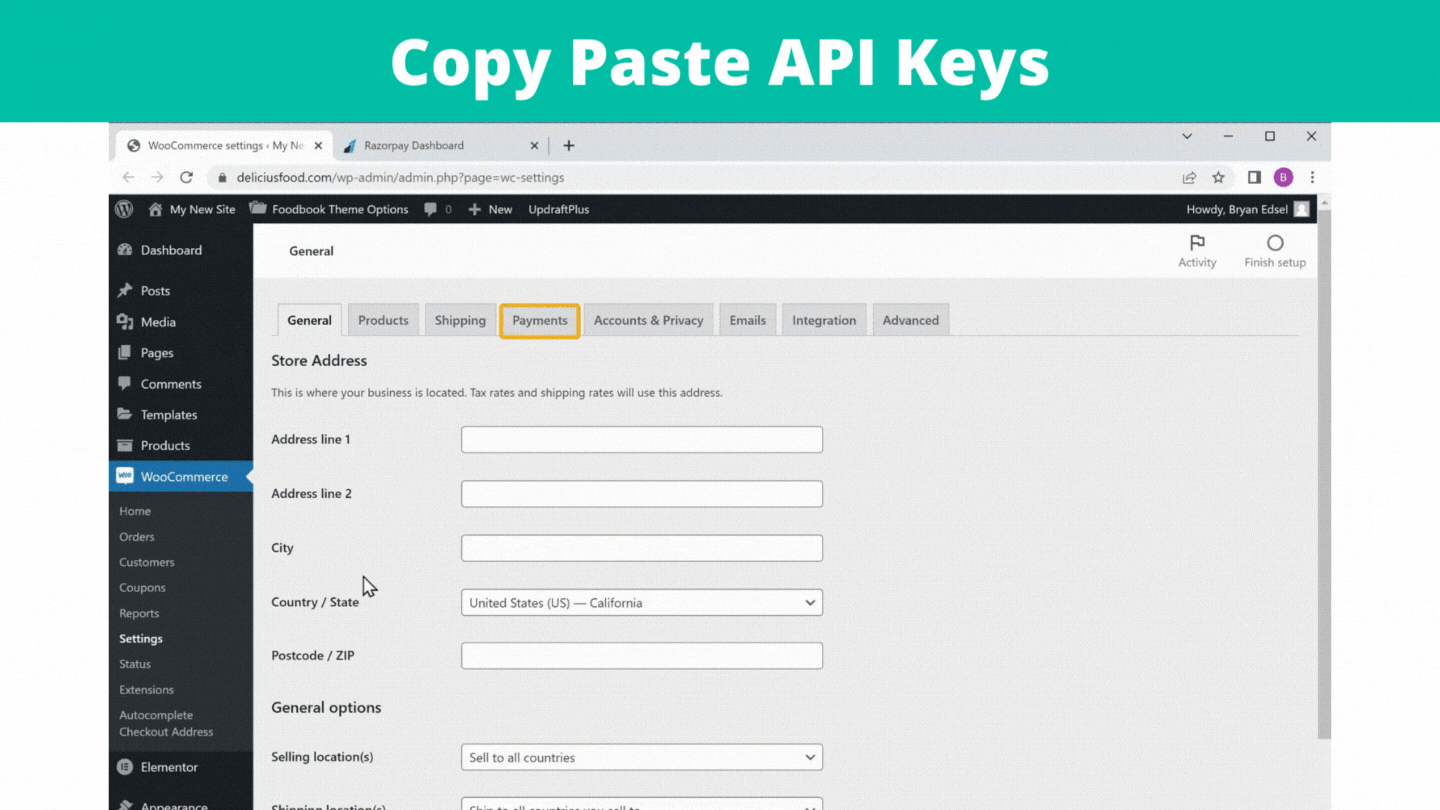
Your Razorpay account will be connected with your website and your customers will be able to make payments on your site using Razorpay.
If you go back to the customer’s checkout page, you can see that payment is not available. But if you click ‘refresh’, you can see that the Razorpay payment has been added and your customers can make payments on your site. In addition, once they try booking an order, you can see that the order has been placed. They can also track their orders.
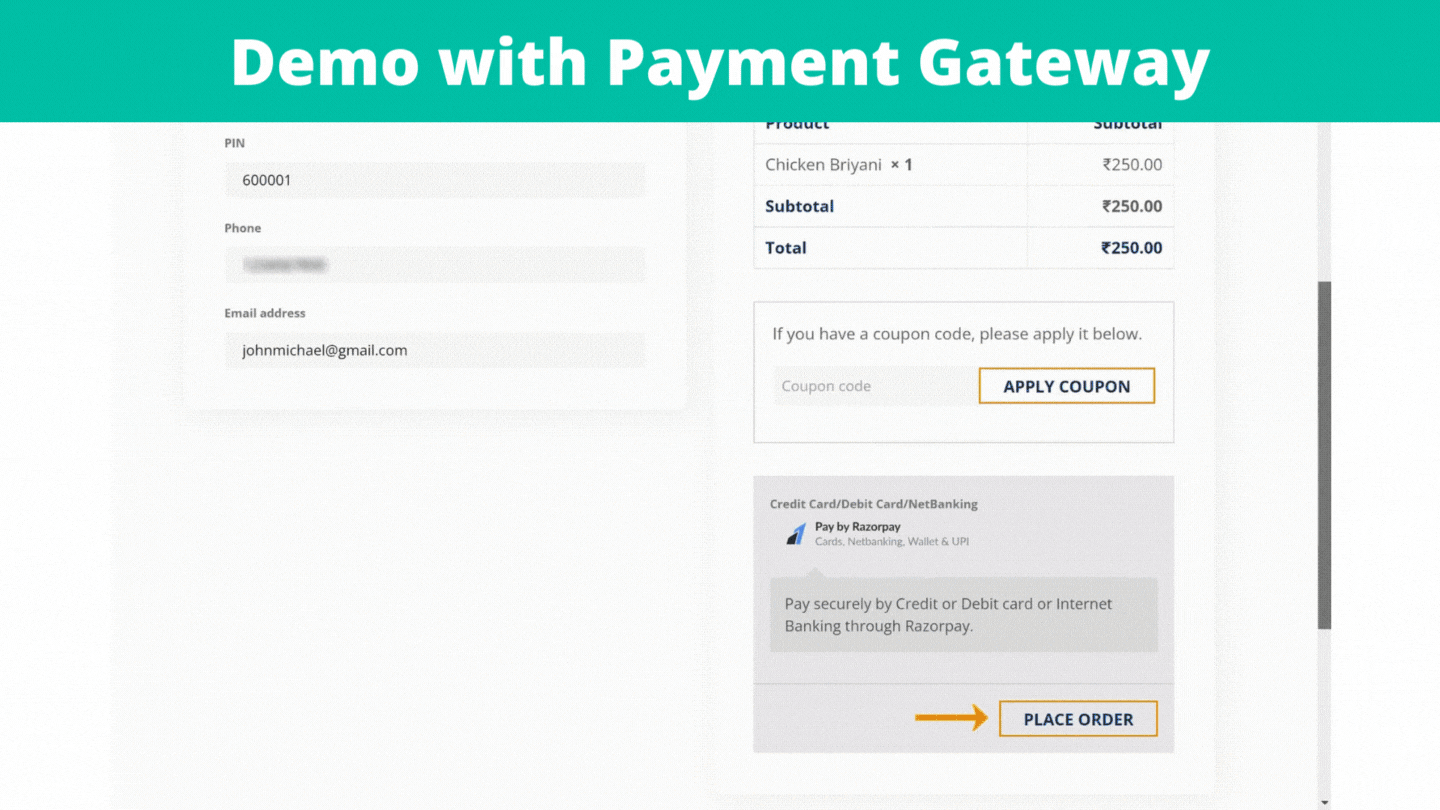
This is how your customer can place an order and make a payment on your site.
Now, as soon as someone places an order on your site, you will receive email notifications in your inbox. If you go to your inbox, you can see that you have received two emails. The first email is from Razorpay with all the details of the payment. The amount will be transferred to your bank account in 3 days. The second one is from WordPress, with the details of the order.
You can also see the orders from your dashboard. Go to your WordPress dashboard, go to FoodBook and click Orders. You can see the orders you have received if you click ‘view orders’. You can also set the order status, and you can see your tracking status has changed.
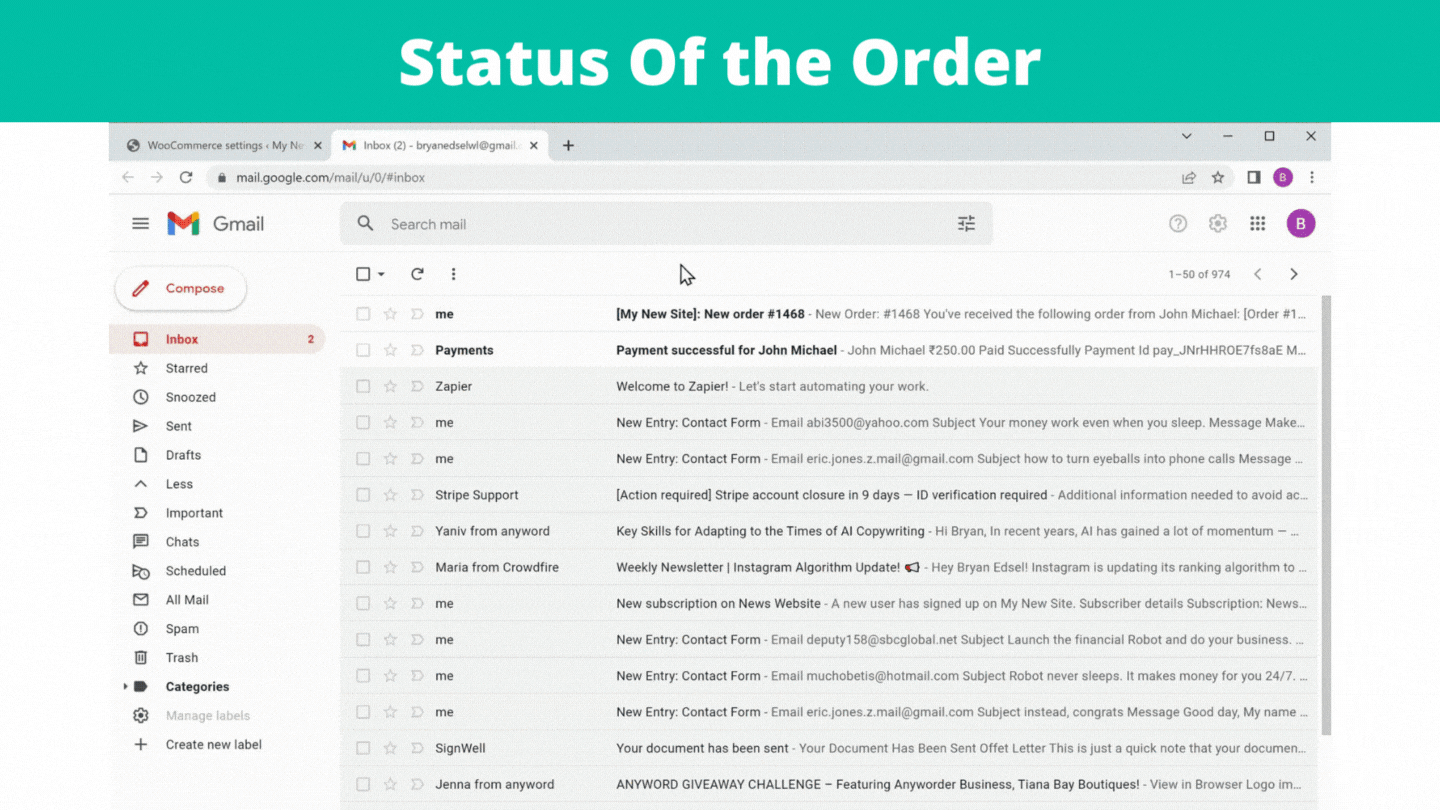
Now if the customer checks their inbox, you can see that they’ve received an email with an update about their order status.

Now if they go back to Orders on your website and click refresh, they can see their update here too.

This is how you can know when someone places an order on their site.
When a customer places an order on your site, you need someone to deliver the food to your customers. So to add a delivery person, go to your Dashboard, click Users and then on ‘All Users’. You need to enter the details of the delivery person, so click here and assign the role as “Delivery Boy”. Click “Add new user”, and the new delivery person is added.

In the same way, you can add as many delivery persons as you want
Now, if the delivery person goes to their inbox, they can see that they have received an email. They can see a username, and if they click this link, they can set their account password. Once they log in, the delivery person’s dashboard looks like this.

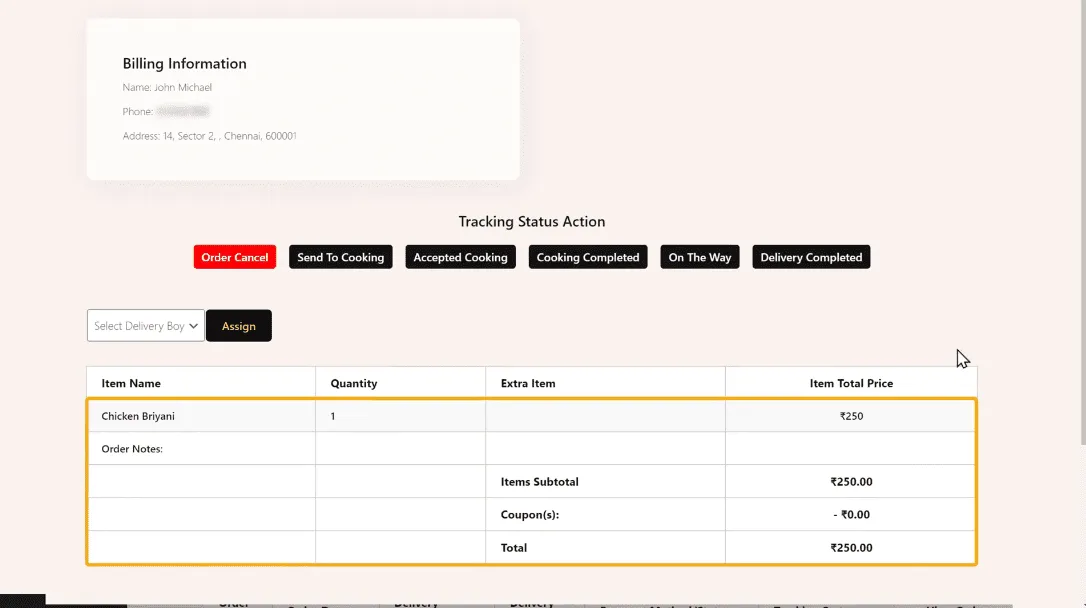
Now you can assign an order to the delivery person. Go to your Dashboard and click FoodBook. Click on View Details on the order you received. Click here, select the delivery person and click “Assign”. Once the order is assigned to him, the delivery person will get a notification. If the delivery person goes to their Dashboard and click
“view details” they can see complete details of the order and delivery location.

Now, if you see here, you have got the address details. Instead of this, if you want to get the location on a map like this. You can do that by adding a tracking feature to your website, which brings us to the next part.
A: Get the Google Maps API key
Go to your WordPress Dashboard, ‘FoodBook’ and click Location settings. To enable location tracking on your site, you need to get the Google Maps API key and enter it here. So to get the API key, click this link and sign in to your Google account. Next, click ‘Agree and continue. You have successfully signed in to Google Cloud Platform.

B: Activate the free trial of Google Cloud Platform
Click Activate, and here you need to give some information about yourself to use the free trial. Select your country and provide a phone number to receive a verification code, account type, and card details. The details will be used only for verification, and you won’t be charged when the free trial ends. Finally, click ‘Start Free Trial’.
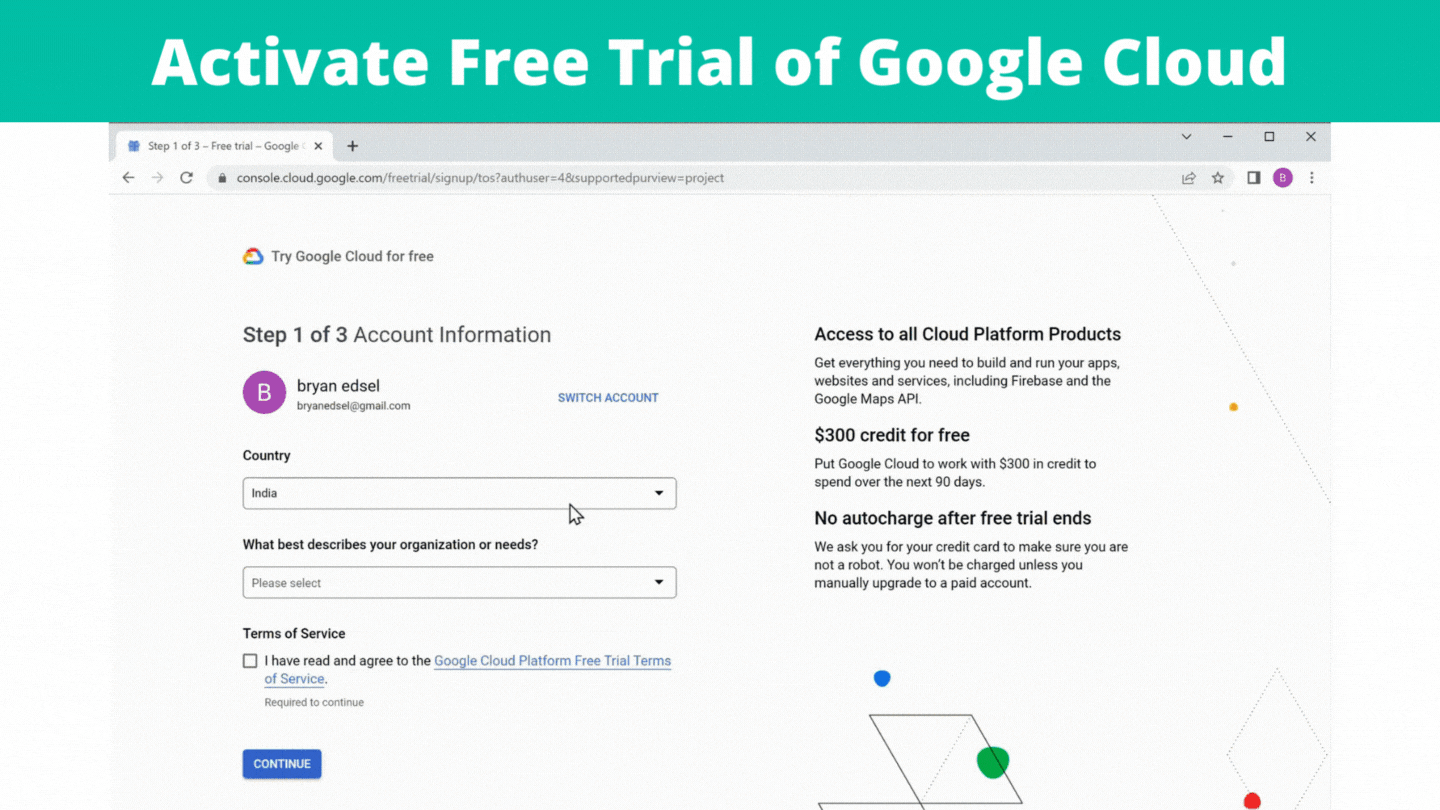
So now you have successfully activated the free trial of Google Cloud.
To get the Google Maps API key, click here and then click new project. Enter the name you want, click and select “My maps billing account”. Next, click and go to APIs & Services. Select Library, and it will take you to a page where you will find the APIs for Google Maps. To get the API key, you need to enable these 2 APIs. Then click Credentials and then click Create Credentials. Select API key.

C: Enable location tracking on your site
Once you get the API key, you need to add this to your website to enable location tracking. So copy the API key, go back to your dashboard and paste. Once you’re done, click Save settings. You can now add your location by typing in your location.
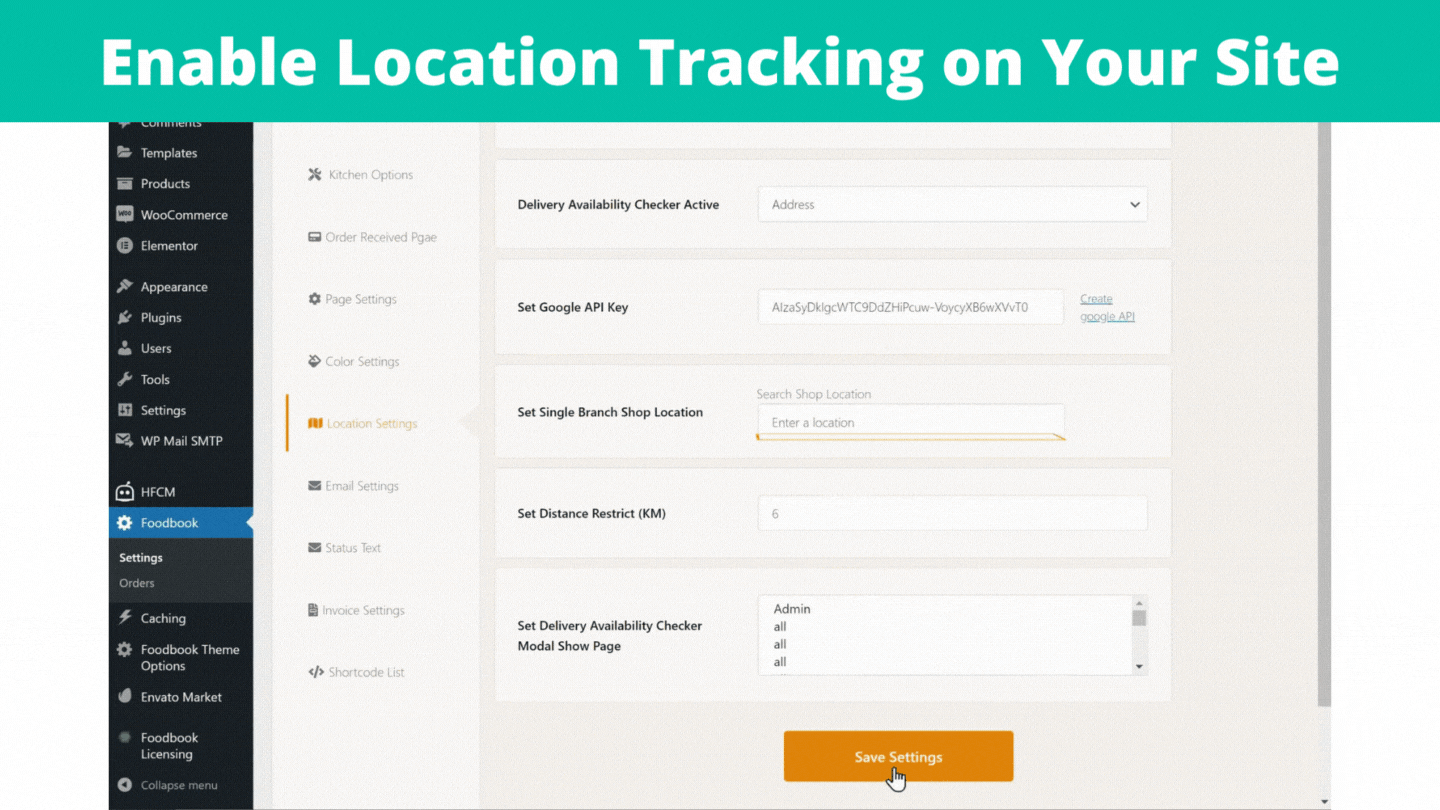
Now, if you want to deliver orders only to a certain distance, you can do that easily. So once you add a distance, only someone within that distance can place an order. Once you are done, click Save settings. You can also test it from different locations to see how it works.

You have successfully enabled Google Maps services on your site.
Let’s now see a complete order demo

D: Auto filling the address details
As you saw earlier, while placing an order, the customer has to type the address manually while placing an order. Instead of that, if you want to auto-fill the address details of your customers, you can enable the auto-filling feature. You will get the customer’s exact location by allowing this, making it easier for the delivery person to deliver the food.
Now to enable the auto-filling feature, you need the Google API key. So go to your WordPress Dashboard and then go to FoodBook. Click on Settings and then go to Location settings to copy the API key. Now go to WooCommerce and click Autocomplete address for Woocommerce. Paste the Google API key here and click Save Changes.

If you go to your checkout page, click refresh, and if the customer tries to enter their address, you can see address suggestions. The customer can select their address and proceed with the order quickly.

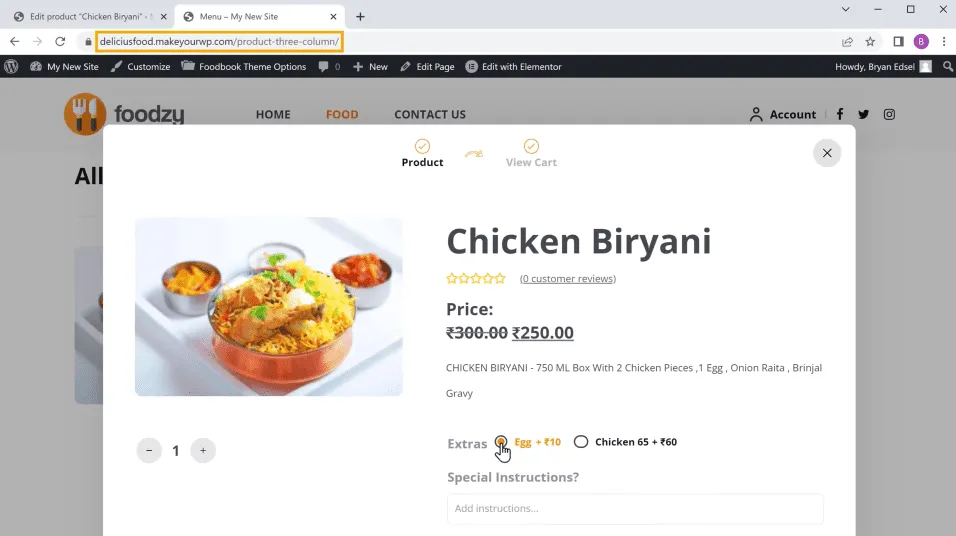
Next, let’s see how you can add extra food options to your customers when they order a product.
Go to your WordPress Dashboard, then go to Products. Now click on the product and scroll down. Next, click Add Features and give a name for the section. Now you can provide a name for the add-on and its price. Once you are done, scroll up and click Update.
If you go to your site, refresh this page and click on the food product, you can see the add-ons you created. Your customer can now add this to their order if they want.

If you go to your website, you can see that your website address ends with makeyourwp.com.
Instead of this, what if you want your website to have a simple address, like yourwebsitename.com, which looks more professional. Then, you can get your domain name for your website, which brings us to the next part of the tutorial.
A domain name is the name of your site, and hosting stores all your site files in one place. Therefore, having a good name is essential as it represents your business online. Take your time and weigh up multiple options before you choose one.
It would be best to choose a good hosting provider that offers excellent performance, automated backups, top-notch security, and more. You already have hosting on MakeYourWP for your site, and you will see how you can get a unique domain for your hotel booking website.
A: Enter any name/domain that you want for your website
To get your domain name, click on this link, and it will take you to webspacekit.com.
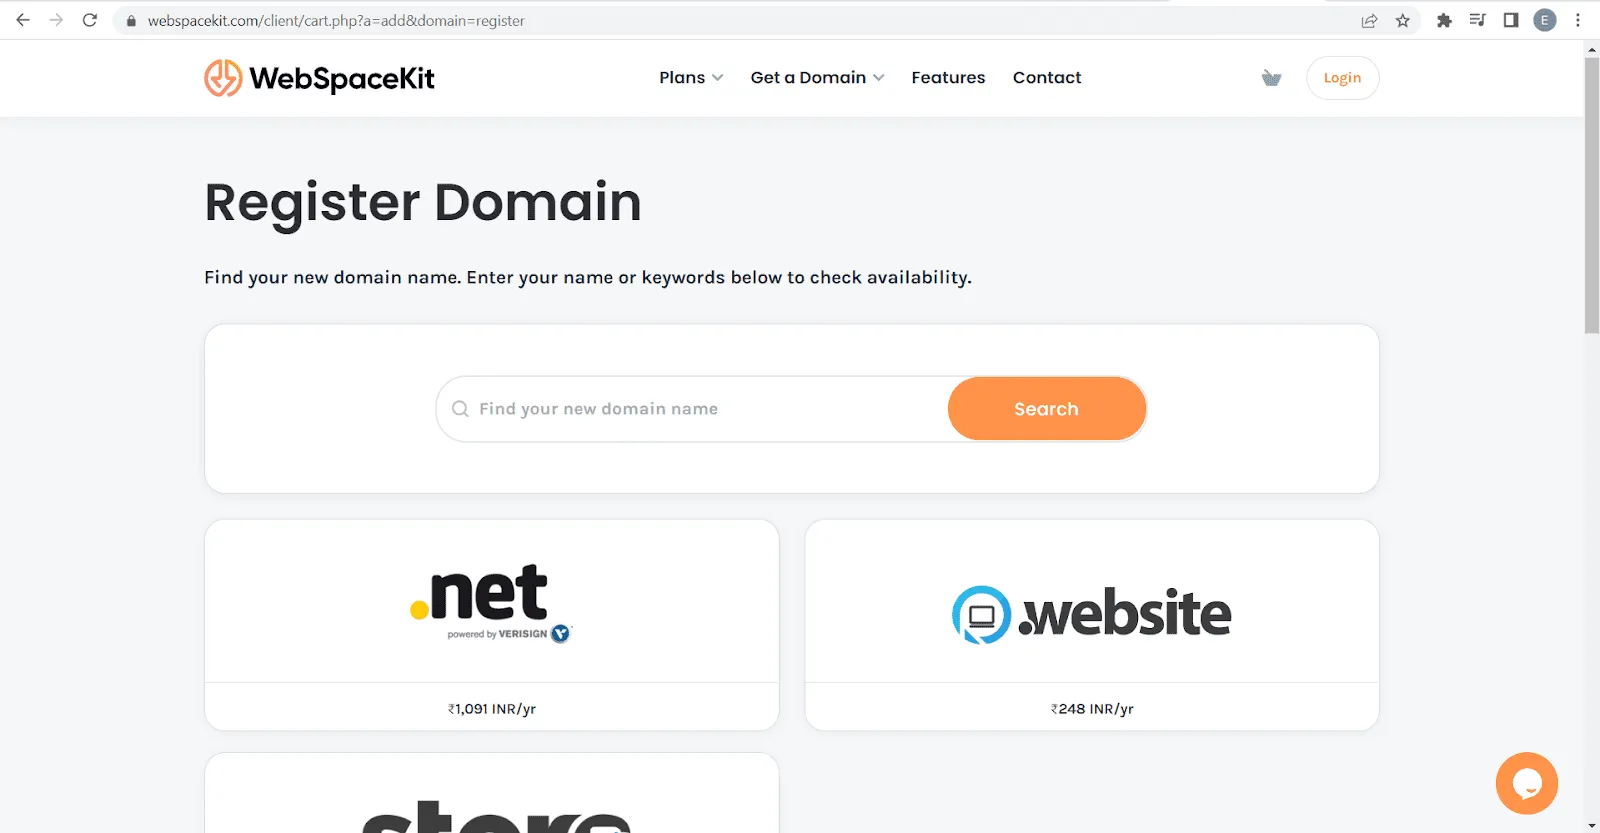
Now, enter the name you want for your website and click ‘search’. You can see that this domain name is available. Just click ‘Add to cart’ and click ‘continue’ to get this name for your website.
It will ask you to select a hosting plan. As you already have hosting for your site on MakeYourWP, let’s click ‘skip’. It will take you to the cart page. You can see that you are getting your domain for one year, and after one year, you need to renew your domain to keep using it. So to get this domain, fill up your details and your payment details. Click ‘Order now’’ to get the domain.

B: Connect this name/domain to your food ordering website
You are going to do two steps.
Step 3.1: Add a domain to your website
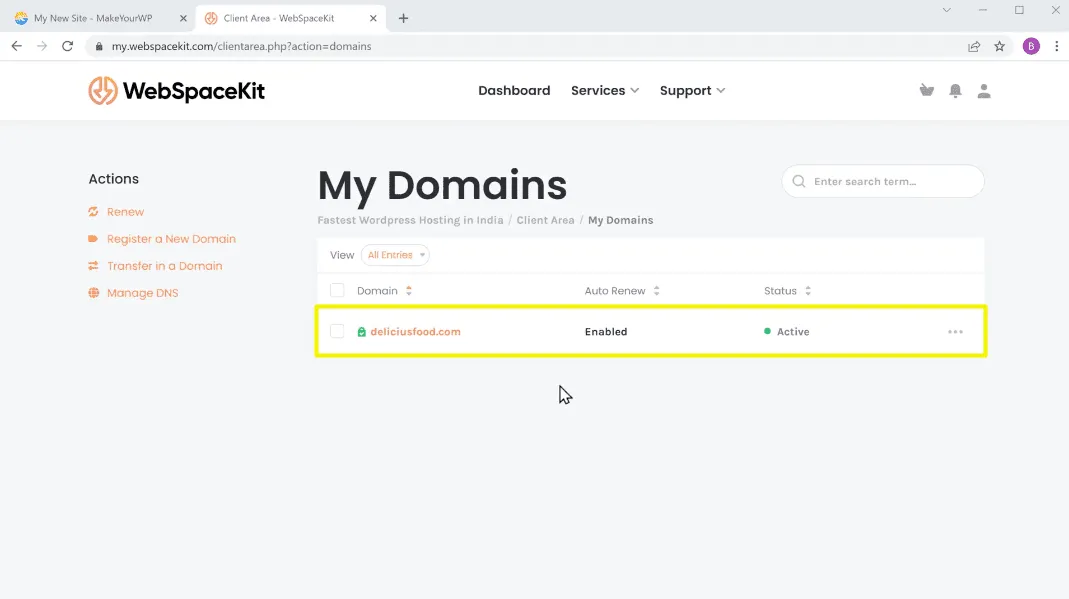
Go to domains and enter the domain name which you purchased.
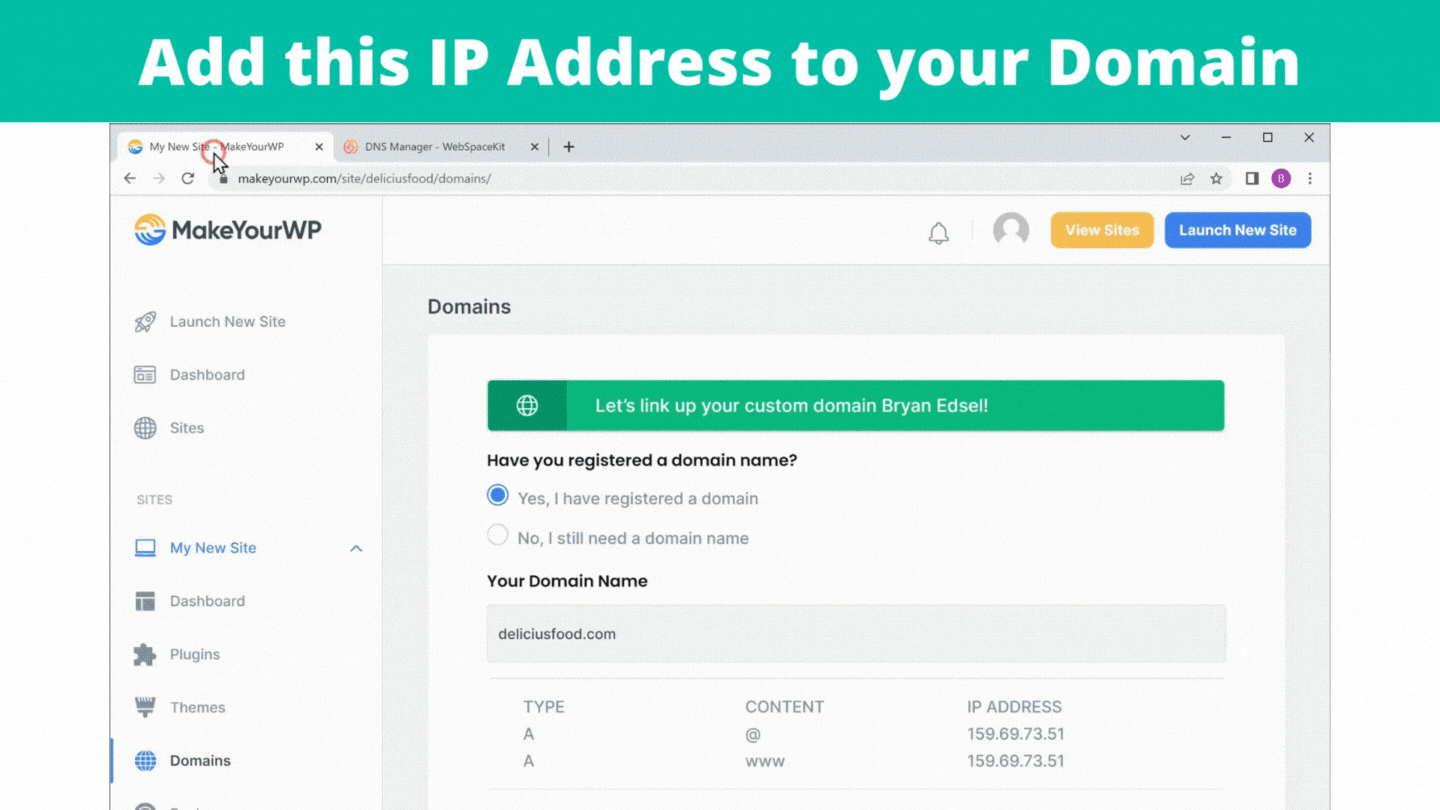
Step 3.2: Add this IP address to your domain
Click domains and select the domain which you purchased. Click “Manage DNS”, and next to the “A” record, you need to add your IP address. Go back, copy the IP address and paste it. Click save changes.
To connect the domain, go back to MakeYourWP to enter the name of the domain/website you purchased and click “Connect domain”. You’ve successfully connected your new domain name with your website. So to check it, open a new tab, type your new domain name and press enter.
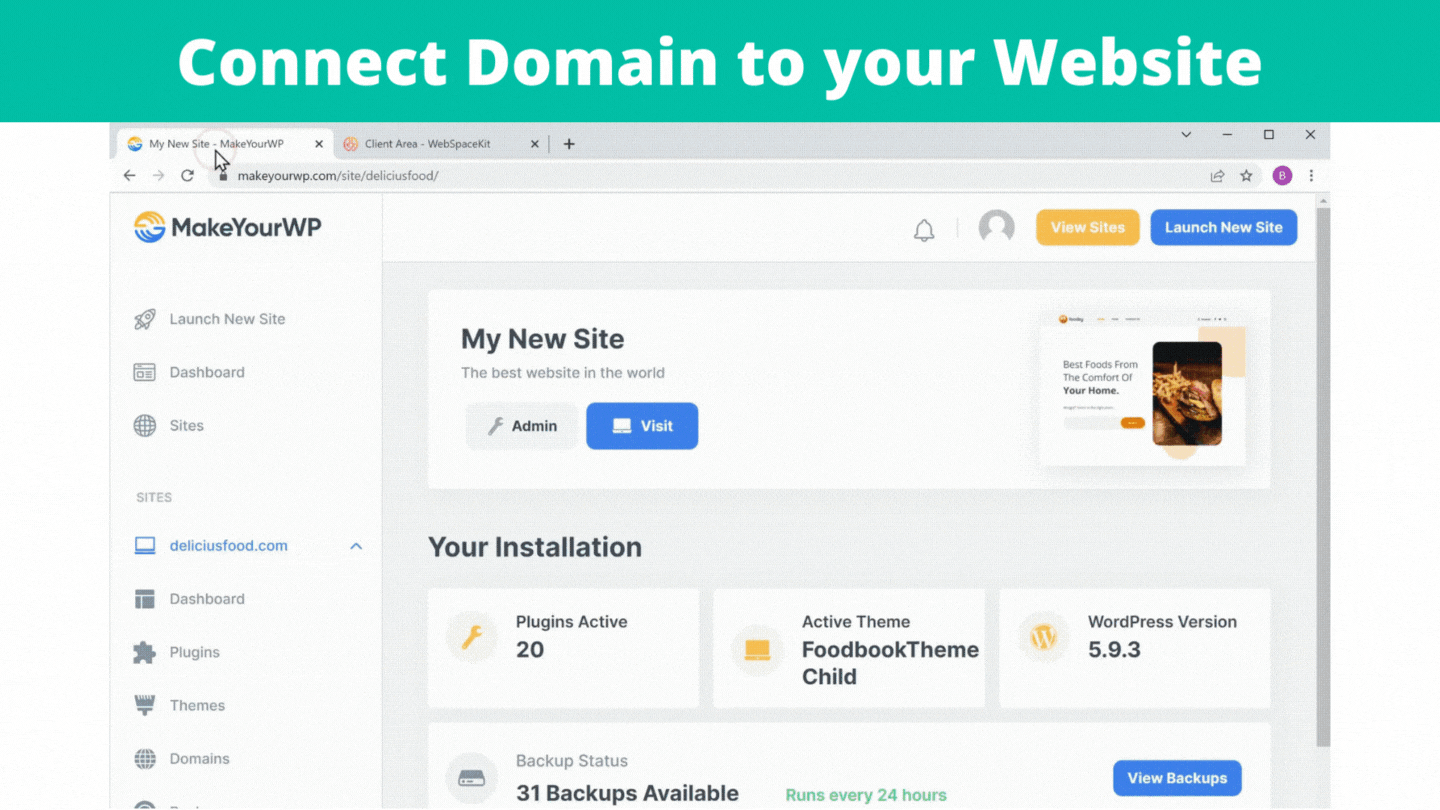
You can see that you’ve successfully connected your domain and got your food ordering website. Your customers can go to your domain name to access your site and place orders quickly.
So this is how you can get your domain name for your website.
Let’s see how you can edit the content of your website. So to edit the content, go to any page you want to edit and click ‘Edit with Elementor’. It will take you to the editing section, where you can edit any part of the page.
A: Change home page text
Just select the text and enter the text you want.

In the same way, you can change any text you want on the page.
B: Change the background image.
Just go to the section and click edit section. Then, go to the Style tab to find the background image for that section. Now, click ‘choose image’ and drag and drop it from your computer to change it.
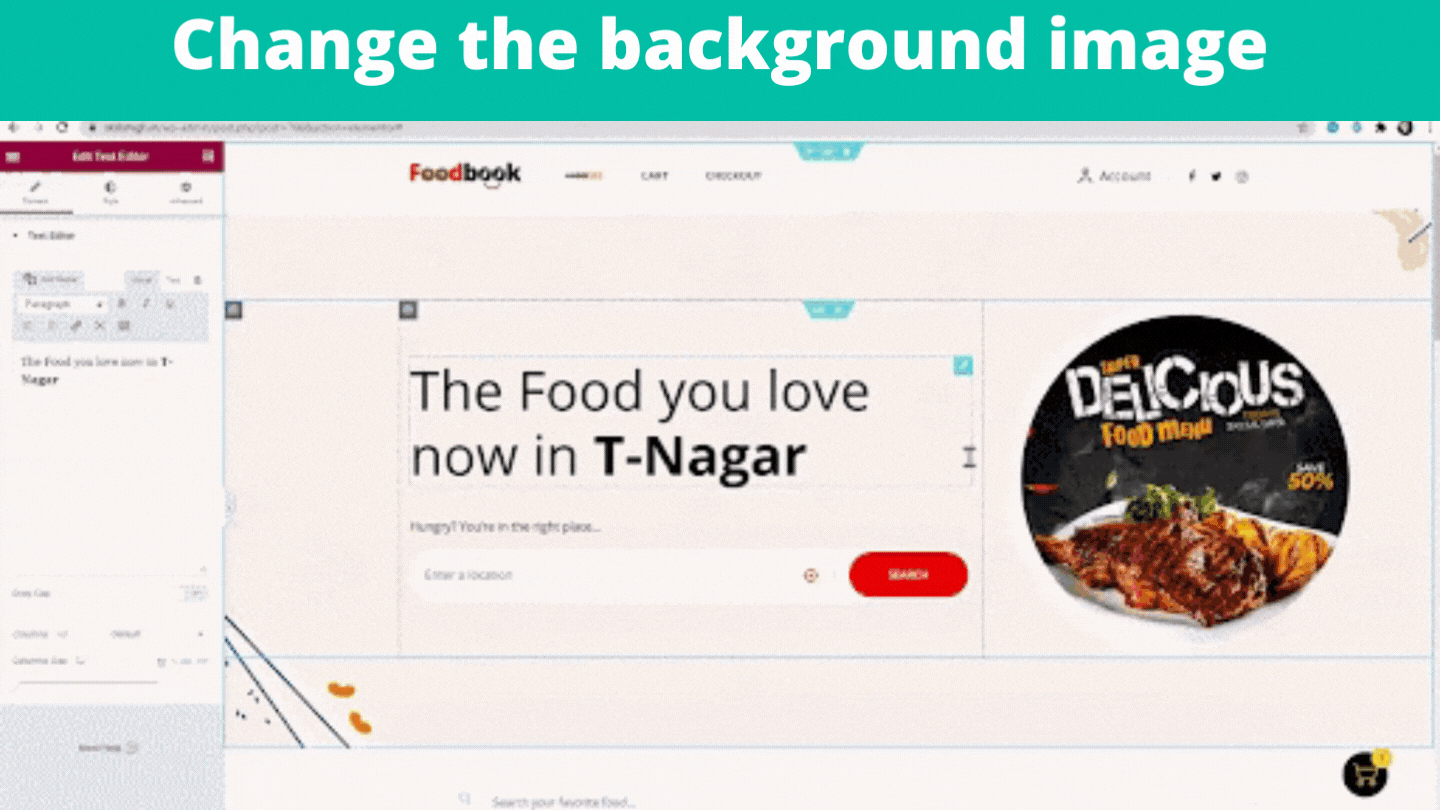

In the same way, you can change any image on this page.
If you want to edit a section, click on it. Give a name you wish to, and to add an image, drag and drop an image from your computer. Once you’ve done the changes, click update.

Now, if you go back to your site and click Refresh. You can see that your site has been updated with the changes you made.

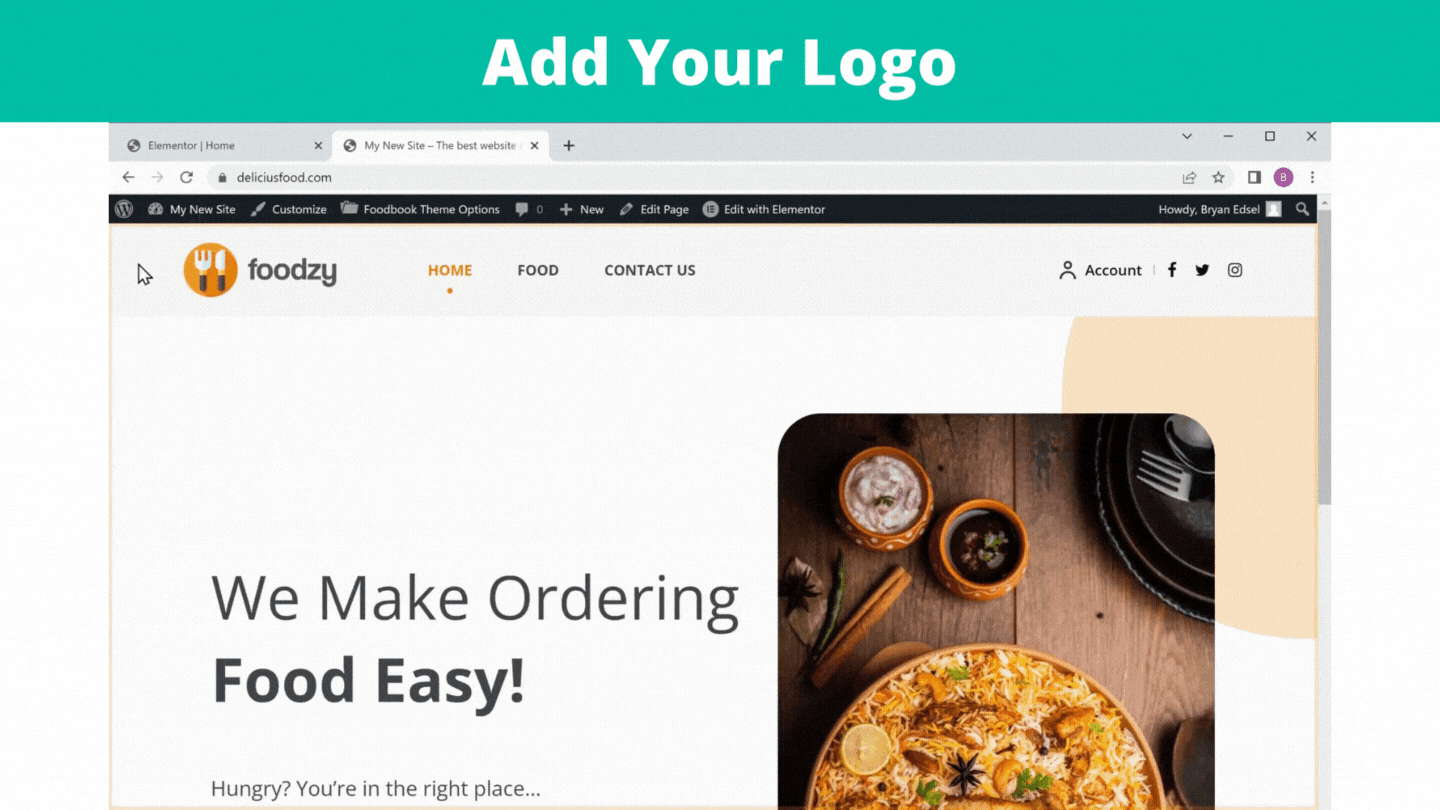
C: Add your logo
Go to your WordPress dashboard, General, click Header and then click on Header Nav Bar. Now here, you can see the default logo on your site. So to change it, delete the logo first and then click ‘Add image’. Next, drag your logo and drop it here. Finally, click select, and you can see that your logo has been changed. Now to save the changes, click Publish.
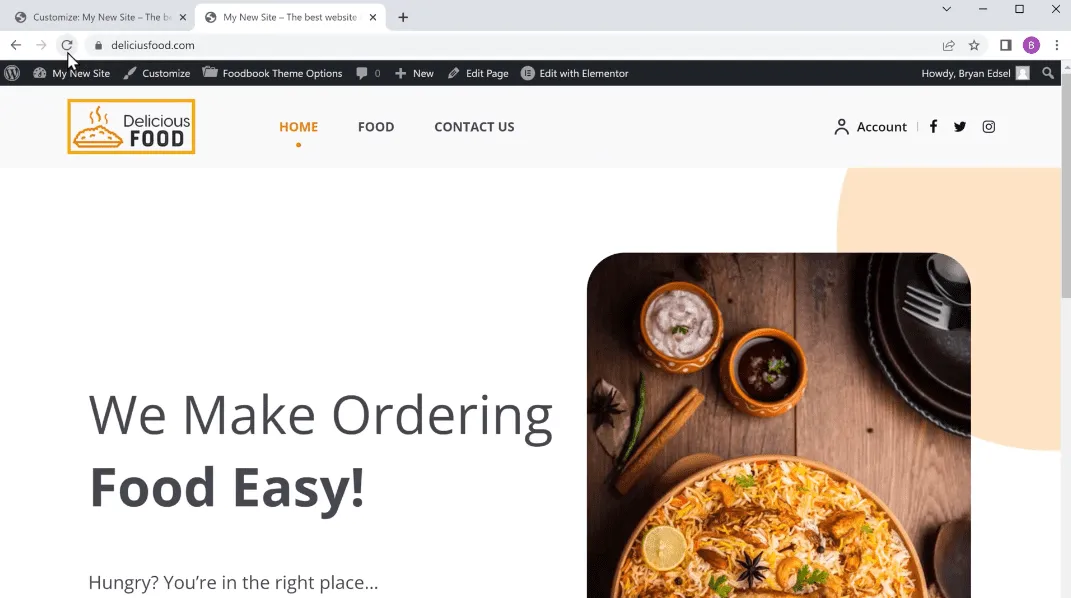
Go back to your site and click Refresh. You can see that you have successfully changed the logo.
This is how you can make a food ordering website using WordPress. Now, if you’re ready to make your food ordering website, click this link, and it will take you to MakeYourWP page, where you can launch your site and start building your food ordering website.
You have built your food ordering website where customers can order quickly and get them delivered right at the comfort of their homes. Now your next goal is to increase your online sales. Here are some suggestions to help you get more orders on your food ordering website.
Customers love a good bargain. Promoting exclusive offers can encourage them to order directly from your website, thus increasing your customer engagement. In addition, customers can be notified of any offers you wish to promote on your website via mobile or email.
It would be best if you were efficient in every stage of the process. Avoid negative experiences for your customers during delivery. Good packaging, timely delivery and enticing presentation can help drive repeat orders.
You can promote your online ordering platform at every opportunity and in-person communication with dine-in customers. In addition, you can use outdoor, indoor posters and signage on your premises to drive more traffic to your website.
Social media can be a boon for your restaurant that provides you with a way to engage and promote online ordering. It can serve as a bridge between your website and target customer base. Facebook offers a “Shop Now” button right at the top of your restaurant profile which you can utilize to get more customers.
Having a Google My Business account gives your customers a simple way to find you and connect. It is a free service from Google which enables restaurants to manage how they appear across Google platforms and make their business stand out. You can give essential information such as website name, address, phone number, and delivery button, helping you bring in more visitors/more orders to your site.
You can use food bloggers and influencers to promote your service on their channels, which works like magic most of the time. Let the pictures and content they post speak for themselves. As much as people love food, the high-quality content they post will also help drive more traffic to your website. It provides you much more clarity of your business with the leads coming in, and also, your marketing campaigns can be customized as per needs.
In recent times, online food ordering and delivery is no longer just an optional extra but has grown in leaps and bounds and become an essential part of the operation and a key source of revenue. Instead, most consumers would order directly online from a restaurant than go in person. As a result, restaurants can adapt and offer more online channels for ordering food which can, in turn, help them increase the volume of orders.
MakeYourWP can be your preferred website template for building your food ordering website with in-built themes, plugins and features that you need. Just select the template you want, purchase, customize, and you are ready to go.
If you have any questions about starting a food ordering website with MakeYourWP or any other queries?
Feel free to discuss them in the comments section below!