Are you looking for a way to start your Online Course Website?
These 6 steps we discuss in this article will make it a breeze for you.
Did you know the E-learning market surpassed 250 Billion Dollars in the year 2020 and is expected to cross 1 Trillion by the year 2027.
Starting an online course website might seem daunting, but that is not the case. In this article, we’re going to take you through every step to make it as clear as possible.
The process will be pretty smooth, and you’ll have your website up and running in no time.
To create our online course website we’re going to use MakeYourWP. It makes the process of setting up your website so easy that:
Additionally, you don’t have to worry about managing your website’s technical stuff as its technical team does it all for you.
From Speed, security, to backups everything is managed by MYWP itself so you can focus on thriving your online course business.
If you follow this article step by step, you’ll be able to create an online course website where you can add your courses on any topic you want.

The course can be both free and paid, and if a visitor wants to get any course, they can just select it and purchase it.
They’ll also be able to see your course content, as shown here.

Then you’ll also be able to add quizzes to your lessons to make them engaging for your students.

And finally, you’ll be able to customize your site to any style you want just by using drag and drop.

And the best part is your website will be automatically optimized for mobile and tablet view. So your course will look good on any device.

To add the cherry on top of it we’ll show you some real ways to enhance your brand value by promoting your online course website and getting more customers.
So let’s get started.
Here are the steps you need to create an online course website that represents your unique style and impresses your visitors:
So now you know what you’ll get after following this tutorial, so without further ado, let’s start.
To launch your website, just click here, and it’ll take you to the MakeYourWp website.

Now scroll down and search for ‘online course’ in the search bar, and you’ll find the online course website template.

To see how this site looks, just click the view demo, and you can see the complete online course website that you’ll get.

Now to get more information about any course just click on that course to select it.
Now to get this online course website for yourself, follow these steps:
a. Click the launch site button.

b. Enter your details and click the next step button.

c. Enter your payment details and click Sign Up Now.

And now! You’ve successfully purchased your website. Now to launch your site, scroll down and click “launch new site.”

Now enter a temporary website address for your website in the “Choose Your URL” section. For example, I’ll enter “99course,” and you’ll notice that your online course website is already selected.

After entering your URL, click launch New Website, and cheers! You have launched your brand new website.

So now if you click to visit, you’ll see the same demo site that we saw on the link that we selected.

Now, 99course.makeyourwp.com is just a temporary link to your site. You can easily change it to your own .com domain. We’ll see how to do this in the fourth part of this article.

Once you launch your website, your website will have all the features of an online course website. So next, let’s go to the second part, where we’ll see how you can add your courses to this site.
We’re going to add a course to your site in five steps.
Bonus: Add a Quiz to Your Course
To edit the content of your site, you need to log in to your Website. So to do this, go to makeyourwp account and click admin.

After logging in, you’ll be able to access the backend of your WordPress website from where you can control and change your site completely.
Once you log in, you can go to the next step to remove the sample courses from your website.
To remove the sample courses, go to Courses and click all courses.

Here you’ll find the default sample courses that you have on your site.

Now to remove these courses:
a. Click on the check box beside the title option to select all the courses.
b. Click on the Bulk Select button and
c. Then select the ‘Move to Trash’ option and click ‘Apply.’

So now, if you go to your site and click refresh, then you’ll see that all the sample courses have been deleted.

Once you’ve deleted the sample courses, you can go to step 3 to create your course.
To create your course, go to courses and click add new, and it’ll take you to the page where you can add your course.

Here, enter a course name, its description and add an appropriate course image.

So now if you click publish and go to the site, then you’ll see that your website has the course we added just now.

Now, if you click on it, then you’ll see all the details about the course. So it means you’ve successfully added your course.
But as you can see the course is free right now. So we’ll see how you can make this into a paid course later in this article.
First, we’ll complete building this course as when you scroll down, you won’t see any content in the course.

Next, let’s see how you can add the contents to your course. So let’s go to step 4, which is adding topics to the course.
To add the topics to the course, go to your course page, scroll down and click add a new topic.

Now enter a topic name like ‘Learn Photography’ and then click add topic.

Now once you add your topic, you’ll get a heading like this on your course page.

Next, let’s create the lessons inside this topic, as shown below.

So to add the lessons:
a. Click on Lesson.
b. Enter the title for your lesson and
c. Then click ‘update lesson.’

In the same way, you can add all of your lessons.

So now we have added these ‘Lessons’ inside this topic so let’s update our course by clicking on the update button.

If we go back to our course page and click refresh, you’ll see that you now have the topics and lessons in your course.

Next, let’s see how a person who is visiting your website can sign up for this course.
If a person visiting your website goes to your course and clicks ‘enroll,’ they will be asked to log in to your site.

To create an account on your site, they have to click on ‘Create a new Account’ and enter these details and click register.

As soon as the visitors sign up, they can start watching your course.
Now, if the visitor clicks ‘start course,’ then they’ll see all the lessons, but there’s no content inside these lessons.

So next, let’s see how you can add content to each of these lessons.
To add your content go to the course page and select the lesson you want to add your content.

Once you select it, you can add your content either in text or in the form of a video as a video course is more engaging than textual content, so we’re going to add a video to this lesson.
To add a video, first, we need to select the source of the video. So if you click on ‘select video source,’ then you’ll see that you have different types of video sources that you can use.

If you’re creating a video course, then we recommend Vimeo, as it keeps your course videos secure by blocking people from downloading them.
So to add any video, you need to enter your Vimeo video URL.

So to get this URL we need to create an account on Vimeo and upload our video. So to upload the video:
a. Click on this link, and it will take you to this page.

b. Now to upload your videos, first you need to create a new account. So to do it, click ‘join for free and then sign in with Google.

c. Now click on the videos option. (This is where you can upload your videos.)
d. Now to upload a video that you want for your course just drag your video and drop it on this page and your video will be uploaded.

e. Now to get the URL of this video click on the link icon and then click on ‘copy video link.’

f. Go back to your course edit page, add the URL, and click on ‘Update.’

Now if you go back to your course page and click refresh then you’ll see that your video has been added to the course.

In the same way you can add videos to all the lessons.
Once you’re done, if you go to your site and click refresh then you’ll see that we now have videos on all of these lessons.

Now let’s say someone has completed a lesson on your course and you want to give them a quiz so that they can recall what they’ve learnt so far. So how will you do that?
You can easily do it by adding a quiz to your course.
So next let’s go to the bonus part of this section, where we’ll see how you can add a quiz to your Course.
a. To add a quiz go to your course editing page, scroll down and click on the quiz button.

b. Now give a name to your quiz. Let’s say ‘Photography Quiz’ and click ‘Save & Next.’

Now we can start adding the questions to our quiz.
c. To add questions click on ‘add question’ and type your question.

Here you need to select your question type so click on it and you’ll see the types of questions you can add here.

For instance, for the above question I’m going to choose true or false.

Now here you need to select the answer to your question. So I’m going to select the right answer as true. Now once you’ve done this click on save answer and then click Save & continue.

So now we’ve completed adding our 1st question so let’s click next and click save. Here you can see our quiz has been added.

Now if you want to change the placement of this quiz you can just drag it and then drop it where you want to place the quiz in your course.

Once you’ve done that to save the changes just scroll up and click update.

Okay so now, let’s see how the quiz looks if we go to our course page and click refresh. You can see that we now have the quiz and your students can answer your questions.

So if they select an answer and click submit here you can see that, they can see the results of their answers.

Okay, so this is how you can add a quiz to your lessons. So now you know how to create a course like this and add content to it. But now if you see it here, you’ll see that this course is free. Now how do you make this into a paid course?
So in order to access the content people need to purchase it. So next let’s go to Part 3 of this article, where we’ll see how you can make this course into a paid course.
To make your course into a paid course we are going to do four steps.
To create a product go back to your wordpress admin area, then go to Products and click ‘add new.’

Now first enter the name of this product. So enter the same course name that you created earlier.

As you’re creating this product for your course, enable the option ‘For Tutor.’

Now you need to set a price for your course so type it in the ‘Regular price’ section.

So once you enter these details and click publish then our product will be created.

Once you have created your product let’s go to the next step, which is to link this product to your course.
To make things easy for you, let’s understand why we’re doing this step. Just like in our phone to increase any functionality we add an app to it, in the same way to increase the functionality of a website we add plugins.
Now with MakeYourWp all the plugins are already installed on your website so you don’t have to worry about anything.
To add selling functionality we use WooCommerce plugin and to make online courses we use Tutor LMS plugin.
Now to be able to sell our courses we combine the power of both the plugins by linking our course (Tutor LMS) to the product (WooCommerce).
So to link the product we created in the first step to our course follow these steps:
a. Go to Courses and click on ‘All Courses.’

b. Open the course that you created earlier by clicking on the course title.

Now if you scroll down then you’ll see that your course type is set to free.
c. To make this into a paid course check the paid option and then select the product that you created earlier.

So now you have created your product and linked it to your course.
d. Once you’ve done these changes, scroll up and click update.

Now if you go to your course page and click refresh, you’ll see that your product is now available for purchase and it has the same price that you set for your product.

But here, you can see the product price is in US Dollars. Now if you want a different currency then you can change this to any currency that you want using your admin area.
Let’s see how you can change this currency.
So to change the currency go back to your admin area and then go to WooCommerce and click settings.

Now scroll down then you’ll see the currency option.

Now, if you click on it then you’ll see all the currencies that are available. You can choose any currency that you want.

Once you’ve selected your currency then you can click save changes to save your currency.

Now if you try to purchase this course then you’ll see that it says ‘there are no available payment methods.’
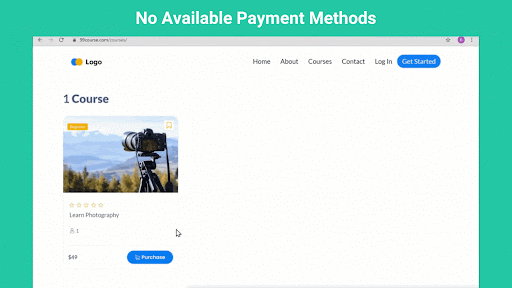
Now to allow people to make payments on our site and purchase our course we need to set up a payment method. So, let’s see how you can add a payment method to your site.
To set up a payment method go to your admin area, click on WooCommerce, and click payments.

Here you’ll see the different types of payment methods that you can add to your site. In this article, we’re going to use the stripe payment method so turn on the toggle button to enable the stripe.

Now to set up the payment method click on ‘set up’ next to stripe, click API settings, then click connect and it’ll take you to the stripe website.

Now to set up the payment you need to create an account on stripe. So follow this to create your Stripe account.
a. Enter your details.

b. Enter the details about your business and click Next.

c. Now enter your bank details where you want to receive your payments.

Now when someone purchases your course that money will be sent to this account.
Once you enter these details then click next and it will take you to your WordPress Dashboard.
Now scroll down and click on save changes and the stripe payment method will be added to your site.

So now we have successfully connected our Stripe account to our website.
Now if we go back to our course page and click refresh, you’ll see that we now have the option to pay for the course.

So now if someone wants to purchase this course then all they have to do is,

This way, anyone can purchase your course. Now if they click the view course then they’ll see the course that they’ve purchased.

Now they can click on it and start watching the course content.

So this is how a customer can buy your course.
Now once someone purchases your course, if you go to your email inbox then you’ll see that you have received an email from your website, saying that someone has purchased your course.

And we have also got mail from Stripe which shows the money that we received.

So, this is how you can let your visitors purchase your course.
Now if we go to our website here you can see that our website address ends with makeyourwp.com.

Now instead of this, what if you want your website to have a simple address like ‘99course.com’ which looks more professional.
You can do that by getting your own domain name for your site. Next, let’s go to part 4 of this tutorial, where we see how you can get your own domain name for your course website.
To get your domain name just click on this link and it will take you to Webspacekit.com.
Now here, enter any name that you want for your website like ‘99course.com’ and if you click search you can see that this domain name is available.

So once you find a name that is available, to get this name just click ‘add to cart’ and then click ‘continue.’

Now it’ll ask you to select a hosting plan and as you already have hosting for your site on MakeYourWP so click skip and it will take you to the checkout page.

Now you’re getting this domain for 1 year and after 1 year you can renew your domain to keep using it.
So to get this domain to fill up the details and then select your payment method. Then enter your payment details and click order now.

And you have got your domain.
So once you’ve got your domain now you need to connect this domain to your website.
So next, let’s see how you can connect this domain to your course website, which we just built so to connect this domain we’re going to do 2 steps.
To add the domain:
a. Go to makeyourwp.com dashboard.

b. Go to domains

c. Now enter the domain name which you purchased.

Once you’ve entered your domain, let’s go to the final step which is to add this IP address to your domain.

To add the IP Address go to your WebSpacekit account and then click domains.

Now select the domain which you purchased and then click ‘manage dns’.

Now click on the editing icon to edit your IP Address.

Now next to the ‘A’ record you need to add your IP address which we saw earlier.
To do this first go back to your makeyourwp tab, and copy the IP address.

Then come back to your domain and paste the IP address beside the ‘A’ records.

And at last click save changes.

Now go back to makeyourwp and click connect domain.

And now you’ve successfully connected your new domain name to the website.
So now if you open a new tab and type the domain name and press enter then you’ll see your course website which you just created.

So now your visitors & customers can go to your domain name to access your site and courses.
So this is how you can get your own domain name for your website.
Next, let’s go to the final part of this article, where we see how you can edit any page on your site.
To edit any page on your site you just have to go to that page and click edit with elementor.
Let’s say you want to edit the homepage. So to do that just click edit with elementor and it’ll take you to the editing section.

This is where you can edit the contents of this page.
To change any text, just select the text and then enter your text.

And you can see the text has been changed.
In the same way you can change any text you want on any page.
To change any image just click it and select the image in the editing section and then drag and drop an image from your computer.

Now as you can see the image has been changed. So in the same way you can change any image on your site.
Okay, so once you’re done with all the changes to save your changes just click update.

Now if you go to your site and click refresh then you’ll see that your page has been changed.

Now if you open your website from a mobile device also then you’ll see that everything is automatically optimized for mobile devices.

So now you know how you can create your online course website.
Now you have your online course website and you’re all set to earn money from it. But wait wait. To get in front of your customers you also need to promote this website.
So let’s look at some proven ways that helped the course creators in promoting their online course business.
YouTube is the second largest search engine after Google and thousands of people are looking to solve their problems here.
Thus it presents you with opportunities to solve the problems of your customers and gain a lot of eyeballs on your content.
Thousands of creators promote themselves and their courses using YouTube. Some people are even earning their full time income from this platform.
WebsiteLearners’ most important authority gaining medium is YouTube only. We’re delighted to say that we’re the world’s number one YouTube channel for WordPress.
There’s no other platform which is as effective as YouTube today. People love videos more than any other content format because they are easy to grasp and digest at the same time.
So, create a YouTube channel and start showing your expertise to the world.
YouTube has a creator academy full of free courses to teach you to be successful on this platform. You can take help from that too.
Many creators have used the power of SEO to attract their target audience. Companies that blog have 55% more visitors to their site. HubSpot is an excellent example of using Blogs to attract new customers.
If you want to learn how to create articles that can attract a lot of customers to your website then watch this video.
How to Rank Your Website on Google – WordPress SEO For Beginners
If you follow this article step by step then you can apply all the strategies mentioned in this video on your website too.
Leveraging social media can make or break the success of your online course. Many influencers use it to promote their course nowadays and they’re getting a huge success.
You can watch this tutorial to learn how to promote your course on Facebook. And once you have a good grasp on one channel then you can move on to other channels of promotion also.
Facebook Ads Tutorial 2021 – How To Create Facebook Ads For Beginners (QUICK GUIDE)
It’s hard to get people to pay for your course when they don’t know you or trust you. A free course can help you to connect with your customer and build trust.
Make a course that solves their problem. This will help them to know you and engage with your content. In technical terms it’s called a lead magnet.
Here, you have to offer a solution to a small problem of your customer. Let’s say you create courses on Digital Marketing then you can offer a small course on Facebook Marketing.
This will help them to get acquainted with your teaching style and they’ll be assured that they’re investing their money in the right place.
So now you’ve all the tools and a laid up plan to start your online course business.
Now if you’re ready then click here to start making your website right away.
Your online course website will continue to evolve and grow over time, however, these are the essential steps to go up and running with your Online course business.
Setting up your website on your own can be less expensive and in the long run being able to make your own changes will also save you a lot of time and money.
We started this article by discussing different platforms that you can use to set up your website, their pros, and cons and deciding which one will work best for you.
Then we showed you how you can start your online course website up and running in no time,using MakeYourWP.
We discussed how you can remove the sample courses, and add your own courses in their place. And we also learned how you can add quizzes to each lesson of your course.
Then we converted your course into a paid course and set up the payment method so that your customers can pay you effortlessly.
To make your website more professional we linked it to a custom domain of your choice.
And at last, we learned how you can edit any page on your website.
A good online course website is more than just a place to sell your courses. It’s where an instructor can create an experience that strengthens your brand and converts visitors into loyal students.
Choosing the right platform will make it effortless to set up and launch your online course website and gives you a headstart in being an online success.